Categories
Recipes

chili verde

I’d always been opposed to the idea of owning a crock pot. Our apartment is so tiny and it doesn’t seem possible to nestle another thing in between our kitchen aid mixer, vitamix, coffee maker, soda stream, food processor … so many gadgets … that I use surprisingly regularly. A crock pot also felt like giving up. Surrendering my culinary creativity to mushy foods that all taste and look the same. Not to mention the myriad of crock pot recipes that call for condensed soups, seasoning packets and all of those industrial food products that I just can’t get behind.

And then, around Thanksgiving, I was visiting my mom. We ran errands all day, hopping in and out of the car, driving from place to place, and got home around six in the evening. And her house, her house smelled amazing. The kind of smell that really makes you feel taken care of and instantly banishes the “what the hell are we having for dinner tonight” worry. Unbeknownst to me, my mom had thrown leeks, potatoes and vegetable stock into her crockpot before we’d left to take on the days errands, and now all that was left to do was to puree the soup and make a salad. This was when I realized that I could indulge the convenience of the crock pot without giving up good food.

chili-verde-4

Fast forward to Christmas, and my grandparents gifted us a crock pot. Since then I’ve been experimenting with a few new recipes, including my mom’s leek and potato soup. Most of these recipes could also be braised in a dutch oven or made on the stovetop, but I must again admit it is insanely nice to come home to a meal that is nearly ready to eat.

This chili verde is a mashup of several different recipes from around the Internet. It’s hard to go wrong when you combine tomatillos, chilis and pork. They’re made for each other. This version is not particularly spicy and makes enough for at least eight meals. Not surprisingly, it freezes well and you can easily reheat it in your crock pot and enjoy another round of chili verde at a later date. I’m starting to see why people like these things.

But, I still resist the microwave. It is my last stand.

Chili Verde
1 1/2 lbs tomatillos, taken out of their husks
1 onion, cut into eighths
6 cloves of garlic
4 serrano chilis, stemmed and de-seeded (Keep in mind that the heat of serranos is quite variable, it’s good to taste them to see how spicy they are before you increase the amount of chili you use)
3 lbs pork shoulder, peeled and cut into 1.5″ cubes
4 yukon gold potatoes, cut into 1″ cubes
1 orange, juiced (or 1/4 cup orange juice)
4 cups of chicken stock
1 teaspoon cumin
1 teaspoon dried oregano
2 bay leaves
salt and pepper
olive oil/bacon fat/lard
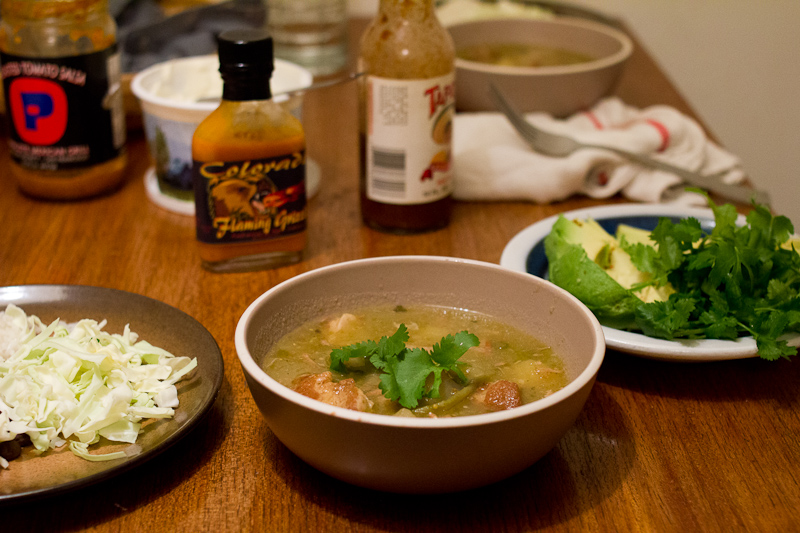
fresh cilantro, sour cream, avocado, cabbage, lime, tortillas and hot sauce/salsa for serving

chili-verde-1chili-verde-2

Cut your pork into one and half to two inch cubes. Season it with salt. Heat a tablespoon of oil/bacon fat/lard in a non-stick skillet over medium high heat. In batches, brown the pork on all sides. Put your first batch aside and brown the next few pieces. Continue until you’ve browned all of your pork. It will probably take somewhere in the neighborhood of 20 to 30 minutes to brown this much pork, but it adds a ton of flavor into the final dish.

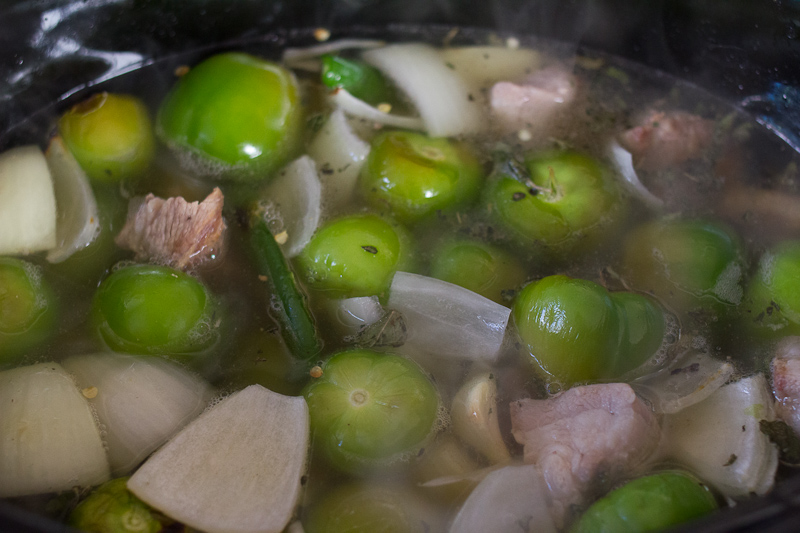
Meanwhile, line a baking sheet with parchment paper and spread the tomatillos, onion, garlic, and serrano chilis into a single layer. Turn your broiler to high and char the vegetables. You’re looking for a deep dark spots on all of the vegetables and for the tomatillos to look deflated. Pour your charred vegetables and all of their juice into your crock pot vessel, or into a dutch oven.

After you’ve browned all the pork, deglaze with some orange juice, chicken stock or water. Be sure to scrape up all the delicious browned bits and add those into your crock pot, along with all of the pork.

Add the potatoes, chicken stock, cumin, oregano, bay leaf, a little salt and pepper, and cover. (FYI – If this is too much to do before work, you can prep the recipe up until this point and refrigerate the entire dish, and then start the cooking in the morning). Set your crockpot to high and cook for 6 hours, or low and cook for 8 to 10 hours. If you’re cooking in a dutch oven in the oven, preheat your oven to 300° F and cook for about 4 hours. The pork should be super tender by the end of the cooking time, and the vegetables will have become a soupy sauce.

Taste for seasoning. Add more salt and pepper as needed. It may need salt, especially if your broth was unseasoned. I serve chili verde in a soup bowl with tortillas, cilantro, sour cream, avocado, salsa and cabbage on the side. This way folks can make their own mini tacos with whichever fixings they like best, and you get to drink up that delicious tomatillo broth at the end of the meal.

chili-verde-3

-Emily

Ps. Do you have a crock pot or crock pot-adaptable recipe that you love? Please send it my way! We’ll soon tire of the three dishes I’ve added into the meal rotation and I’ll need new ones to try. Gracias!

Categories
Recipes

summer vegetable crumble

Growing up, eating with the seasons just happened to a bi-product of my mother’s obsessive gardening. She’d try planting just about anything once, but under that hot Sacramento sun things like squash and tomatoes really thrived. I remember harvesting zucchini the size of toddlers and tossing them back and forth in the swimming pool. Summer produce stands out most in my memory, though I’m sure we ate from her garden past August.

The Answer is Always Pork | Summer Vegetable Crumble

Eating from the garden was just how eating went in my family, and it wasn’t until my senior year of college when I became more interested in food politics and the complexities of our industrial food system, that I really understood the impact eating seasonally and locally has on our local economy, our environment and our health. The short answer is it’s a big one. And the long answer is much better explained by the folks who really know what they’re talking about, Michael Pollan and Marion Nestle to name a few.

Eating with respect to the seasons and spending our dollars in support local farms and food businesses has become a not-so-private mission of ours, and even in my mother’s eyes, we verge on militant. But if there is one thing to care about, the health of our family and our planet isn’t a bad one, especially if it also means eating wonderful food.

Living in middle of downtown San Francisco, we don’t grow much beyond a few pots of herbs, which is where our CSA (Community Supported Agriculture) Farm Share subscription from Eatwell Farm comes in. Eatwell Farm’s mission is to feed body and soul. They are committed stewards to the environment and constantly challenge industrial agricultural practices in favor of sustainable ones. They care about their land, their employees, and growing the healthiest and best food money can buy—and you can absolutely taste it.

We’ve had our CSA with Eatwell for over 3 years and could not be happier. We get perfect produce. We eat healthier. We stretch ourselves by cooking with ingredients we might not necessarily buy. We know our dollar is going to support a local farm and local families working hard to change our food system. And we spend the same amount as we would spend at the grocery store, where just pennies of your dollar make it back to the farmers. If we don’t support local farms, we’ll lose them—a tragedy with repercussions far beyond just taste—and a CSA is a simple, effective and delicious way to vote with your dollar.

If I haven’t convinced you, taste the difference for yourself! Eatwell Farm has been kind enough to offer our Northern California readers a discount to try their CSA Farm Share subscription. New Eatwell Farm subscribers can use the code: ALWAYSPORK to get their first 4 box subscription for just $99. Good ingredients make it easier to cook good food, and I honestly cannot recommend Eatwell enough. If you don’t live in Eatwell’s delivery radius, I urge you to check out Local Harvest to see if there are any farm share subscriptions in your area.

The Answer is Always Pork | Summer Vegetable Crumble

Now I’ll step down of my soapbox and move onto the recipe. This dish is made with all kinds of wonderful summer produce—zucchini, eggplant, tomatoes, peppers. It was inspired by ratatouille, with a little sprinkle of cheese and buttery pastry crumble added to jazz it up a bit. It’s great as a vegetarian main dish, but could also be served as a side. It takes just 30 minutes to throw together, but tastes like far more effort went into it.

Savory Summer Vegetable Crumble
1 onion, diced
1 cup tomatoes, diced
1 Japanese eggplant, cut into 1” chunks (or half of a globe eggplant)
1 – 2 zucchini, cut into 1” chunks
2 peppers, diced (we used bell pepper, but any mild pepper will do)
a good sprinkle of fresh thyme or oregano
1 – 2 tablespoons olive oil
chili flake, salt and pepper to taste
⅓ cup gruyere, mozzarella or parmesan cheese, shredded (use what you have)

For the crumble topping
4 tablespoons butter, cold and cut into small 1 tablespoon pieces
¾ cup whole wheat or all-purpose flour (we used Eatwell’s Sonora Wheat Flour, which was A+)
½ teaspoon kosher salt

Preheat your oven to 450° F and put one rack closest to the top.

The Answer is Always Pork | Summer Vegetable Crumble

First make the crumble topping. In a medium bowl, combine the flour and salt. Add the butter and work it into the flour with your fingers or a pastry blender, until the butter is in pea-sized pieces and the mixture just comes together if you squeeze it. It will still be pretty crumbly, which is just what you want. Put the crumble topping into the fridge until the veggies are ready.

The Answer is Always Pork | Summer Vegetable Crumble

In a cast iron skillet or other oven-safe pot, sauté the onion in a little olive oil over medium-low heat. When the onions are soft, add the tomatoes and sauté just a minute more. Season well with salt, pepper and chili flake. Add the other chopped vegetables and toss to combine. Sprinkle with the grated cheese and then with the crumble top.

Bake 20 minutes on the top rack, until the vegetables are just starting to get soft at the edges and the crumble top is browned. This will serve two to three people as a vegetarian main, or four to five people as a side dish. It would be delightful alongside a roast chicken or quickly sautéed pork chop. You could also top with a few eggs in the last few minutes of cooking if you’d like something a bit heartier. The beauty of good, simple food is it’s flexibility, so mix it up! I hope you enjoy!

The Answer is Always Pork | Summer Vegetable Crumble

The post was written in partnership with Eatwell Farm, but the opinions are always our own.

-Emily

Categories
Recipes

olive oil ice cream | angel food cake

Asking me to pick a favorite food is like asking a mother to pick her favorite child. It’s hard. But press me long enough and I’ll probably say ice cream. Or pasta. Or green beans. Or sushi. It really depends on the day.

Indecision aside, ice cream is up there at the top of my list. It aways sounds good even if I’m stuffed. I like even the worst of ice creams. Wendy’s frosty or McDonalds vanilla cone, I’ll choke one down—if choke is synonymous to joyfully consume with a grin of happiness across one’s face. I love ice cream.

This ice cream was inspired by the orange olive oil cake that I made a few weeks ago. The ice cream follows the same general recipe as Bi-Rite’s ice creams: heavy on the cream, light on the other flavorings. It’s really wonderful. And as my custard was chilling, I mused… orange and olive oil would go really well with pistachios, and who doesn’t like ice cream topped with with crunchy bits? Thus pistachio brittle brittle was born. It was a good hunch. This is a really sublime combination. I’m only sad I can’t fit more than one batch of ice cream into my ice cream maker.

olive-oil-ice-cream-1

angel-food-cake-1

Whenever I make ice cream, I end up with a jar of egg whites in my fridge. They’ll languish there, maybe a tablespoon is added to a cocktail, and then a few weeks later I’ll toss the rest. It’s wasteful and a shame. And so, I decided to see if I could make a baby angel food cake out of the remaining egg whites. Turns out, you absolutely can! It’s about half the height of your traditional angel food cake, but no less delicious.

Orange Olive Oil Ice Cream with Pistachio Brittle
5 large egg yolks
3/4 cup sugar
2 cups heavy cream
1 cup 1% or 2% milk
1/4 teaspoon kosher salt
1 orange, zested
1/4 olive oil

In a medium bowl, whisk the yolks just to break them up and then whisk in half the sugar (6 tablespoons). Set aside. Put a plastic container in an ice water bath.

In a saucepan, heat the cream, milk, rest of the sugar and salt over medium heat. When the mixture is just about to simmer, whisk 1/2 cup into the egg yolk mixture. Then whisk in another 1/2 cup. Then add the egg mixture in with the remaining milk in the saucepan and stir.

Cook the mixture carefully over medium heat, stirring constantly until it is thickened. If it can coat the back of a spatula and hold a clear path when you run your finger across it, it’s ready. Pour through a mesh strainer into a plastic container. Zest the orange over the custard mixture and mix in. Stir occasionally until the mixture cools. Once cool, put in the refrigerator to chill for 2 hours or overnight.

Whisk the olive oil into the chilled base. Freeze according to your ice cream maker’s instructions. Enjoy right away, or put back into the plastic container and freeze.

olive-oil-ice-cream-4 olive-oil-ice-cream-3

For the pistachio brittle
1 cup sugar
1/2 cup water
1/2 cup light corn syrup or tapioca syrup
1/4 teaspoon kosher salt
1 1/2 cup shelled pistachios
1/8 teaspoon baking soda
1 1/2 teaspoons unsalted butter

A note on candy making:  The first time I tried to make this brittle I used an organic sugar made from evaporated cane juice. It’s basically the more hippie/less processed variety you can buy at Whole Foods or Trader Joe’s. Don’t do this! Your brittle will reach a point where it suddenly transforms from syrup to rock candy. There’s no way to coax it into caramel and it is a nightmare to clean. To make this recipe, you’ll need to get the super processed C&H or Domino Pure Cane Sugar that your grandma uses.

Line a baking sheet with parchment and then brush it with a light layer of oil. Combine sugar, water, corn syrup and salt in a heavy saucepan. Put the pan over medium heat and cook without stirring until the mixture reaches 280° F, about 20 – 25 minutes. Pay close attention once it reaches 250° F because it will get to 280 very quickly and you don’t want it to burn.

Stir in the pistachios and stir frequently as the nuts toast and the syrup browns. When the syrup is a mahogany brown, remove from the heat and carefully stir in the baking soda. Once that is blended, stir in the butter.

Pour onto the prepared baking sheet and carefully spread into a thin and even layer using a heatproof spatula. You’ll want to work quickly to spread it before it hardens, but be careful because the mixture will be very hot!

Let cool to room temperature for at least an hour and then cut into pieces to sprinkle on top of the ice cream. Store in a tupperware on the counter.

olive-oil-ice-cream-2angel-food-cake-5

Baby Vanilla Angel Food Cake
2/3 cup sugar
a pinch of salt
1/2 cup cake flour, sifted
3 tablespoons warm water
5 egg whites
1/2 teaspoon vanilla paste or vanilla extract (I bought vanilla paste online for a Thomas Keller recipe about a year ago. It’s basically just several scraped vanilla beans in a bit of alcohol with some zanthan gum to give it a gel texture. It’s wonderfully strong flavored and pretty great stuff)
1/2 teaspoon cream of tartar

angel-food-cake-4 angel-food-cake-2

Preheat the oven to 350° F. In a food processor, spin the sugar for about 2 minutes until it is super fine. Sift half of the sugar with the cake flour and salt and set aside.

In the bowl of a stand mixture or a large mixing bowl, add the egg whites, water, vanilla paste and cream of tartar. Whisk on medium high until stiff peaks form. This will take about 10 minutes. Once the mixture is looking meringuey, carefully fold in the flour mixture.

Spoon batter into an ungreased tube pan. Cook 25 minutes, until a tester inserted into the cake comes out clean. Cool upside down on a cooling rack for an hour before unmolding from the pan.

-Emily

angel-food-cake-3

Categories
Recipes

bucatini with fava beans and creme fraiche

Last Tuesday, our friend Katie came to visit. Katie and I were roommates in college and it’s accurate to say that during our first year at Georgetown we subsisted on a diet of Thomas bagels, Zatarain’s instant red beans and rice and Haribo gummy bears, and usually all of them in one sitting. Thankfully, we’ve gotten past those horrifying dietary habits, and somehow I write a food blog and Katie cooks for a restaurant.

fava-bean-creme-fraiche-pasta-1

These days, Katie lives up in Boonville, CA and cooks for the Boonville Hotel. Boonville is just two hours North of San Francisco in Medocino County, but we’re not able to get together as often as the short distance would suggest. And so it’s a real good thing when I get an out-of-the-blue text from Katie saying that she’ll be in San Francisco for the day and would I be around?

There is nothing I like more than having someone over for dinner, and even more someone who’s happy to just sit down, shell some beans and chat about all matter of things while I sauté up a shallot. Not everyone can dig into big and important life questions while the other person flits from stove to sink, stirring this and washing that, but Katie doesn’t seem to struggle. We’re a good match.

Which brings me to pasta. This pasta comes together gracefully. You can carry on a conversation and still put a meal on the table in about thirty minutes. There’s nothing fussy about it, but looks and tastes like you did a whole lot more work. In case your market doesn’t have fava beans, you also could swap them for spring peas or asparagus cut into bite-sized pieces. I’m planning to do just that later this week. This recipe makes enough for three people as a main course.

fava-bean-creme-fraiche-pasta-3

Bucatini with Fava Beans and Creme Fraiche
12 oz fresh pasta, bucatini if you can find it, but any long noodley one will do
2 lbs fava beans, shelled
1 shallot, diced
2 tablespoons butter
3 oz creme fraiche
salt and pepper
parmesan, for grating on top

Put a pot of salted water to boil. Take the fava beans out of their pods. When the water is boiling, blanche the favas for a minute or two, until they turn bright green. Scoop them out of the hot water and into a bowl. Then peel off their outer skin. Keep the water boiling to cook the pasta in later.

In a large sauté pan, melt the butter over medium-low heat. Add the shallot and sauté for a few minutes to soften. When the shallot is soft, add the favas and sauté a minute or two more. Meanwhile, add the pasta to the boiling water. Cook the pasta 2 – 5 minutes, depending on its shape.

When the pasta is cooked al dente, scoop it from the water and add it to the sauté pan with the fava beans and shallot. Still over low heat, add the creme fraiche and stir to distribute. Easiest sauce ever. When it’s looking all saucy and delicious, scoop onto plates and garnish with a little grated parmesan.

fava-bean-creme-fraiche-pasta-2

-Emily

Categories
Recipes

on pear galettes and worrying

Last weekend, Jordan and I cooked a special dinner together. It was our standard birthday/anniversary/Valentine’s day meal—a beautiful steak, buttery potatoes, a good bottle of wine. We have it just a few time a year and it’s wonderful every time.

I remember the steak dinner that started this tradition, I think it was our third anniversary.  Jordan cooked at his parents’ house. I was on break from college. He made steak au poivre, roasted fingerling potatoes, beet salad and a dark chocolate souffle. I still have the menu he typed up for the occasion. (Can we just pause for a second an appreciate that he typed a menu for the occasion, adorable.) The meal has been a constant of our relationship ever since.

Now that a few years have passed, we’ve worked out all the kinks. Jordan handles the steak, usually simply grilled and finished with butter. I make the sides and dessert. Dessert is the only part of the menu that changes and this weekend I decided to make a pear galette.

pear-galette-7

So it was Saturday afternoon and I was standing in my kitchen making the galette. Now, those of of you who know me well, know that the type of experience I’m about to tell you about doesn’t really happen to me. I’m pretty solidly grounded, and frankly, if this happened to you and you told me about it, I’d probably think it was a little new-agey and nuts. Now putting all that aside, as I stood there slicing the pears for my galette, I was transported. For just a few minutes, I felt like the person I’m meant to become. She was calm and confident and capable. I folded the dough up around the pears and I knew in this very concrete way that everything is going to be alright.

It’s been an especially anxious year, full of lots of worrying on my part about big things and small (but mostly big, if we’re honest).  And so it was such a relief to just know that everything is going to be ok, that I’m going to be ok. Knowing that this happier, calmer version of myself is out there and that I’ll get there some day—even if it isn’t today or tomorrow or this year—put me at peace in a way nothing else has. I’ve tried to reason myself into feeling this way for months, but it took this unexpected, out of body experience to actually get the message across. Strangely, or maybe not so strangely, I have a pear galette to thank for that.

pear-galette-6

As for the pear galette, it was divine. Comice pears are perfect for pie—the texture can stand up to baking and they don’t get too sweet. The galette has just enough spice to accent the flavor of the pear, but doesn’t overpower it. I’d recommend you hurry and make your own before comice pears are done for the season.

Comice Pear Galette, with inspiration from Lindsay Shere, a longtime pastry chef of Chez Panisse
For the crust (makes two)
2 1/2 cups all purpose flour
1 1/4 teaspoons kosher salt
2 1/2 sticks unsalted butter
about 5 tablespoons ice water

For the galette
3 comice pears, peeled and sliced thin
2 tablespoons flour
2 tablespoons sugar
1/2 teaspoon cinnamon
1/4 teaspoon nutmeg
sugar for dusting

In a food processor, combine flour and salt. Remove the butter from the fridge and cut into 1 inch cubes. Add them to the flour mixture. Process until the butter chunks are about the size of peas. Add the water and pulse a few times to combine. Divide into two equal balls, flatten into 1″ thick discs, wrap in plastic wrap and refrigerate for at least two hours or overnight.

pear-galette-1 pear-galette-2

Preheat your oven to 400° F. Line a baking sheet with parchment paper. Peel the pears and slice them into thin slices. In a small bowl, combine the flour, sugar and spices. Dust a surface with flour and roll out the dough until it is about 1/4 inch thick. In the center of the dough, sprinkle the flour mixture. Arrange the pear slices in a mound on top of the flour mixture. Fold the dough up around the filling. Brush the dough with water and sprinkle with a heavy dusting of sugar.

Transfer to a parchment-lined baking sheet and back for 40 minutes to 1 hour, until browned and bubbly in the center. You can also form the galette, cover in plastic wrap and return it to the fridge until you want to bake it.

pear-galette-5pear-galette-4

I like to serve mine warm with ice cream and usually put it into the oven as we’re sitting down to dinner. It’s also really good for breakfast. Just say you need to take a good photo for your blog. Enjoy!

-Emily

pear-galette-8


Categories
Recipes

buckwheat crêpe gâteau

Sometimes, when you’re feeling particularly overwhelmed by the challenges the universe has decided to throw your way, there’s really not much you can do but bake a cake. I won’t elaborate on the details because these types of details aren’t fun for anyone, but I trust you’ve all been to a similar place. A place where there is nothing you can do but put one foot in front of the other, and bake a cake.

Fortunately, I’ve got a slew of cakes for the baking. There’s Jordan’s favorite chocolate cake, there’s a perfectly citrusy loaf cake, there’s my Nonnie’s carrot cake, and now there is this cake. A cake made of crepes. Mostly it just looks pretty, but let’s not discount how a pretty thing can lift the spirit.

It can.

crepe-cake-3

Buckwheat Crêpe Gâteau
For the crepes
1 cup buckwheat flour
1/2 cup all-purpose flour
2 eggs
2 1/2 cups milk
1/2 teaspoon salt
2 tablespoons sugar
1 teaspoon vanilla

Whisk together the flours, eggs, milk, salt, sugar and vanilla. Let the batter sit in the fridge for 2 hours or overnight. Once the batter has rested, heat a nonstick sauté pan over medium-low heat. When the pan is hot, pour in about 1/4 cup of batter. Swirl the batter around the pan by tilting the pan, first to the right, then towards the back, then to the left, then to the front. Let the crepe just hang out there for a few minutes, don’t poke at it, don’t try and peak—both of these will result in a sad, probably ripped, subpar crepe. Be strong, resist the temptation.

When the batter has formed thin skin and there are bubbles throughout, use a spatula to coax up the edges. Then, using your fingers or a spatula, flip the crepe. Let it cook another 30 seconds or so and repeat with the rest of the batter. Cool the crepes before assembling the cake.

For the cream filling 
1 cup heavy cream
1 teaspoon cinnamon
1/4 teaspoon nutmeg
2 tablespoons powdered sugar
1 teaspoon vanilla
a pinch of salt
maple syrup for drizzling

In a large bowl or the bowl of a mixer, combine the cream, cinnamon, nutmeg, powdered sugar, salt and vanilla. Whisk until a fluffy cream forms.

crepe-cake-1

To assemble the cake, put a crepe on a large plate. Spread a thin layer of cream and top with another crepe. Repeat until you’ve used all of the filling and all of the crepes.

crepe-cake-2crepe-cake-4

To serve, cut into slices and drizzle with maple syrup. It’s good for dessert. It’s even better for breakfast the next day. Dessert for breakfast isn’t to be discounted either.

-Emily

crepe-cake-5


Categories
Recipes

cheese pupusas with pickled slaw

We were in the car on our way to go surfing last weekend when Jordan turned to me and said, “Let’s make pupusas”. “Sure, let’s do it,” I replied without blinking an eye. It was decided, pupusas for dinner. What about the winding drive up Highway 1 made him think of pupusas, I have no idea. What I do know is that when you’ve been cooking and writing about it long enough, you tend to dive headfirst into this type of thing. We stopped questioning each other’s food whims long ago. Semi-obscure regional dish, why not. Grind our own meat for a three pound loaf of country pate, seems reasonable. Wedding cake in one hundred square feet of kitchen, it’ll be fun. Unlike most other areas of my life, the kitchen seems to be the place where I have the guts to just go for it. No questions, no fear, no regrets. Behold, PUPUSAS!

pupusa-7

Now isn’t that pretty. Maybe I should get ‘no fear, no regrets’ and a sexy papusa tattooed on my arm as a reminder to be more adventurous in the rest of my life …

Pupusas are traditional dish from El Salvador. They’re basically a corn dough that is filled with a mixture of cheese, beans or braised meat, flattened into a half inch thick disc and then pan fried or cooked on a grill.  Although I do indeed have an adorable Salvadoran grandma, I haven’t yet had the chance to learn how to make pupusas autenticas. It’s on my list, but in the meantime, I’m working off of this recipe. It’s a fusion of a several recipes found on the internet, and despite it’s lack of pedigree it turned out pretty dang delicious. It’s hard to go wrong with cheesy corn bread topped with tangy spicy slaw, wouldn’t you agree?

Pupusas de Queso con Curtido 
For the pupusas
2 cups masa harina (Maseca is a common brand, Bob’s Red Mill also makes one)
1 1/3 cups warm water
1/2 teaspoon salt
1 cup grated mozzarella, monterey jack or quesillo cheese
butter or oil for cooking them

First, grate the cheese. Then make the masa. In a large bowl, combine the masa harina, salt and warm water. Using your hands, mix the dough until a soft and just slightly sticky dough forms. You’ll just need to knead it for a minute or two. If it is too crumbly, add some more water. If it is too wet, add a few tablespoons of masa harina. Let the dough sit for 10 – 15 minutes to let the masa harina fully hydrate.

pupusa-2

Shape the dough into eight 2″ balls. Press your thumb into the center of the ball and pinch it into a bowl shape using your thumb and fingers. Fill the hole with about a tablespoon of cheese (or other filling like refried beans or braised pork). Pinch the edges of the bowl closed to cover the cheese. Then flatten the ball into a disc using your hands. Flatten a until the disc is about 1/3″ thick. Repeat with the rest of the balls of masa. Refrigerate until you’re ready to fry up the pupusas.

pupusa collage

We made this little video of how to shape the pupusas if my explanation above confuses more than it helps. Cinematography is not a strength here at the Answer is Always Pork, but this will get the job done.

For the curtido
1/2 head of cabbage, sliced thinly
1 carrot, grated
1 onion, sliced thinly
1/2 cup apple cider vinegar
1/4 cup water
1 teaspoon salt
1 teaspoon brown sugar
1 teaspoon dried oregano
1/2 teaspoon chili flakes

pupusa

In a large bowl, combine the sliced cabbage, carrot and onion. In a small bowl, combine the vinegar, water, salt, sugar, oregano and chili flake. Whisk to dissolve the sugar and salt. Pour over the cabbage mixture. Cover and refrigerate for a few hours or overnight.

In a sauté pan over medium heat, melt some butter or heat some oil. Cook the pupusas, about 5 minutes per side, until golden brown all over and deep brown in spots. You’ll see the cheese start to ooze out of them. Serve topped with the curtido, plus some guacamole, crema and salsa if you’re a Californian and bastardizing traditional foodstuffs is right up your alley. Buen provecho!

pupusa-8

-Emily

Categories
Recipes

nonnie’s russian teacakes

russian-teacakes-8

These are probably my favorite cookie. They are buttery, just the right amount of sweet, as perfect with coffee as they are with a glass of milk. The recipe is my Nonnie’s, and she always makes sure to have a tin of them ready when I go over to visit.  Food just tastes better when someone makes it for you, especially if that person knows their way around a stick of butter like my Nonnie.

I usually have an acceptable level of self-control in regards to the desserts I make, but restraint is nearly impossible with these cookies. These cookies are are my kryptonite. Whenever I make them, or am lucky enough to snag a tin from the master herself, I force myself to ration them to make them last as long as possible. One for breakfast with coffee, two for dessert. Tin kept under lock and key. Trust me, it’s tough to not plow through the entire batch in a day or two. I ate the last one out from under Jordan’s nose and didn’t feel even the slightest tinge of remorse. That is how much I love these cookies.

Because they are a family specialty and because they are my favorites, I thought it only fitting to go all out for the Great Food Blogger Cookie Swap and send these to three lucky ladies, Rebecca, Laura and Willow.

russian-teacakes-13

Nonnie’s Russian Teacakes
1 cup (2 sticks) butter, softened
1/2 cup powdered sugar, sifted
1 tsp vanilla extract
2 1/4 cup all-purpose flour, sifted
1/4 tsp salt
3/4 cup pecans, finely chopped
powdered sugar, for rolling in after baking

russian-teacakes russian-teacakes-2

Beat the butter until light and fluffy. Beat in sifted powdered sugar and vanilla until well combined. Sift in flour and salt. Add pecans. Mix until a crumbly dough forms. Refrigerate for at least four hours, preferably overnight.

russian-teacakes-6russian-teacakes-5

Preheat your oven to 400° F. Roll dough into 1″ balls. Bake 12 – 14 minutes, until they are just starting to be a bit golden around the bottom. Roll in powdered sugar while hot. Let cool completely and roll again in powdered sugar.

russian-teacakes-7russian-teacakes-10

My Nonnie is an amazing cook. She rocks pot roast, turkey stuffing, crab cakes, berry pie, biscotti, not to mention her famous cheesecake, like nobody’s business. My russian teacakes couldn’t hold a candle to Nonnie’s until very recently, but my dedication to the art has paid off.  My secrets are revealed in this little puppet below. Watch it and learn how to make your cookies *almost* as good as Nonnie’s!

Packing cookies for transport is a serious thing. And serious things usually require a trip to Daiso, the Japanese version of the dollar store and one of my favorite places in San Francisco. There I picked up some adorable tins, mini cupcake papers and gingham wrapping paper—all in the interest of making sure my cookies arrived unharmed and as adorable as they are delicious. Once cooled, cookies were placed in tins, recipes were written up, and I packed the mailing boxes chock full with crumpled pages of an unread Vogue magazine to ensure my cookies didn’t get to jostled on their journey. Priorities.

russian-teacakes-4russian-teacakes-9russian-teacakes-12russian-teacakes-14russian-teacakes-15

And now that I’ve exhausted you with all kinds of adorable, you really should make these cookies this holiday season.

-Emily
russian-teacakes-17

Categories
Recipes

malted vanilla ice cream with kit kat

This ice cream was a challenge. Not because making ice cream from scratch is a difficult thing—I’ve made it many times before with success. But because sometimes I loose my head at the grocery store, throw reason out the window and buy something as a ‘substitute’ that should never, never be used as a substitute.

kit-kat-ice-cream-6

It was a Tuesday night and I was making ice cream for our supper club later in the week. We were responsible for dessert and I’d brainstormed a glorious candy-filled concoction. I figured I’d make the custard quickly before Jordan got home from work and we sat down to dinner. I was already feeling a bit on edge before I began this culinary project, but like I’ve mentioned before, there is nothing like cooking to help me find my center. Except when a crucial error in judgment sends the whole thing into a sticky, custardy, teary tailspin. You can probably guess which ensued that fateful Tuesday.

Dear readers, Ovaltine, though technically a malted milk beverage, is NOT malted milk powder. Don’t let any discussion forum or milk wiki on the internet convince you otherwise. And don’t try and talk yourself into it after you’ve already been to four grocery stores and not one of them sold true malted milk powder. Let me just say it again: Ovaltine is not a viable substitute for malted milk, in any cooking context.

Thankfully, Jordan got home just as I was warming the milk and cream to add to my eggy-Ovaltine blend of poor decision making and pulled the emergency break on this disaster. This is how it went down.

J: Why are those eggs so brown? I thought malted milk was white? How much did you use?

E: I … I … I went to four grocery stores. I couldn’t find malted milk powder ANYWHERE. I even went up to the market all way up the hill. I was there forever trying to find it.  So looked it up online to see if I could substitute something. Some internet people say you can substitute Ovaltine. It’s probably fine ……………(panic)……………… It’s probably horrible. I’m such an idiot. I just ruined five eggs. Five beautiful eggs. They were from our CSA, you know. And now we’re out of eggs. And the city of San Francisco still won’t offer up any malted milk powder. (Collapse in heap on kitchen floor).

J: Well, before you add the milk, did you even taste it?

E: No. (Shame face).

J: Sutter Fine Foods has malted milk powder. Let me show you.

E: (Grumble, sniff, grab purse).

And so we walked down to the corner store on our block, Jordan led me to the baking section, grabbed a container of Carnation Malted Milk Powder from the top shelf and beamed. I may have muttered something about how this was the most damn annoying ice cream that I’ll ever make, paid the cashier, and scampered up the stairs to correct my mistakes of earlier in the evening.

With actual Carnation malted milk powder instead of Ovaltine, my custard was a beautiful pale yellow, and the final ice cream was delicious. There is nothing like the combination of malted milk, vanilla and kit kat to make a person forget the trials that led them to that delicious end. And, if you heed my advice and don’t get lured to the Ovaline dark side, you too can enjoy a perfect ice cream without the drama.

kit-kat-ice-cream-1kit-kat-ice-cream-4kit-kat-ice-cream-5

Malted Vanilla Ice Cream with Kit Kat, adapted from Bi-Rite Market’s Sweet Cream and Sugar Cones
5 egg yolks
1/2 cup malted milk powder (we used Carnation)
1 3/4 cup heavy cream
3/4 cup 1% or 2% milk
1/2 cup sugar
1/2 teaspoon kosher salt
1 teaspoon vanilla extract
3 Kit Kat bars, chopped

In a medium bowl, whisk the egg yolks. Add the malted milk powder and whisk together.

In a saucepan over medium heat, warm the cream, milk, sugar and salt together. Bring just to a simmer. Whisk about 1/2 cup of the milk mixture into the egg yolks, pouring the hot milk slowly into the eggs to temper them. Add another 1/2 cup of milk into the eggs. Then pour the egg mixture back into the saucepan with the rest of the milk.

Put a mesh strainer over a medium sized bowl or tupperware. Fill a large bowl with ice and water.

Over medium heat, stir the milk and egg mixture until it begins to thicken. When the ice cream base could coat a spoon, pour it through a mesh strainer into a bowl or tupperware. Cool the base in the ice water bath, stirring occasionally. Refrigerate the base overnight.

The next day, add the vanilla to the ice cream base. Pour it into your ice cream maker and freeze according to your maker’s instructions. Meanwhile, chop up the kit kats.

kit-kat-ice-cream-2kit-kat-ice-cream-3

When the custard is just about frozen, add the kit kat pieces. Serve right away or put into a tupperware and freeze for another few hours to harden completely.

-Emily

Categories
Recipes

apple galette

A  weekends or two ago, we had our friend David over for dinner. David is usually in far off places like Thailand, Tajikistan or the Democratic Republic of Congo doing amazing, amazing work, and so it not often that he comes over for dinner. There really is nothing like dinner with old friends to make you feel like yourself again. Eating a meal with David is one of the best things for the soul, for my soul at least. Fortunately, for the next year or so he is stuck in Palo Alto learning lots, which means many more meals with David are in our future. I couldn’t be happier about it.

apple-galette-5

Onto the food. Fall is undeniably here even in temperate San Francisco, and so we roasted a chicken and vegetables to celebrate. In the spirit of fall, I thought it only fitting to make an apple galette for dessert. I’m not sure why it took me so long to discover the galette. As it turns out, galettes are everything that is wonderful about pie, but with an increased crust to filling ratio—a major pro in my book—and a far less fussy preparation. Because you simply fold a sheet of pastry around the filling, they are so easy to make. This particular apple galette turned out beautifully—rustic and delicious. I’m certain there will be many more galettes in our future, ideally eaten with David.

Apple Galette
For the Pie Crust 

2 1/2 cups all purpose flour
1 1/4 teaspoons kosher salt
2 1/2 sticks unsalted butter
about 5 tablespoons ice water

apple-galette-1 apple-galette-2

In a food processor, combine flour and salt. Remove the butter from the fridge and cut into 1 inch cubes. Add them to the flour mixture. Process until the butter chunks are about the size of peas. Add the water and pulse a few times to combine. Divide into two equal balls, flatten into 1″ thick discs, wrap in plastic wrap and refrigerate for at least two hours or overnight.

For the filling (for one galette, to serve 3 or 4 people)
3 large apples, peeled and cut into slices about 1/2″ thick
1 lemon, juiced
1/4 cup granulated sugar
2 tablespoons flour
1 teaspoon cinnamon
a pinch of nutmeg
a pinch of salt
1 egg yolk
1 tablespoon milk or cream
sugar for dusting

apple-galette-3apple-galette-6apple-galette-7

Preheat your oven to 375° F. Line a baking pan or cookie sheet with tin foil. In a large bowl, combine the apples, lemon juice, sugar, flour, cinnamon, nutmeg and salt. Roll out the crust until it is about 1/4 inch thick. In the center of the crust, mound the apple filling. Fold the dough up around the filling, take care to make sure that there aren’t any holes in the crust where the filling could leak out.

apple-galette-8 apple-galette-9

Place the galette back in the fridge for about 15 minutes for the butter in the dough to firm up. Meanwhile, whisk together the egg yolk with the cream or milk. Remove the galette from the fridge and brush with the egg mixture. Sprinkle with sugar. Bake for 45 minutes to an hour, until the crust is golden brown. Serve warm with vanilla ice cream.

apple-galette-10

-Emily