Categories
Recipes

on pear galettes and worrying

Last weekend, Jordan and I cooked a special dinner together. It was our standard birthday/anniversary/Valentine’s day meal—a beautiful steak, buttery potatoes, a good bottle of wine. We have it just a few time a year and it’s wonderful every time.

I remember the steak dinner that started this tradition, I think it was our third anniversary.  Jordan cooked at his parents’ house. I was on break from college. He made steak au poivre, roasted fingerling potatoes, beet salad and a dark chocolate souffle. I still have the menu he typed up for the occasion. (Can we just pause for a second an appreciate that he typed a menu for the occasion, adorable.) The meal has been a constant of our relationship ever since.

Now that a few years have passed, we’ve worked out all the kinks. Jordan handles the steak, usually simply grilled and finished with butter. I make the sides and dessert. Dessert is the only part of the menu that changes and this weekend I decided to make a pear galette.

pear-galette-7

So it was Saturday afternoon and I was standing in my kitchen making the galette. Now, those of of you who know me well, know that the type of experience I’m about to tell you about doesn’t really happen to me. I’m pretty solidly grounded, and frankly, if this happened to you and you told me about it, I’d probably think it was a little new-agey and nuts. Now putting all that aside, as I stood there slicing the pears for my galette, I was transported. For just a few minutes, I felt like the person I’m meant to become. She was calm and confident and capable. I folded the dough up around the pears and I knew in this very concrete way that everything is going to be alright.

It’s been an especially anxious year, full of lots of worrying on my part about big things and small (but mostly big, if we’re honest).  And so it was such a relief to just know that everything is going to be ok, that I’m going to be ok. Knowing that this happier, calmer version of myself is out there and that I’ll get there some day—even if it isn’t today or tomorrow or this year—put me at peace in a way nothing else has. I’ve tried to reason myself into feeling this way for months, but it took this unexpected, out of body experience to actually get the message across. Strangely, or maybe not so strangely, I have a pear galette to thank for that.

pear-galette-6

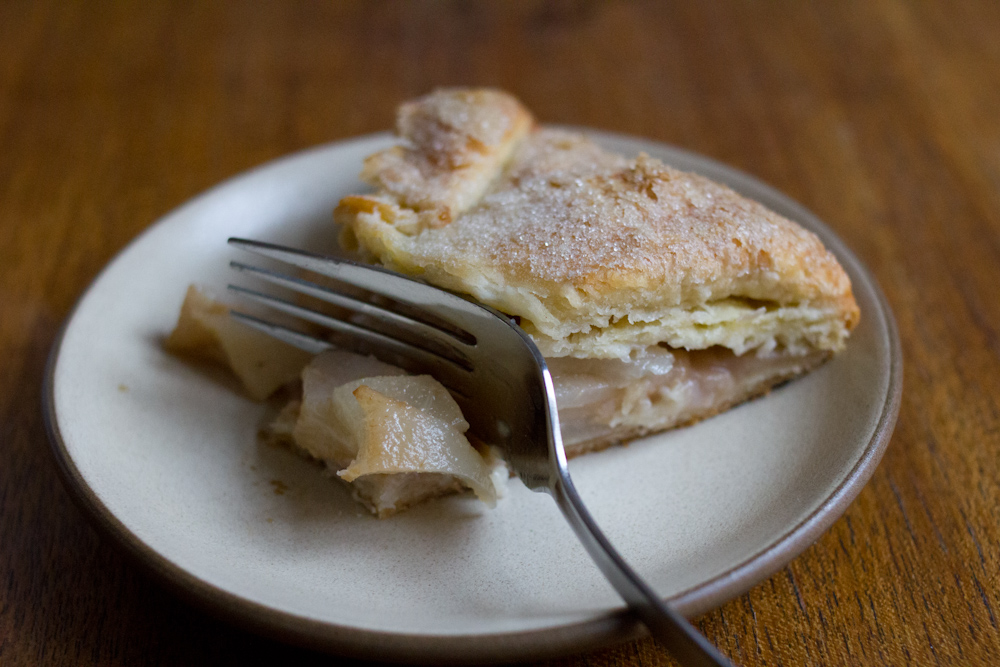
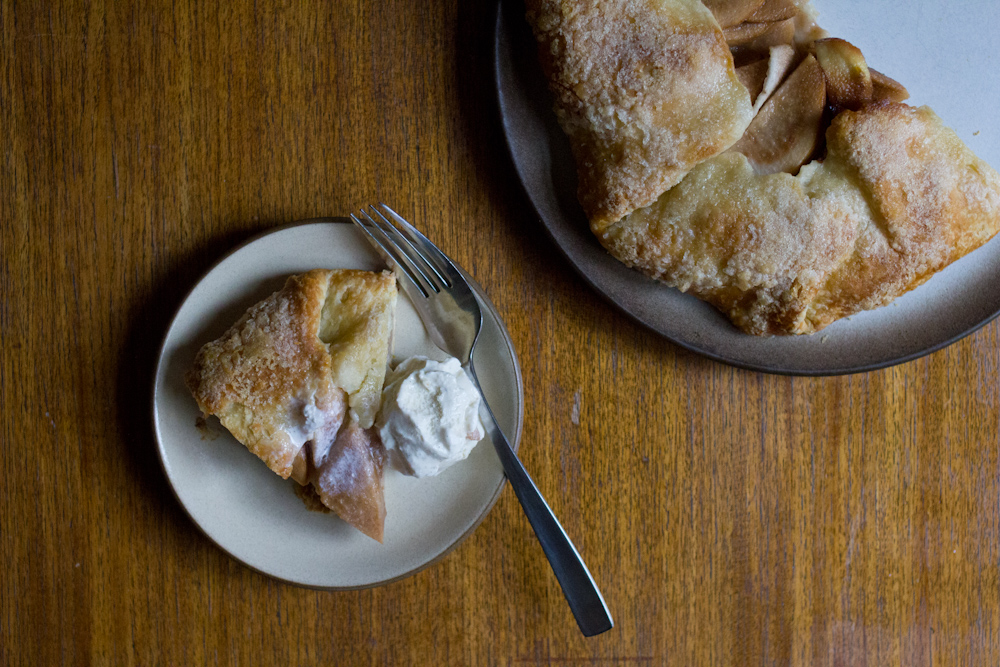
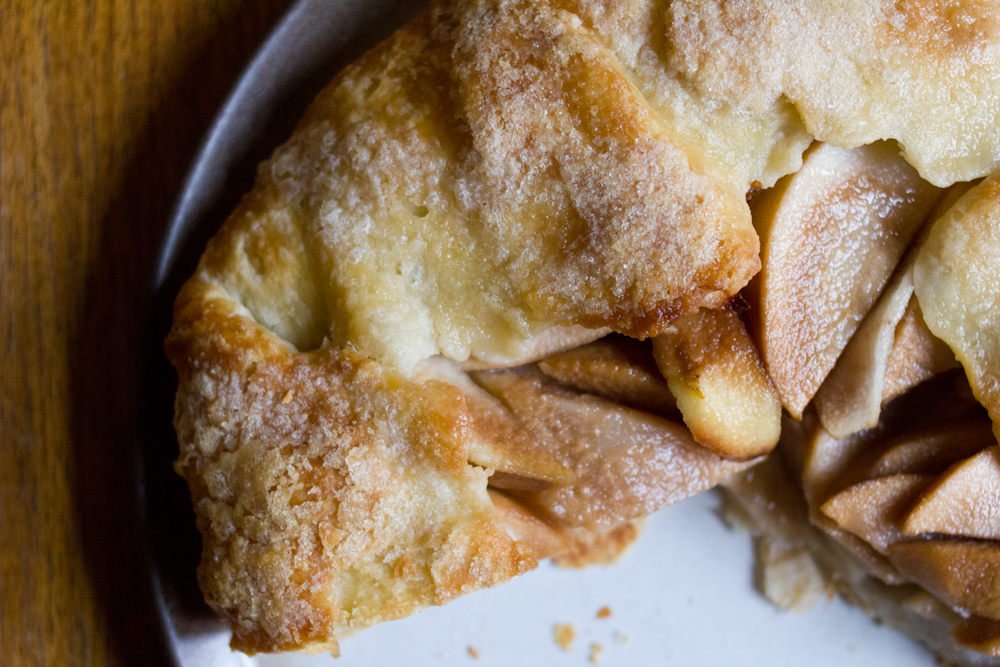
As for the pear galette, it was divine. Comice pears are perfect for pie—the texture can stand up to baking and they don’t get too sweet. The galette has just enough spice to accent the flavor of the pear, but doesn’t overpower it. I’d recommend you hurry and make your own before comice pears are done for the season.

Comice Pear Galette, with inspiration from Lindsay Shere, a longtime pastry chef of Chez Panisse
For the crust (makes two)
2 1/2 cups all purpose flour
1 1/4 teaspoons kosher salt
2 1/2 sticks unsalted butter
about 5 tablespoons ice water

For the galette
3 comice pears, peeled and sliced thin
2 tablespoons flour
2 tablespoons sugar
1/2 teaspoon cinnamon
1/4 teaspoon nutmeg
sugar for dusting

In a food processor, combine flour and salt. Remove the butter from the fridge and cut into 1 inch cubes. Add them to the flour mixture. Process until the butter chunks are about the size of peas. Add the water and pulse a few times to combine. Divide into two equal balls, flatten into 1″ thick discs, wrap in plastic wrap and refrigerate for at least two hours or overnight.

pear-galette-1 pear-galette-2

Preheat your oven to 400° F. Line a baking sheet with parchment paper. Peel the pears and slice them into thin slices. In a small bowl, combine the flour, sugar and spices. Dust a surface with flour and roll out the dough until it is about 1/4 inch thick. In the center of the dough, sprinkle the flour mixture. Arrange the pear slices in a mound on top of the flour mixture. Fold the dough up around the filling. Brush the dough with water and sprinkle with a heavy dusting of sugar.

Transfer to a parchment-lined baking sheet and back for 40 minutes to 1 hour, until browned and bubbly in the center. You can also form the galette, cover in plastic wrap and return it to the fridge until you want to bake it.

pear-galette-5pear-galette-4

I like to serve mine warm with ice cream and usually put it into the oven as we’re sitting down to dinner. It’s also really good for breakfast. Just say you need to take a good photo for your blog. Enjoy!

-Emily

pear-galette-8


Categories
San Francisco Thoughts on Life

alice waters and chez panisse

chez-panisse-menu

For our fourth anniversary, Jordan and I went to Chez Panisse. We were in college and I know he saved for months to take me out for that meal. It was pure magic. The restaurant was cozy, beautiful and warm. A big bouquet of wild flowers and branches sat on a small table next to an assortment of gorgeous produce and loaf of fresh bread, a few slices missing. We snuggled into a corner near the kitchen and ate the most perfect four courses of my life. Everything tasted like the best version of itself. The love and care and respect that went into each and every part of that meal was palpable. It was how food is meant to be.

Our dinner at Chez Panisse was the first nice meal we’d ever been to together. My love affair with food had really started to get serious at the time and it felt so special to eat at the restaurant that changed the way we eat in the United States so completely. It warms my heart to look back on that meal and feel the earnest excitement of that night all over again. I left Chez Panisse so inspired to learn, to cook, and to get closer to my food.

Alice Waters changed I think about food and cooking more than anyone, outside of my Nonnie, my Mom and Jordan. From Alice I learned to cook simply and with the seasons, to respect my food and let the qualities of each ingredient shine. I learned to care where my food came from and how it was produced, to acknowledge the environmental impact our food choices make on the earth. I learned that there was nothing more precious than sitting down for a meal together, and that the kitchen and the table are where I am most at peace.

I like to think that I cook with Alice every night. Her philosophies inspire the way I shop, I cook and we eat. Because I feel so close to her in my kitchen, and because I have tremendous respect and admiration for the amazing work she does for children’s education, for the environment, for growers, ranchers and producers, for food and cooking in the United States, it was a dream come true to meet her tonight. I was starstruck, like you are when you meet one of your heros.  I aspire to have a fraction of her guts, vision and grace. Here’s to making that happen and eating well along the way.

jpeg

-Emily

Ps. If you’re not familiar with Alice Waters, Chez Panisse and the slow food revolution, I’d recommend reading this wonderful book. You can’t read it and not fall at least a little in love with Alice. Chez Panisse Vegetables is also a favorite around here and a wonderful place to begin cooking more seasonally.

Categories
Recipes

squash ravioli with brown butter sage sauce

There is nothing like crisp fall weather to make making squash ravioli from scratch seem like a better idea, except maybe David Tanis’ book The Heart of the Artichoke. David Tanis was a chef at Chez Panisse and is a beautiful writer. His recipes are simple, but coax the best flavor out of every ingredient he adds. His writing is just as wonderful—simple and heartfelt. This storybook-style cookbook easily convinces you to try every recipe inside. And the photos are just gorgeous. I just read the book cover to cover so be prepared for a string of beautiful David Tanis recipes.

It was a Sunday and Sundays are for cooking adventures here at Chez Jojonoodle. We had a few beautiful squash from our CSA sitting on the table and I had some time to kill before Jordan got home from work. I put on an episode of This American Life and got down to business.

While making ravioli from scratch is time-consuming, you can make this dish from start to finish in about three hours. If you relax and accept that your ravioli are going to look very, very rustic, it will be even easier.

You begin by making the pasta dough. While the dough is resting, you’ll roast the squash. After the squash is roasted and dough rested, you’ll roll out the dough and fill your pasta. Cooking the pasta and making the sauce takes only 10 minutes, which you should do immediately before sitting down to eat.

Squash Ravioli with Brown Butter Sage Sauce, adapted from The Heart of the Artichoke by David Tanis

For the pasta dough
2 cups all-purpose flour
4 egg yolks
pinch of salt
2 T olive oil

For the filling
2 lbs of squash (We used carnival and golden nugget. Butternut would be great)
salt and pepper
2 T olive oil
1/2 cup pecorino, grated
zest of one lemon
1/2 t red pepper flakes
nutmeg, for grating

For the sauce
4 T butter
a small handful of sage leaves
salt and pepper
1 clove garlic, mashed
juice of 1/2 lemon

Preheat an oven to 375 degrees.

Place the flour in a large bowl. In a smaller bowl, beat the eggs with the salt. Make a well in the flour and pour in the eggs. Mix well with a spoon. Pour the dough onto a floured counter and knead until smooth. Wrap in plastic wrap and set aside to rest for at least one hour.

Cut the squashes in half and scrape out the seeds. Put them skin side up on a foil-lined baking sheet. Bake for 45 minutes – 1 hour, until fork tender.

Scrape the flesh out of the squash skins and put in a large bowl. Add the olive oil, pecorino, lemon zest and red pepper. Season with salt and pepper. Grate in a bit of nutmeg and stir well. Set aside.

Using your pasta machine, roll out the dough into thin sheets.  To make the process manageable, I cut the dough into eighths and then rolled each of those pieces out and filled them one by one. I recommend that you coat the dough ball with flour to reduce stickiness and roll out the dough until you’ve reached the second to last setting.

Lay this piece of thin dough on a baking sheet and cut into squares—mine were about 4 by 4 inches. Put a dollop of filling in the center of each square. Wet the edges with a little water. Fold one side over the other and press firmly around the edges to make a seal. Set aside on a flour-coated baking sheet. Keep at it until you’ve finished with all of the dough and filling. I made about 40 ravioli.

When you are ready to eat, put two pots of water to boil. Salt them well. Add the ravioli gently and boil for 4 – 6 minutes.

Meanwhile, melt the butter over medium heat. Add the sage and garlic, stirring occasionally as the butter browns. Once the butter has browned, season with salt and pepper and turn of the heat. Add the lemon juice. Spoon the sauce over the raviolis, top with a little parmesan and then enjoy the fruits of your labor!

Categories
Chez Jojonoodle/Chez Panisse Project Recipes

green bean and tomato salad

I’ve got to squeeze this recipe in here really quick before the green beans and tomatoes vanish until next summer. This recipe is from Chez Panisse Vegetables and is absolutely wonderful like most of Alice Waters’ recipes. Simple, fresh and easy to prepare, Jordan said it was his favorite way to eat green beans. Now that is an endorsement.

Green Bean and Tomato Salad with Vinaigrette, adapted from Chez Panisse Vegetables
2 – 3 handfuls of green beans, ends removed and cut into 1 inch long pieces
1 basket cherry tomatoes, halved
1 shallot, diced very fine
2 T red wine or champagne vinegar
salt, pepper

Put on a pot of salted water to boil. In a small bowl, macerate the diced shallot in the vinegar. Add a hefty pinch each of salt and pepper and set aside. The longer this mixture sits together the better. Blanche the green beans for 3 – 5 minutes in the boiling water and then rinse with cold water. Pour into a serving platter and sprinkle with tomatoes. Just before serving,  pour the dressing over the vegetables and enjoy!

-Emily

Categories
Chez Jojonoodle/Chez Panisse Project Recipes

saffron pasta with grilled squid

Jordan and I have a new plan. We’ll call it Chez Jojonoodle just to keep things simple around here … craving details yet?

The goal: to challenge ourselves culinarily and bring new recipes to you. The method: download the weekly menus from the famed Chez Panisse and make at least one dish from that week’s menu going off nothing more than the title of the dish. What fun!

Our first foray into the Chez Panisse/Chez Jojonoodle challenge was from the menu on Thursday, July 7th: Hand Cut Saffron Pasta with Monterey Bay Calamari. We had invited our adventurous eater friends Matt and Alexa over for dinner and dove right in. I made the saffron pasta, making a few adjustments from the egg pasta recipe I explained here and Jordan took on the squid.

Saffron Egg Pasta with Grilled Squid
1 batch egg pasta
1 lb whole squid
lemon juice, olive oil, salt,  pepper and chili flake
fresh herbs, chopped (we used basil, parsley and chives)

For the pasta
2 1/2 cups flour
1 t salt
3 egg yolks
3 eggs
1 T olive oil
1 T water
1 pinch saffron

I followed the same egg pasta recipe I’ve used in the past but with one small tweak.  For a saffron pasta, infuse one pinch of saffron threads in the 1T olive oil and 1T warm water mixture. It will dissolve some, but use a pestle to crush the threads a bit to encourage the infusion before adding it to the eggs. Follow the rest of the pasta recipe as directed here.

One additional note: I would highly recommend dusting each sheet of pasta with flour before cutting into strands. This will save you a lot of time pulling sticky pasta strands apart or prying them off a baking sheet before cooking.

Cook the pasta in boiling, salted water for 4 – 6 minutes and toss with olive oil.

For the squid

Remove the beaks and spines of the squid. Rinse them off and refrigerate until ready to grill.

Make a marinade with olive oil, lemon juice, salt, pepper and chili flake. Heat your grill (or grill pan in our case) to medium high. Just before grilling, toss the squid in the marinade. Grill them for just 1 – 2 minutes per side. If you overcook the squid, they will be tough and nobody wants that!

To serve, top the olive-oil-dressed pasta with the squid. Squeeze a good amount of lemon over the squid and sprinkle with chopped herbs.

Before I made the pasta, I thought the saffron might have just been a throwaway – something that makes a dish sound appealing, but doesn’t actually contribute any flavor. I was wrong. The floral flavor of the saffron really came through in the pasta. Also surprisingly, the squid had a lot more flavor than expected. Calamari usually just taste like the breading they are fried in, but these grilled squid had a noticeable ocean flavor. Maybe it was because of the simple preparation, or maybe because they were young and very fresh. Another plus: squid are an inexpensive and sustainable seafood. Overall, this was a very fun dish to prepare and tastier than expected! I’m looking forward to our next interpretation.

-Emily

Categories
Recipes

mushroom pasta handkerchiefs

Jordan and I have some really wonderful friends. Our friend Ralph, who occasionally walks Miss Willow and knows how much we love to cook, gave us one of those nifty hand-crank pasta makers! A friend of his was moving, her nearly-new pasta maker was unable to make the trip and Ralph set it aside for us. Isn’t that grand!

Mushroom Pasta Handkerchiefs, adapted from the Chez Panisse Cafe Cookbook

I noticed this recipe in the Chez Panisse Cafe Cookbook a few weeks ago and I added it to my list. I thought it would be a long while before I could make it (sadly, I am not a hardcore Italian grandmother who rolls her pasta with a sawed-off broom handle), but when fate brought a pasta maker into our lives, I knew it was meant to be. The pasta turned out beautifully. While it is not the easiest dish since you make the pasta from scratch, it is well worth the effort. The dish is balanced, showcases the few ingredients that make it up and is supremely comforting – everything you expect from an Alice Waters recipe.

For the egg pasta dough (makes 1 pound of pasta) 
2 1/2 cups flour
1 t salt
3 egg yolks
3 eggs
1 T olive oil
1 T water

Mix the flour and salt together.  In another bowl, whisk together the eggs, egg yolks, olive oil and water. On a work surface, pour out the flour mixture and make a well in the center. Pour the eggs into the well. With a fork, stir the eggs in a circular motion slowly bringing more flour into the eggs.

Once the flour has soaked up the eggs and it is not in danger of running all over or when you accidentally break through the well and egg is rushing towards the edge of your counter, use a bench scraper to mix the flour and eggs together. It will be crumbly. Knead the dough into a ball using a squeezing motion. Once it has combined, wrap in plastic wrap and let rest at room temperature for 45 minutes.

Divide the dough into two balls. Dust one with flour and roll it out into a flat pancake. Open your pasta maker to the largest setting and pass the dough through. Double the dough on itself and pass it though again. Continue to pass the dough through at the largest setting, until it is smooth. Cut the kneaded dough into several smaller pieces. Wrap the pieces you aren’t currently stretching with plastic wrap.

Gradually stretch the dough, passing it though progressively thinner settings. You want pieces that are about 4 inches wide by 12 inches long- you’ll cut these into 4 inch by 4 inch squares. Don’t worry if your dough is not uniform in width or length – this is a rustic pasta dish! When it has reached your desired thickness, put it onto a parchment lined baking sheet and cover with a damp towel. Take care to put parchment paper in between the layers of the dough, it will stick to itself like crazy. Continue this method with the rest of dough. You’ll get a decent arm workout and feel quite accomplished. After you’ve rolled out all of the dough, cut the dough into 4 inch squares and put a pot of salted water on to boil.

For the pasta (serves 4, we doubled this recipe to serve 6 as a main course)
1/2 lb mixed mushrooms (we used creminis, shitakes and morels)
4 T butter
salt and pepper
1 medium onion, diced fine
1/2 t thyme, chopped
3 cloves garlic, diced fine
1/2 cup creme fraiche
1/2 cup chicken stock
1/2 lb pasta dough
1/4 cup grated parmesan cheese
a few handfuls of arrugula
lemon juice
olive oil

Clean the mushrooms of their grit. Cut them into quarters. Dice the onion, thyme and garlic. In a saute pan, melt 1 T butter. Add the mushrooms and saute over medium heat until lightly browned. The mushrooms will lose a lot of their liquid; you should wait for this to evaporate before setting them aside. Set the mushrooms aside. Melt another tablespoon of butter and saute the onion until translucent. Add the garlic and saute for another two minutes. Add the mushrooms, creme fraiche and chicken stock. Turn the heat to high and reduce until it is a thick saucy consistency.  Check for seasoning, turn of the heat, and set the filling aside.

Preheat an oven to 500 degrees. Butter a large baking dish. In the pot of boiling water, cook the pasta sheets several at a time for about 3 minutes each.  Put the pasta sheets side by side in the baking dish. Spoon a few tablespoons of the mushroom mixture into the center of each pasta sheet and fold the corners up around the filling. Alice makes this step seem really simple, but it is a bit trickier than she makes it out to be. The pasta will flop all over the place and doesn’t really stick to itself like you’d hope. Just try your best to seal the little pasta pouches – they will taste amazing regardless of how they look.

Cover the entire dish with the grated parmesan cheese. Put in the oven and bake for 10 – 15 minutes, until the parmesan is melted and browned. Meanwhile, toss the arrugula with lemon juice and olive oil.  Using a spatula, place several pasta pouches on each plate and tuck the dressed arrugula around the pasta. Enjoy and bask the fruits of your hard work!

-Emily

Categories
Recipes

shaved asparagus and parmesan salad

The only thing more spring that fresh strawberries might be raw asparagus. This salad is perfect, simple and balanced.  The nuttiness of the parmesan and the sharpness of the dressing compliment the asparagus wonderfully. This was out first foray into raw asparagus territory and it turns out that the distinct asparagus flavor is actually more mild when it’s raw. I also was worried about the asparagus being tough, but you shave the spears so thin that they become really tender – think asparagus fettuccini.

Shaved Asparagus and Parmesan Salad, from the Chez Panisse Cafe Cookbook

1 shallot, diced
2 T white wine or champagne vinegar
2 T lemon juice
salt
1/3 cup olive oil
1 bunch asparagus spears
pepper
Parmesan cheese, shaved

Dice the shallot and let it marinate in vinegar, lemon juice and a pinch of salt.

Carefully shave the asparagus spears into thin ribbons. I used a japanese mandolin, but you could also use a vegetable peeler or a very sharp knife. This step takes a while, but the end result is worth it. The asparagus is so tender and wonderful and not stringy at all. Jordan also suggested using a mandolin to cut the spears into asparagus coins instead of ribbons as a time saver. You could cut multiple spears at once and your fingers are in less danger as you cut. We think this would be just as tasty.

Whisk the olive oil into the shallot mixture. Pour over the asparagus and toss to coat. Plate each serving and top with generous amount of shaved parmesan.

-Emily

Categories
Recipes

panna cotta with passionfruit sauce

This was my first panna cotta. Panna cotta is the dessert that chefs on Top Chef who were adamantly “not pastry chefs” would try with disastrous results, and so I was a little gun shy. Honestly, it is an amazingly simple dessert and I’m not sure why so many people messed it up. Panna cotta has a delightful, milky flavor that is great on its own, but even better as a base for other toppings. We topped it with fresh strawberries and passionfruit sauce, but it would be great with any other berry, stone fruit, citrus, nuts. It’s basically a dessert base for all seasons! I know Alice Waters wouldn’t settle for anything less.

Panna Cotta with Passionfruit Sauce, from the Chez Panisse Cafe Cookbook

One 1/4 oz packet of unflavored gelatin
Flavorless oil, for greasing the ramekins
1-inch piece of vanilla bean, sliced and scraped
3 cups heavy cream
1 cup whole milk
1/4 cup sugar
zest of 1/4 lemon

1/4 cup passionfruit pulp
3 T simple syrup
1/4 cup diced strawberries

Grease 8 ramekins with a flavorless oil. In a medium-sized bowl, dissolve the gelatin in 3 T water.

In a heavy saucepan over medium-low heat, heat the cream, milk, vanilla, sugar and lemon until simmering. Simmer for a minute or two. Pour into the gelatin mixture and whisk until the lumps of gelatin are fully incorporated. Strain through a fine mesh sieve into another bowl. Fill the ramekins and place them in the fridge to set up. Ideally, they will have about 4 hours to chill before serving.

To serve, top with passionfruit sauce and diced strawberries.

-Emily