Categories
Recipes

asparagus tart

Spring is here and so are the asparagus! Though we really didn’t experience much in the way of winter this year in SF, I still can’t help but be happy it’s spring. The other night we had the most heavenly asparagus at our friends’ house. Among their many talents, Russ and Kelly have an impressive green thumb. They have a garden plot near their place in Potrero Hill and we were lucky enough to sample some of their freshly harvested asparagus. Sweet Demeter, it was the best asparagus of my life, and I couldn’t wait to get my hands on some more.

Asparagus Tart | The Answer is Always Pork

So on Sunday before Jordan headed out for work, we went down the Civic Center Farmers Market and picked up two beautiful bunches of asparagus. While these weren’t quite the caliber of Russ and Kelly’s, I was still pretty pleased. Hurray for spring! Hurray for asparagus!  

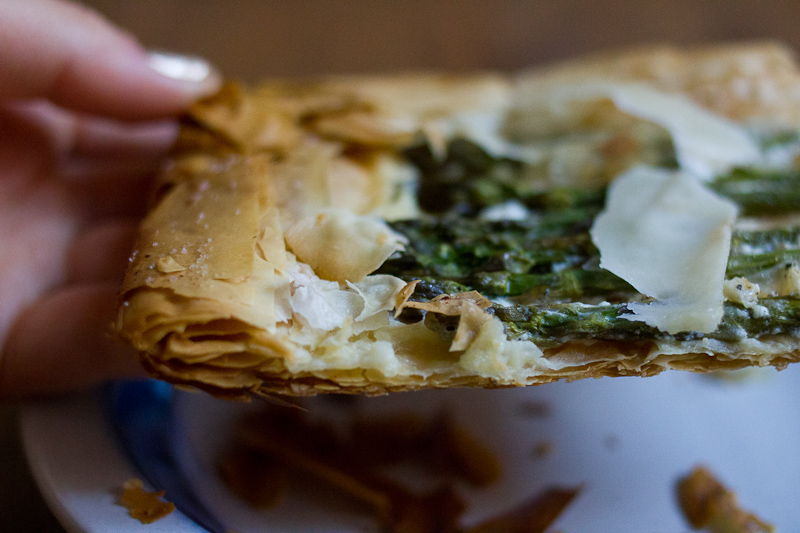
I decided to turn one of the bunches into a simple tart. The inspiration was from an old issue of Sunset magazine—a phyllo and tomato ‘pizza’ that I used to make at my mom’s house in the summers, but hadn’t made in years. I had some phyllo sitting in the freezer from another so-so experiment, and so this was a snap to throw together. It takes about 10 minutes to assemble, about 20 bake and then you’ve got a beautiful tart to show for your efforts. For a crust that is almost no work, this one is deliciously flaky and satisfying. And, bonus fun fact, phyllo dough is vegan … until you slather it in butter. Easy, fresh and delicious!

Asparagus Tart | The Answer is Always Pork


Asparagus Tart with Creme Fraiche
1 bunch asparagus (if you can snag ones that are the thickness of a pencil, that would be perfect)
8 sheets of phyllo dough (defrosted either on the counter for a few hours on in the fridge overnight)
4 tablespoons butter
1/2 cup creme fraiche
salt, pepper
parmesan, for shaving on top
a few lemon wedges, for serving

Preheat your oven to 425° F. Line a baking sheet with parchment paper. Wash and pat your asparagus dry.

In a small dish, melt the butter. Spread one sheet of phyllo dough on the baking sheet. Brush the entire sheet lightly with butter. Top with another sheet of phyllo. Continue brushing with butter and layering with the rest of the sheets.

Asparagus Tart | The Answer is Always Pork

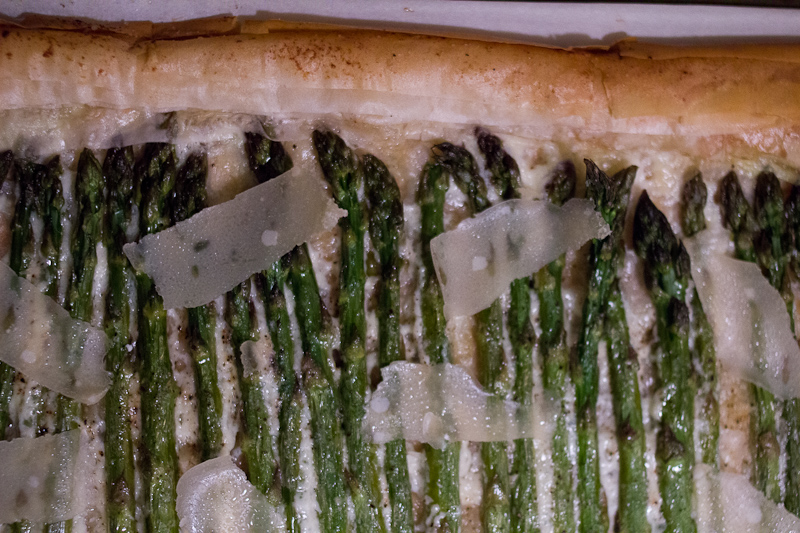
Once you’ve stacked the phyllo, spread an even layer of creme fraiche in the middle of the dough, leaving a 1 1/2″ border along the sides. Arrange the asparagus evenly in a row. Fold the phyllo dough up around the asparagus and brush the border with the remaining butter. Sprinkle the asparagus with a little bit of salt.

Bake the tart for 20 – 25 minutes, until the edges are golden brown. Remove from the oven and top with some black pepper and shaved parmesan. Add a squeeze of lemon if you’re feeling feisty.

Asparagus Tart | The Answer is Always Pork

-Emily

Ps. This op-ed about food and health by Mark Bittman from this week’s New York Times is fantastic. Butter is back, and all I can say is 1000 times YES.

Categories
Recipes

pesto pasta salad

Last week I was lucky to attend an awesome blogging conference Alt Design Summit. It was fun and inspiring and I’m buried under a mountain of insanely cute business cards from all of my new bloggy friends. I’ll share more soon, but since I know you’re hungry, here is a recipe for a quick, easy and delicious pesto pasta salad.

+++

Pesto pasta is an old standby here. I make it about every other week in the summer when basil is in season and readily available. We usually have it for lunch over the course of a few days. It is fresh, flavorful and cheap. Plus you can through a little of whatever you’ve got lying around in it and it still turns out pretty good. I guess pesto just works miracles like that.

pesto-pasta-4

Pesto Pasta Salad
For the pesto
1 bunch basil (we used a small bunch of basil and some arrugula which was a day or two past its prime)
1 lemon, zest and juice
1-2 cloves of garlic
1/4 cup nuts (pine nuts are the standard, but we’ve used pecans and walnuts also)
1/4 cup parmesan cheese
1/4 olive oil
salt and pepper

pesto-pasta-2

In the bowl of a food processor combine basil, lemon zest, lemon juice, garlic nuts and parmesan. Pulse until you’ve got a coarse paste. Now turn the food processor on and drizzle olive oil in through the top hole until the pesto comes together and everything is chopped uniformly. Season with salt and pepper.

For the pasta salad
1 lb dry pasta
1 can whole pitted olives
8 oz mini mozzarella balls
1 cup cherry or grape tomatoes, cut in half
1 batch of pesto

pesto-pasta-1

Bring a pot of water to boil. Salt it until it tastes like sea water. Cook the pasta according to the package directions. Drain and rinse for a minute or two with cold water. Combine pasta, olives, mozzarella, tomatoes and pesto in a large bowl. Stir to combine. Serve at room temperature or cold.

pesto-pasta-3

This pasta salad recipe is super flexible. You can add more veggies—blanched green beans are great, kidney beans or chick peas are a good way to make it heartier, marinated artichokes would be lovely too! Just remember that more sauce is better when you’re making a pasta that you’ll refrigerate and eat over a few days. Without enough sauce, the pasta will seem dry, bland and rather sad.

-Emily

Categories
Recipes

caramelized onion tart

Every time I have caramelized onions, I wonder why caramelization isn’t obligatory for all onions. It is just magical how onions can transform from sharp and pungent to sweet and magnificent with just a little heat and a little patience. This tart is lovely because it lets the onions shine. If you can crank out a decent pie crust, all the better. Flaky dough + creamy onions = heaven.

onion-tart-2

You could also consider this tart a perfect opportunity to eat bacon. I’d cook the bacon first, drain off some of the fat from the pan, add a tablespoon of butter and then saute the onions in the bacon fat and butter combo. Chop up the bacon in to bits and then combine them with the onion custard before you pour it into the tart shell.

We had this tart for dinner with a salad and roasted veggies. It would also go nicely with soup or roast chicken. I had it for lunch the next day and can attest that it reheats like a dream—in the unlikely event that you have leftovers.

Simple Caramelized Onion Tart, adapted from Orangette
1/2 recipe for flaky pie dough
3 tablespoons butter
2 large yellow onions, peeled and sliced thin
1/2 cup heavy cream
1 egg
salt
pepper
pinch of nutmeg

Flaky Pie Crust 
2 1/2 cups all purpose flour
1 1/4 teaspoons kosher salt
2 1/2 sticks unsalted butter
about 5 tablespoons ice water

Make the pie crust the night before. In a food processor, combine flour and salt. Remove the butter from the fridge and cut into 1 inch cubes. Add them to the flour mixture. Process until the butter chunks are about the size of peas. Add the water and pulse a few times to combine. Divide into two equal balls, wrap in plastic wrap and refrigerate.

Preheat your oven to 375 degrees.

onion-tart-1

In a heavy-bottomed pan over medium low heat, melt two tablespoons of butter. Add the onions. Caramelize the onions stirring occasionally. Depending on your stove, this will take somewhere in the neighborhood of 45 minutes.

onion-tart-3

While your onions are caramelizing, roll out the pie dough. Put it in a 9-inch tart pan and trim off the excess. My favorite Julia Child trick for getting perfect edges on a tart is to drape the excess dough over the edges of the pan and then roll the rolling pin on top of the dough over the edges of pan. The sharp edges of the pan will cut through the dough and you can easily pull away the excess. Put the tart shell in the fridge until your onions are done caramelizing.

Whisk together the egg, cream, salt, pepper and nutmeg.

onion-tart-4

After the onions are a medium brown, remove them from the heat. Mix them with the egg mixture and pour into the tart pan. Bake for 30 – 45 minutes, until the top of the tart is golden brown. Unmold the tart and serve hot or let cool to room temperature and serve.

onion-tart-5

-Emily

Categories
Recipes

grilled cheese with asparagus and preserved lemons

Like I said, cheese sandwiches are all the rage. I had a version of this sandwich at Mission Cheese Shop a few weekends ago and it was delicious. I had to recreate it at home for Jordan.

Grilled Cheese with Asparagus and Preserved Lemons
4 slices of sourdough bread
2/3 cup fontina cheese, grated
1 T butter
4 stalks asparagus, cut into 1 inch pieces
1 preserved lemon, cut into very thin slices

Turn on the broiler. Spread the asparagus on a baking sheet. Drizzle with a little olive oil and sprinkle with salt and pepper. Broil the asparagus for a few minutes, until al dente and browned slightly.

Spread the bread with butter. Heat a nonstick saucepan over low heat. Put the bread in the pan butter side down, layer with cheese, asparagus and preserved lemon, top with another slice of bread. Cover the pan and let cook for about 5 minutes, until golden brown. Flip and cook the other side until golden. Cut in half and serve hot.

-Emily

Categories
Recipes

buckwheat crepes with ham, cheese and egg

This recipe is another gleaned from The Heart of the Artichoke by David Tanis. He recommends it as a light lunch or as a first course, but Jordan and I had it for dinner without complaint. This crepe is actually sublime. It is simple, but hits on all the right notes. It is cheesy, smokey and slightly sweet from the ham, and earthy from the buckwheat—heavenly. We balanced out that goodness with this cauliflower soup and green beans.

Don’t be afraid of making these crepes if you’ve never made crepes before (or never made crepes with success before). This batter is quite robust and the crepes are really easy to flip. Just do yourself a favor and use a non-stick pan. The recipe below makes four to six 10-inch crepes, more than enough for 2 people.

Buckwheat Crepes with Ham, Cheese and Egg, adapted from The Heart of the Artichoke by David Tanis
1/2 cup buckwheat flour
1/4 cup all-purpose flour
1 egg
1 1/4 cups milk
1/2 salt
2 T honey
2 slices of good ham per crepe
1/4 cup grated gruyère cheese per crepe
1 egg per crepe

Whisk together the flours, egg, milk, salt and honey. Put in the refrigerator for at least an hour.

Preheat the oven to 400 degrees.

Heat a non-stick pan over medium-high heat. Quickly ladle in 1/3 cup batter. Swirl the pan to spread out the batter. Let the crepe brown on one side, about 3 minutes, and flip using a spatula or carefully with your fingers. Remove the crepe from the pan and set aside. Cook the remaining crepes.

To fill the crepes, lay each one top side down on a baking sheet. Make a ham and cheese barrier around the edges to contain the egg. Crack the egg into a small mug. Gently pour the egg into the center of the crepe and sprinkle with salt and pepper.

Bake until the egg whites are white and the cheese is melted. A runny yolk is ideal. Serve immediately.

You can also prepare these crepes without the egg—a ham and cheese sandwich variation—which is just as good. To fill the crepes, sprinkle one side of the crepe with cheese and ham and then fold the crepe over to make a half-moon. Brush with a little melted butter.  Warm for a few minutes in the 400 degree oven, until the cheese is melted and the crepe is crispy.

-Emily