Categories
Recipes

pasta with creme fraiche, kale and mushrooms

Each year, we have what we’ve come to call the “pasta of the year”.  The pasta of the year is a pasta dish that we turn to for a reliably tasty and soul-satisfying dinner every other week or so. It quickly becomes part of our regular weeknight dinner repertoire, dominates for nearly a year, and then mysteriously fades away, only to be rediscovered occasionally by browsing our own blog archives. It’s a strange phenomenon, but we’ve come to accept it’s benevolent presence in our lives.

pasta-of-the-year

The pasta that started it all was a marinated tomato and ricotta pasta. You’d let some peak of summer tomatoes hang around with fresh herbs, olive oil and lemon juice for 20 minutes or so. Then toss your pasta with an excess of ricotta cheese and top that with the marinated tomatoes. Heaven from June through September.

There was the pasta carbonara kick, which featured an incredibly poetic post from Jordan about his love for the dish. And then there was orzo topped with burrata cheese. My spicy soba noodle salad was certainly a contender in 2014.

And now, though the soba noodle salad is making an honorable attempt to defend the title in 2015, we have our new favorite pasta equation. Pasta + creme fraiche + sautéed shallot + wilted green, and it’s sister pasta, pasta + creme fraiche + shallot + al dente veg. Creme fraiche is a genius way to arrive at a solidly sauced pasta with nearly no effort, and we’ve already established that shallots are good on everything. Toss in whatever green or quick-cooking veggie (mushrooms, asparagus, green beans, favas, peas) you have around and you’ve got yourself a supremely delicious, decently well-balanced meal. If you happen to live at our house in the winter/spring of 2015, you have this pasta every 10 days.

pasta-creme-fraich-kale-2

Pasta with Creme Fraiche, Kale and Mushrooms
1 lb pasta
1 shallot, diced
2 cups (8 oz) cremini mushrooms, sliced
2 cups kale, sliced
2 tablespoons butter or olive oil
1/2 cup creme fraiche
salt and pepper

Bring a pot of salted water to boil. Dice your shallot and slice your kale and mushrooms. Throw your pasta into the pot of boiling water to cook.

Meanwhile, in a sauté pan over medium heat, melt the butter, and sauté the mushrooms. When the mushrooms are nearly done, add the shallot and sauté just a few minutes more. Taste your mushrooms and season them with salt. Then add the kale. Turn the heat off and just let the kale wilt a bit.

Drain your pasta and add it back into the pot. Throw the mushroom mixture into the pasta pot, along with a generous dollop of creme fraiche. Stir to distribute the creme fraiche. Season with bit more salt and pepper, and serve. Feel free to embellish with parmesan cheese and herbs, though it isn’t necessary.

pasta-creme-fraich-kale-1

-Emily

Categories
Recipes

spicy soba noodle salad

Despite the name of this fine blog, many of the meals we eat are vegetarian. This recipe also happens to be vegan and gluten-free—do you even recognize us!?  We are indeed pro-vegetable here at The Answer is Always Pork and this salad has become one of our weeknight favorites. You can throw it together in about 25 minutes, which is especially handy when you a) are trying to launch a new product at work, b) remember less than an hour before leaving for an event that it is a potluck, or c) that special combination of lazy and impatient that makes ordering take out impossible. It’s also really easy to scale this up for a group, just double or triple everything and it works out fine.

soba-salad-2

What else? We’re gradually making progress planning our wedding, which somehow still feels like the most obvious and the most surprising thing to happen to us. Jordan is back at school for the spring semester, though he is never really *off* anymore these days, masters-shmasters. I’m online shopping for obscure textile art and pottery books from the 70s, purchases include “Far Beyond the Fringe”, undeniably an amazing title for any book. Willow is decapitating toys shaped like Star Wars characters, no wookie left unscathed. There’s a new bakery in the neighborhood that’s pretty mind-blowing. Life is moving right along, and I like that just fine.

Spicy Soba Noodle Salad
For the dressing

1 lemon, zested and juiced
1-1″ piece of ginger, peeled and grated
2 cloves of garlic, grated
1/4 cup rice vinegar
1 tablespoon honey (or agave syrup for you super vegans)
2 tablespoons soy sauce
1 teaspoon sesame oil
2 – 3 tablespoons olive oil
a small pinch of cayenne pepper or a squirt of siracha chili sauce
salt and pepper to taste

For the salad
1 head of romaine lettuce, chopped
1 cucumber, sliced
cilantro, mint or green onion, sliced thinly
2 bunches of soba noodles (japanese buckwheat noodles, they come wrapped in single-serving bunches)
4 oz of extra firm tofu (I like the Trader Joe’s sprouted tofu that comes in two 4oz packages)

soba-salad-1

In a medium bowl, whisk together the dressing ingredients. Season with salt and pepper. Bring a medium pot of water to boil and season it with salt.

While you’re waiting for the water to boil, chop the lettuce, herbs and cucumber. Mix them together in two medium bowls. These will become your dinner bowls. Slice the tofu into 1.5″ x  0.5″ slices. Put a non-stick pan over medium heat. Pat the tofu dry with a paper towel and then brown the tofu, about 4 minutes per side. When your tofu is cooking on it’s last side, cook the soba. You can also serve the tofu raw, but I like

Cook the soba noodles according to the package directions, somewhere between 5 and 8 minutes. Drain the soba noodles and rinse with cold water. Put back into the pot and pour the dressing over the soba.

Top each salad bowl with soba and then sprinkle with tofu. Serve with siracha and sesame seeds.

-Emily

Categories
Recipes

tonkatsu

You and tonkatsu have probably met each other’s acquaintance at your local sushi restaurant. It’s usually an option in a bento box of some kind, alongside other Americanized favorites—salmon teriyaki, vegetable tempura, California rolls. Like Argentine milanesa or Italian chicken parmesan, tonkatsu is basically a pounded piece of meat that is breaded, fried and served with sauce. It’s hard to go wrong.

We don’t do anything fancy with our tonkatsu. It is easy to prep and takes just 10 minutes to fry (and you can shallow fry it – no need to bust out the dutch oven and a liter of oil).  We usually serve it in a large bowl with shredded cabbage, vinegar rice and a few garnishes picked up during the occasional visit to Japantown. It’s not traditional to serve tonkatsu with vinegar rice, but I love vinegar rice and it’s my kitchen. Plus it helps jazz up cabbage.

Tonkatsu | The Answer is Always Pork

Tonkatsu 
2 thin cut, boneless pork chops, pounded a bit (you could also use chicken)
1/4 cup flour
1 egg, beaten
1/2 cup panko bread crumbs
salt and pepper
high temp oil for frying (safflower, sunflower, or canola oil)

For Serving
Vegetable and Fruit Sauce (Japanese BBQ sauce)
Vinegar sushi rice (1 cup rice, 1/4 cup rice vinegar, 2 tablespoons sugar, 1 teaspoon salt)
Shredded cabbage, about 1/2 cabbage cut into thin slices (toss with some rice vinegar if you’re not making vinegar rice)
Pickled ginger (optional)
Togarashi (Japanese dried chili pepper, optional)

Tonkatsu | The Answer is Always Pork

Cook your rice according to your rice cooker or the package directions. While your rice is cooking, make the sushi su by combining 1/4 cup rice vinegar,  2 tablespoons sugar and 1 teaspoon salt in a small saucepan and heating until the sugar and salt dissolve. Slice your cabbage into very thin slices and set aside. Then prep the pork.

Using a rolling pin or the flat side of a meat mallet, pound the pork cutlets until they are about 1/2 inch thick. Season well with salt and pepper. Then dredge the pork in the flour, then the egg, then the panko. Set aside or refrigerate if your rice still has a while left to cook.

When your rice is done cooking, heat 1/2 inch of oil in a heavy sauté pan or cast iron skillet. When the oil is hot (test by dropping a bit of panko into the batter. If it immediately starts to bubble, the oil is ready), add the pork to the pan. Cook 5 minutes per side, until the pork is golden brown. Remove from the pan and let drain on a plate with paper towels or a cooling rack. Cut into thin strips.

Add the sushi su to the rice and stir gently to distribute.  Split the cabbage between two medium bowls. Top with some rice. Then top with the tonkatsu. Serve with Vegetable and Fruit sauce, togarashi, and pickled ginger.

-Emily

Tonkatsu | The Answer is Always Pork


Categories
Recipes

coq au vin

The second way we wanted to test cooking our beautiful chicken from Eatwell Farm was to braise it. The first thing that comes to mind when I think of braised chicken is coq au vin, and the second is Julia Child. (I won’t be offended if you click that link right now and improve your day significantly by watching a few minutes of The French Chef).

My love for Julia is great. She’s taught me many things over the years, things that are just as useful in the kitchen as outside of it. The most important is probably confidence (Never apologize!!!), and the second, humor (“They’ll never know!”, she winks and scrapes an omelet that jumped ship right back into the pan). Julia’s warmth and enthusiasm for life are something I aspire to, and when I cook her recipes, I feel that much closer to it.

eatwell-coq-au-vin-5

Coq au vin tastes like comfort. You can’t go wrong with the slow simmered combination of chicken, wine and vegetables, it turns out delicious every time. And it’s impossible to not feel taken care of after you eat it. Isn’t that feeling, that love and community, exactly what inspires us every time we prepare a meal to share.

Coq au Vin, adapted from Julia Child’s Mastering the Art of French Cooking
1-3 to 4 pound chicken, broken down (legs, thighs, wings, breasts, you know the drill)
1 onion, diced
3 carrots, diced
2 cloves of garlic, diced
1/4 cup cognac
2 cups dry red wine
2 cups chicken stock (homemade if you got it, but if not, Better Than Bouillon concentrate isn’t half bad)
a few sprigs of thyme
a bay leaf
salt, pepper
2 tablespoons of bacon fat or oil
3 tablespoons butter
2 tablespoons flour
3/4 pound cremini mushrooms, cut into quarters

Preheat your oven to 300° F. Sprinkle the chicken pieces on both sides with salt. In a dutch oven over medium heat, heat the bacon fat or oil. Brown the chicken pieces on both sides. I’d do it in two batches so you don’t crowd the pan. Remove the browned chicken from the pot and set aside.

eatwell-coq-au-vin-1eatwell-coq-au-vin-2

Add a bit more bacon fat or oil and sauté the vegetables until the onions are translucent, 7 – 10 minutes. Deglaze the pan with 1/4 cup of cognac and then pour in the wine and chicken stock. Add the chicken back in along with a few sprigs of thyme and a bay leaf. Bring everything to a boil.

eatwell-coq-au-vin-3eatwell-coq-au-vin-4

Once it boils, cover the pot and put it in the oven. Let simmer for about 40 minutes. Meanwhile, brown the mushrooms. Warm 1 tablespoon of butter in a pan. Add the mushrooms and brown them, stirring occasionally, about 10 minutes. Remove the mushrooms and put them on a plate.

After about 40 minutes, though you could go longer if you have a tough bird, remove the braise from the oven, and put it back on the stovetop. Fish out the chicken pieces and put them aside on a plate.

In the pan you browned the mushrooms in, melt 2 tablespoons of butter. When the butter is melted, add 2 tablespoons of flour. Cook the roux for a few minutes, until it is a light golden brown. Add the roux to the braising juices and whisk to combine. Bring the braising liquid back to a boil and the sauce will thicken nicely. Season the sauce with salt and pepper and then add the chicken and mushrooms back in.

You can serve the coq au vin immediately, or turn off the heat, cover and rewarm when you’re ready to eat. We served ours with mashed potatoes, but rice or pasta would also do just fine. It’s good to have something to soak up the sauce.

eatwell-coq-au-vin-6

Isn’t that roasted chicken head a sight to behold?! The coq au vin is on the left, and Jordan knocked that sauce out of the park.

-Emily

Ps. If you really want to nerd out and love Julia Child even more, read My Life in France, and then read this phenomenal biography by Bob Spitz. And if you’re in a bad mood, watch a few episodes of The French Chef. You cannot help but smile.

Categories
Recipes

roast chicken

This past week, we had a wonderful opportunity through Eatwell Farm, our CSA farm, to cook three very special chickens. The chickens are a heritage breed, Black Australorp, and were raised in the open air on pasture for the past four months at their farm as part of a sustainable poultry project they’ve been developing at the farm. The birds were harvested the very same morning they were dropped off with me. I know for a fact that I’ve never had the chance to cook a chicken as fresh or as humanely raised as these beauties, and the experience was delicious from start to finish.

eatwell-chicken-3eatwell-chicken-5

In the United States, and especially in big cities, we’re incredibly distanced from where our food comes from. Our meat comes butchered, pre-packaged and shrink-wrapped, even if we’re shopping at quality markets. It’s very easy to forget that meat comes from animals, animals who gave their life so that we could take pleasure in eating them. It’s a convenient system, but I find, even as a person who thinks about food a lot, I often forget this incredibly important fact.

And so it was exciting, and intimidating, to be handed three large birds with head and feet still attached on Friday afternoon. They were impressive and a bit scary with their black talons sticking eight inches out of a plastic bag. But what I did not expect when I signed up to test cooking a few chickens was how differently I’d feel about the birds because of this simple change in butchering style.

eatwell-chicken-1eatwell-chicken-2

My emotional connection to sitting down for a meal is very strong, but I’ve never experienced that type of connection with a piece of raw meat before now. Sure I’ve appreciated a steak for it’s perfect marble, but holding that chicken’s head in my hand, examining it’s long, lean legs, I felt an entirely new appreciation for the creature and for the effort that went into raising it. Because it was undeniable that the bird I was planning to cook was a very real animal, cooking it was even more meaningful. I could begin to grasp the sacredness this exchange. That awareness is something that we don’t often experience with city living, and I’m grateful for it. Being more thoughtful and emotionally engaged is always a good thing, especially regarding something we do every single day—eat.

Now, what you really want to know—how did that handsome bird taste? The skin was phenomenal. Thicker and fattier than a typical store-bought chicken, which meant it crisped up into perfect chicken cracklins! I could have eaten the whole birds worth on my own. The meat was far more complex than a conventional bird, even the breasts had a ton of flavor. The thighs and legs were not as tender, but I liked that, evidence that the bird used it’s muscles like it was meant to. Our friend Josh thought the chicken tasted wild, and meant that in the most complimentary way possible. Thanks to these chickens, we had two very special meals, and I’d jump at the chance to cook more of these wonderful birds.

eatwell-chicken-4eatwell-chicken-6

Roast Chicken with Butter, Piment d’Ville and Lemon
1 whole chicken
kosher salt
4 tablespoons butter, melted
Piment d’Ville (or other mildly spicy and flavorful pepper, piment d’espelette, paprika, ancho chili)
1 lemon

A note on my butchering before we begin, I roasted these birds the same way on two separate occasions. One I brought over to our friends place, and not knowing the size of their oven, I cut off part of the legs and butterflied the chicken. These were tall chickens! The other I roasted at home and left completely intact, using tinfoil to keep the bird upright. I must say quite enjoyed the presentation!

One day before you plan to cook your chicken, sprinkle it liberally with salt. I like to use about 1 teaspoon per pound, as the wonderful Judy Rodgers of Zuni Café recommends (and if anyone knows a roast chicken, it’s Zuni). Salting early allows the salt to really permeate the meat and keeps it very moist after cooking.

Preheat your oven to 400° F. Place your chicken in the center of a large roasting pan. After about 25 minutes, baste your bird with the fat that has rendered out. Tilt the pan, and just spoon the fat over the whole chicken. After about 35 minutes, check the it and baste it again, this time with a little melted butter. My bird was done after about 40 minutes, but be sure to check yours for doneness. The internal temperature should be 160° F.

eatwell-chicken-7eatwell-chicken-9eatwell-chicken-10

Remove the chicken from the oven, and sprinkle it with the Piment d’Ville, or whatever pepper is your favorite. Let it rest for 10 minutes before carving. Carve the chicken, taking care to put a piece of crispy skin with each piece of meat. Pour the remaining melted butter over the carved chicken pieces and sprinkle with lemon juice.

-Emily

Ps. Coming up next with our final chicken—coq au vin!

Categories
Recipes

summer vegetable crumble

Growing up, eating with the seasons just happened to a bi-product of my mother’s obsessive gardening. She’d try planting just about anything once, but under that hot Sacramento sun things like squash and tomatoes really thrived. I remember harvesting zucchini the size of toddlers and tossing them back and forth in the swimming pool. Summer produce stands out most in my memory, though I’m sure we ate from her garden past August.

The Answer is Always Pork | Summer Vegetable Crumble

Eating from the garden was just how eating went in my family, and it wasn’t until my senior year of college when I became more interested in food politics and the complexities of our industrial food system, that I really understood the impact eating seasonally and locally has on our local economy, our environment and our health. The short answer is it’s a big one. And the long answer is much better explained by the folks who really know what they’re talking about, Michael Pollan and Marion Nestle to name a few.

Eating with respect to the seasons and spending our dollars in support local farms and food businesses has become a not-so-private mission of ours, and even in my mother’s eyes, we verge on militant. But if there is one thing to care about, the health of our family and our planet isn’t a bad one, especially if it also means eating wonderful food.

Living in middle of downtown San Francisco, we don’t grow much beyond a few pots of herbs, which is where our CSA (Community Supported Agriculture) Farm Share subscription from Eatwell Farm comes in. Eatwell Farm’s mission is to feed body and soul. They are committed stewards to the environment and constantly challenge industrial agricultural practices in favor of sustainable ones. They care about their land, their employees, and growing the healthiest and best food money can buy—and you can absolutely taste it.

We’ve had our CSA with Eatwell for over 3 years and could not be happier. We get perfect produce. We eat healthier. We stretch ourselves by cooking with ingredients we might not necessarily buy. We know our dollar is going to support a local farm and local families working hard to change our food system. And we spend the same amount as we would spend at the grocery store, where just pennies of your dollar make it back to the farmers. If we don’t support local farms, we’ll lose them—a tragedy with repercussions far beyond just taste—and a CSA is a simple, effective and delicious way to vote with your dollar.

If I haven’t convinced you, taste the difference for yourself! Eatwell Farm has been kind enough to offer our Northern California readers a discount to try their CSA Farm Share subscription. New Eatwell Farm subscribers can use the code: ALWAYSPORK to get their first 4 box subscription for just $99. Good ingredients make it easier to cook good food, and I honestly cannot recommend Eatwell enough. If you don’t live in Eatwell’s delivery radius, I urge you to check out Local Harvest to see if there are any farm share subscriptions in your area.

The Answer is Always Pork | Summer Vegetable Crumble

Now I’ll step down of my soapbox and move onto the recipe. This dish is made with all kinds of wonderful summer produce—zucchini, eggplant, tomatoes, peppers. It was inspired by ratatouille, with a little sprinkle of cheese and buttery pastry crumble added to jazz it up a bit. It’s great as a vegetarian main dish, but could also be served as a side. It takes just 30 minutes to throw together, but tastes like far more effort went into it.

Savory Summer Vegetable Crumble
1 onion, diced
1 cup tomatoes, diced
1 Japanese eggplant, cut into 1” chunks (or half of a globe eggplant)
1 – 2 zucchini, cut into 1” chunks
2 peppers, diced (we used bell pepper, but any mild pepper will do)
a good sprinkle of fresh thyme or oregano
1 – 2 tablespoons olive oil
chili flake, salt and pepper to taste
⅓ cup gruyere, mozzarella or parmesan cheese, shredded (use what you have)

For the crumble topping
4 tablespoons butter, cold and cut into small 1 tablespoon pieces
¾ cup whole wheat or all-purpose flour (we used Eatwell’s Sonora Wheat Flour, which was A+)
½ teaspoon kosher salt

Preheat your oven to 450° F and put one rack closest to the top.

The Answer is Always Pork | Summer Vegetable Crumble

First make the crumble topping. In a medium bowl, combine the flour and salt. Add the butter and work it into the flour with your fingers or a pastry blender, until the butter is in pea-sized pieces and the mixture just comes together if you squeeze it. It will still be pretty crumbly, which is just what you want. Put the crumble topping into the fridge until the veggies are ready.

The Answer is Always Pork | Summer Vegetable Crumble

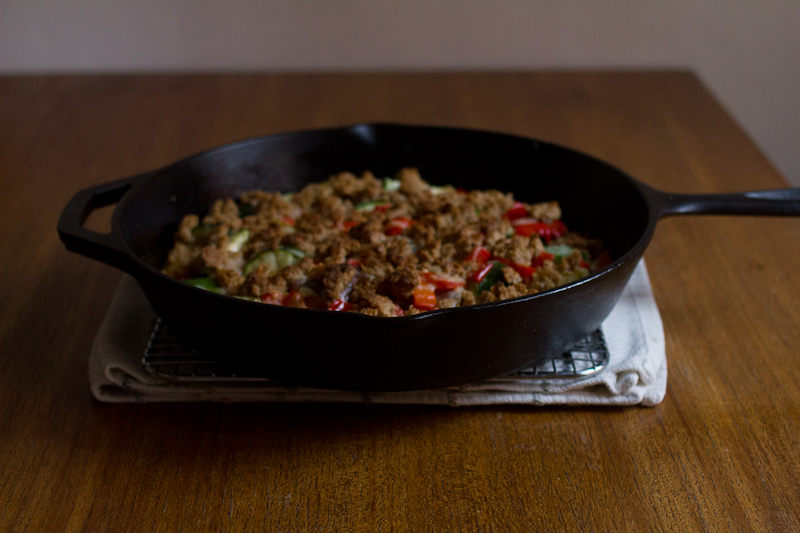
In a cast iron skillet or other oven-safe pot, sauté the onion in a little olive oil over medium-low heat. When the onions are soft, add the tomatoes and sauté just a minute more. Season well with salt, pepper and chili flake. Add the other chopped vegetables and toss to combine. Sprinkle with the grated cheese and then with the crumble top.

Bake 20 minutes on the top rack, until the vegetables are just starting to get soft at the edges and the crumble top is browned. This will serve two to three people as a vegetarian main, or four to five people as a side dish. It would be delightful alongside a roast chicken or quickly sautéed pork chop. You could also top with a few eggs in the last few minutes of cooking if you’d like something a bit heartier. The beauty of good, simple food is it’s flexibility, so mix it up! I hope you enjoy!

The Answer is Always Pork | Summer Vegetable Crumble

The post was written in partnership with Eatwell Farm, but the opinions are always our own.

-Emily

Categories
Recipes

lamb meatballs with pistachio couscous

The first time I had cinnamon in a savory dish was my 18th birthday. I had chosen to go out to a Moroccan restaurant in Sacramento with my family, plus Jordan and my cousin Katie and her then boyfriend-now fiance Scott. Unfortunately, I was also a vegetarian at the time and Moroccan cuisine is decidedly not vegetarian-friendly. It was a meal of meat, meat, and more meat. One of the dishes that I did tentatively sample was chicken bastilla, a pie made with a filling of ground chicken and spices wrapped in a phyllo dough crust. I remember being both confused and intrigued by the savory chicken filling topped with the lightest dusting of powdered sugar and cinnamon.

Cinnamon doesn’t often venture out of sweet territory in the dishes I usually cook, but I must admit it really is quite good when it does.  This couscous recipe was inspired by a recipe in David Lebovitz’s new book My Paris Kitchen. The warmth of the cinnamon goes wonderfully with the brightness of the lemon and the nuttiness of the pistachios. When pared with the very savory lamb meatballs, it is fantastic meal. It’s also quick to prepare. The couscous will cook in about 10 minutes and the same with the lamb. With just a bit of chopping and mixing for prep, you’ve got dinner on the table in 30 minutes.

lamb-meatballs-couscous-3

Lamb Meatballs with Lemon Pistachio Couscous
For the lamb meatballs
1 lbs ground lamb
1/4 onion, grated
2 cloves garlic, grated
1/4 cup parsley, chopped
1/2 teaspoon cumin
1/2 teaspoon salt
1/2 teaspoon pepper
plain yogurt for serving

For the couscous
1 cup israeli couscous
2 tablespoons butter
1 lemon, zest and juice
1/2 cup shelled pistachios
1/4 teaspoon ground cinnamon
2 tablespoons parsley, chopped
fresh ground pepper and salt

lamb-meatballs-couscous-2

Combine ground lamb, onion, garlic, parsley, cumin, salt and pepper. Stir with your hands to combine and then shape into small patties, about 2 inches across. Cover and then refrigerate. Feel free to make the lamb patties the night before.

Bring a pot of salted water to boil. Add the couscous and cook according to the package directions. Drain the couscous and put it into a large bowl. Add the butter, lemon zest and juice, pistachios, cinnamon, and parsley, and stir to combine. Season with salt and pepper to taste. You can serve this warm or at room temperature.

Heat a tablespoon of neutral cooking oil in a cast iron pan over high heat. Cook the lamb meatballs about 3 to 4 minutes per side, until browned and cooked through. Medium is probably what you’re aiming for.

Serve the couscous with lamb meatballs and a salad if you like. Add a dollop of plain yogurt on top of the lamb if you have any on hand. Enjoy!

-Emily

lamb-meatballs-couscous-1

Categories
Recipes

bucatini with fava beans and creme fraiche

Last Tuesday, our friend Katie came to visit. Katie and I were roommates in college and it’s accurate to say that during our first year at Georgetown we subsisted on a diet of Thomas bagels, Zatarain’s instant red beans and rice and Haribo gummy bears, and usually all of them in one sitting. Thankfully, we’ve gotten past those horrifying dietary habits, and somehow I write a food blog and Katie cooks for a restaurant.

fava-bean-creme-fraiche-pasta-1

These days, Katie lives up in Boonville, CA and cooks for the Boonville Hotel. Boonville is just two hours North of San Francisco in Medocino County, but we’re not able to get together as often as the short distance would suggest. And so it’s a real good thing when I get an out-of-the-blue text from Katie saying that she’ll be in San Francisco for the day and would I be around?

There is nothing I like more than having someone over for dinner, and even more someone who’s happy to just sit down, shell some beans and chat about all matter of things while I sauté up a shallot. Not everyone can dig into big and important life questions while the other person flits from stove to sink, stirring this and washing that, but Katie doesn’t seem to struggle. We’re a good match.

Which brings me to pasta. This pasta comes together gracefully. You can carry on a conversation and still put a meal on the table in about thirty minutes. There’s nothing fussy about it, but looks and tastes like you did a whole lot more work. In case your market doesn’t have fava beans, you also could swap them for spring peas or asparagus cut into bite-sized pieces. I’m planning to do just that later this week. This recipe makes enough for three people as a main course.

fava-bean-creme-fraiche-pasta-3

Bucatini with Fava Beans and Creme Fraiche
12 oz fresh pasta, bucatini if you can find it, but any long noodley one will do
2 lbs fava beans, shelled
1 shallot, diced
2 tablespoons butter
3 oz creme fraiche
salt and pepper
parmesan, for grating on top

Put a pot of salted water to boil. Take the fava beans out of their pods. When the water is boiling, blanche the favas for a minute or two, until they turn bright green. Scoop them out of the hot water and into a bowl. Then peel off their outer skin. Keep the water boiling to cook the pasta in later.

In a large sauté pan, melt the butter over medium-low heat. Add the shallot and sauté for a few minutes to soften. When the shallot is soft, add the favas and sauté a minute or two more. Meanwhile, add the pasta to the boiling water. Cook the pasta 2 – 5 minutes, depending on its shape.

When the pasta is cooked al dente, scoop it from the water and add it to the sauté pan with the fava beans and shallot. Still over low heat, add the creme fraiche and stir to distribute. Easiest sauce ever. When it’s looking all saucy and delicious, scoop onto plates and garnish with a little grated parmesan.

fava-bean-creme-fraiche-pasta-2

-Emily

Categories
Recipes

asparagus tart

Spring is here and so are the asparagus! Though we really didn’t experience much in the way of winter this year in SF, I still can’t help but be happy it’s spring. The other night we had the most heavenly asparagus at our friends’ house. Among their many talents, Russ and Kelly have an impressive green thumb. They have a garden plot near their place in Potrero Hill and we were lucky enough to sample some of their freshly harvested asparagus. Sweet Demeter, it was the best asparagus of my life, and I couldn’t wait to get my hands on some more.

Asparagus Tart | The Answer is Always Pork

So on Sunday before Jordan headed out for work, we went down the Civic Center Farmers Market and picked up two beautiful bunches of asparagus. While these weren’t quite the caliber of Russ and Kelly’s, I was still pretty pleased. Hurray for spring! Hurray for asparagus!  

I decided to turn one of the bunches into a simple tart. The inspiration was from an old issue of Sunset magazine—a phyllo and tomato ‘pizza’ that I used to make at my mom’s house in the summers, but hadn’t made in years. I had some phyllo sitting in the freezer from another so-so experiment, and so this was a snap to throw together. It takes about 10 minutes to assemble, about 20 bake and then you’ve got a beautiful tart to show for your efforts. For a crust that is almost no work, this one is deliciously flaky and satisfying. And, bonus fun fact, phyllo dough is vegan … until you slather it in butter. Easy, fresh and delicious!

Asparagus Tart | The Answer is Always Pork


Asparagus Tart with Creme Fraiche
1 bunch asparagus (if you can snag ones that are the thickness of a pencil, that would be perfect)
8 sheets of phyllo dough (defrosted either on the counter for a few hours on in the fridge overnight)
4 tablespoons butter
1/2 cup creme fraiche
salt, pepper
parmesan, for shaving on top
a few lemon wedges, for serving

Preheat your oven to 425° F. Line a baking sheet with parchment paper. Wash and pat your asparagus dry.

In a small dish, melt the butter. Spread one sheet of phyllo dough on the baking sheet. Brush the entire sheet lightly with butter. Top with another sheet of phyllo. Continue brushing with butter and layering with the rest of the sheets.

Asparagus Tart | The Answer is Always Pork

Once you’ve stacked the phyllo, spread an even layer of creme fraiche in the middle of the dough, leaving a 1 1/2″ border along the sides. Arrange the asparagus evenly in a row. Fold the phyllo dough up around the asparagus and brush the border with the remaining butter. Sprinkle the asparagus with a little bit of salt.

Bake the tart for 20 – 25 minutes, until the edges are golden brown. Remove from the oven and top with some black pepper and shaved parmesan. Add a squeeze of lemon if you’re feeling feisty.

Asparagus Tart | The Answer is Always Pork

-Emily

Ps. This op-ed about food and health by Mark Bittman from this week’s New York Times is fantastic. Butter is back, and all I can say is 1000 times YES.

Categories
Recipes

curried butternut squash over farro

I don’t believe in diets. I think diets ruin food for you and for everyone you eat with. Instead I prefer to live by Julia Child’s philosophy—everything in moderation, including moderation. Life is just too short, and you only get one of ’em. But, I do believe that your body will tell you what it needs if you take the time to listen. After an epic weekend of eating with Jordan’s family (pizza at Pizzeria Delfina, followed up by cocktails at Hard Water, followed up by House of Prime Rib, topped off with brunch at Nopa), my body was screaming for some vegetables.

I love vegetables, and though it might be blasphemous to say so seeing as some folks around here consider bacon a food group, vegetables are probably the only food I could tolerate eating weeks on end. We have salad (or slaw or sautéed greens) with dinner every night, but salad as a meal just doesn’t cut it when you bike upwards of 20 miles a day like Jordan does. Plus, when you write a blog called The Answer is Always Pork, you can’t get away with hawking sissy vegetarian food. This dish is my compromise between the need to detox and the need to fuel my handsome nerdlover’s brain and body.

curried-butternut-squash-farro-1

So here we have a salad that does not mess around. Curry powder takes butternut squash to a wonderful warm and spicy place. Farro is one of the best grains out there—it blows quinoa out of the water; nutty and chewy, you don’t miss meat. Top it all with a lemony-yogurt sauce that adds just the right amount of brightness and you’ve got yourself a wining dinner.

It’s also all kinds of flexible. Instead of butternut, you could use whatever squash you’ve got lying around. Or heck, roast up some carrots or parsnips or celeriac. You can serve it hot, serve it at room temperature, serve it cold. Anything goes. This salad is your oyster. Now doesn’t my detox sound like fun?

Curried Butternut Squash & Farro with Lemon-Yogurt Sauce

For the squash
1 butternut squash, peeled and cut into 1 inch cubes
1 teaspoon – 1 tablespoon Indian curry powder (depending on how hot and fresh your curry is)
1 tablespoon olive oilFor the yogurt sauce
1/2 cup greek yogurt
1/2 lemon juiced
salt and pepper

1 cup farro (I like Trader Joe’s Quick Cook Farro – it cooks in 10 minutes and has great texture)
cilantro, for serving

curried-butternut-squash-farro-2 curried-butternut-squash-farro-3

Preheat your oven to 400 F. Line a baking sheet with parchment paper. Peel and cut your butternut squash into cubes. Toss with some olive oil, salt and curry powder and spread evenly on a baking sheet. I’d taste your curry powder—mine was very mild and I needed to use quite a bit to actually taste it when it was put up against the flavor of the squash. You can taste a piece of squash part of the way through cooking and if it is too mild, sprinkle on some more curry. You want this squash to pack a punch. Bake 30 – 40 minutes, until the squash is tender.

Meanwhile, mix the yogurt with lemon juice. Season with salt and pepper.  While the squash is baking, bring a pot of salted water to boil. Cook the farro according to the package directions, drain and toss with a little olive oil.

To serve, mound some farro up on a plate. Scoop on a healthy helping of squash and top with the lemon yogurt. Or throw it all in a tupperware and eat it like a heathen with your hands in the park because you forgot a fork. Either way, enjoy!

-Emily

curried-butternut-squash-farro-4