Categories
Recipes

oatcakes, or a meal in a muffin

oatcakes-6

It might look like a muffin, but this oatcake isn’t messing around with a delicate crumb, bright lemon zest or jammy berries. It is a breakfast that packs a punch, and by a punch I mean each one of these suckers has enough oats and nuts to leave you full for hours, even after a 2.5 mile walk to work or 2 hour surf sesh. While not the most nuanced of pastries, these oakcakes are great for what they’re designed to be—fuel.

Oakcakes, adapted from Heidi Swanson’s Super Natural Everyday
3 cups rolled oats, avoid instant oats if you can
2 cups whole wheat flour
1/2 teaspoon baking powder
2 teaspoons kosher salt
1 teaspoon cinnamon
1/4 teaspoon nutmeg
3/4 cup chopped walnuts, lightly toasted
1/3 cup coconut oil
1/3 cup butter
3/4 cup maple syrup
1/2 sugar
2 large eggs, lightly beaten

Preheat your oven to 325° F. Butter a muffin tin, or line it with adorable paper cups purchased in Japantown.

Combine the oats, flour, salt, baking powder, cinnamon, nutmeg and walnuts in a large mixing bowl.

oatcakes-1 oatcakes-2

In a medium saucepan over low heat, heat the coconut oil, butter, maple syrup and sugar until they melt and combine. Pour the coconut oil mixture over the oat mixture and stir to combine. Add the eggs and stir again until everything comes together. The dough  will be more the texture of granola than batter.

oatcakes-3 oatcakes-4

Spoon the dough into the muffin tins, spreading it amongst the 12 muffin cups. Bake for 25 – 35 minutes, until the edges of the oakcakes are golden.

oatcakes-5

Enjoy for breakfast or as a mid-day power snack. I’d recommend having some tea or coffee alongside these guys.

-Emily

oatcakes-7

Categories
Recipes

sushi

We’ve talked about how I have Jordan to thank for my love all foods fishy. Well, my gateway fish dish was sushi. It started innocently enough with a shrimp tempura roll, maybe some seared BBQ tuna, but soon morphed into hook me up with that chirashi, and stat. I love sushi, especially simple sushi. Vinegar rice + raw fish = perfection.

sushi-7

Which brings me to my next point, it is really hard to hide bad rice (or bad fish, but we’re not going there) when your dish has just two ingredients. Sushi rice is a special thing and insanely hard to make if you don’t have a decent rice cooker. The texture is paramount and we’ve struggled for years to get it right. First we gave it a go in a pot on the stove, and then in a subpar rice cooker. There were tears.

japantown-photo-square

And then for my birthday we went to Japantown. We looked at all the cute things (!!!), took some purikura photos and spent an hour and half in the Japanese supermarket. The very best part of the day (a tough call for me because I love just about everything Japantown has to offer) was that Jordan bought me my very own Zojirushi NeuroFuzzy rice cooker. It has a little computer inside. It sings to us when it starts and finishes the rice. You can customize the hardness or softness of your rice. You can keep rice warm in the cooker for days and it still tastes pretty darn good. NeuroFuzzy is amazing and will make you perfect sushi rice. It is also a very romantic gift.

sushi-1

Armed with a decent rice cooker and access to sushi-grade fish (YAY, JAPANTOWN!), we’ve been reveling in perfect chirashi. So simple and fresh and good. I am so happy. Sushi-happy, which I’m sure must be a phrase in Japanese, if only I spoke it.

Chirashi Sushi
For the sushi-su
1/4 rice vinegar
2 tablespoons sugar
2 teaspoons salt
2 cups sushi rice
your favorite raw fish, sliced thinly

Make the rice according to your rice cooker’s instructions. Rice cookers know all. In a small pan over low heat, heat the rice vinegar, sugar and salt and mix until combined. Remove from the heat and let cool. Once the rice is finished cooking, transfer it to a large shallow bowl. Drizzle the sushi-su over the rice and stir the rice gently to incorporate the sushi-su and cool the rice.

sushi-4 sushi-2

Thinly slice your fish using the sharpest knife you’ve got. Mound a small pile of rice on a plate and top with slices of fish. Serve with soy sauce, wasabi and pickled ginger.

sushi-5 sushi-6

And lastly, if I wasn’t already obsessed with Japan (so much cute!) and Japanese cuisine, we watched this fantastic documentary that transformed the way I look at sushi. I also recently read this wonderfully funny book that made me want to travel to Tokyo and eat everything, immediately.

-Emily

sushi-3

Categories
Recipes

chocolate chip zucchini bread

It’s late summer which means that you probably have zucchini the size of toddlers growing in your backyard or left on your doorstep in the night by a neighbor or delivered in your CSA box. This recipe is here to help you out. We made several variations, tweaking the recipe each time to maximize the amount of zucchini used, minimize refined sugar and retain deliciousness. I won’t claim this bread is healthy, but I also don’t think you should feel guilty eating it for breakfast. You are using up those zucchini after all.

zucchini-bread-5

Chocolate Chip Zucchini Bread
1 1/2 cup all-purpose flour
1 1/2 cup whole wheat flour
1 teaspoon salt
1 teaspoon baking powder
1 teaspoon baking soda
1 teaspoon cinnamon
1/4 teaspoon nutmeg
3 eggs
2/3 cup coconut oil (or vegetable oil)
1 cup crushed pineapple
3/4 cup granulated sugar
2 1/2 cups zucchini, shredded
1 cup walnuts
1/2 cup chocolate chips
1/2 cup flaked coconut, toasted (optional – we did it once, but didn’t repeat for the next few batches)

Preheat your oven to 325° F. Grease two loaf pans with butter and dust with flour.

zucchini-bread-2-1zucchini-bread-1

Combine flours, salt, baking powder, baking soda, cinnamon and nutmeg in a medium bowl. In a large bowl, whisk together eggs, oil, pineapple and sugar.  Add grated zucchini into to the other wet ingredients. Add the dry ingredients to the wet and stir until just combined.

zucchini-bread-2

Stir in walnuts, chocolate chips and coconut if using. Divide batter into two loaf pans. Bake 30 – 40 minutes, until a tester inserted into the center comes out dry.

zucchini-bread-3 zucchini-bread-4

Enjoy! For breakfast, lunch and dessert!

Categories
Recipes

pancakes with white peaches

sour-cream-pancakes

I used to think Bisquick pancakes were the end-all-be-all of pancakes. They were what my Nonnie made for us for breakfast when we stayed at her place, and what my dad made for us when we had breakfast for dinner. My dad was especially talented at making shaped pancakes. Anyone can make a Mickey Mouse pancake, but my dad was (and probably still is) a true pancake artist. He could make just about anything you’d ask for—even adding the batter at different times to make faces, fins or fur. T-Rex, killer whale, guinea pig, we’d name it and he’d make it.

Another childhood favorite was my dad’s ‘special pancakes’, his version of crepes. They were just your standard Bisquick pancake recipe with enough extra milk to make the batter runny enough to coat a pan, and we loved them. While he’d cook up a stack of special pancakes, he’d tell us about how he used to make them for his college football team. He’d wax poetically about how much the guys loved them, and how he’d never give up his secret recipe. All those years of practice making pancakes for a bunch of football players paid off—my dad is good at flipping crepes. We’d snatch them hot off the pan and roll them up like little burritos with a filling of syrup, whipped cream, strawberries, peaches, powdered sugar, chocolate sauce, whatever we had around and could get away with.

Needless to say, my attachment to Bisquick pancakes is a serious thing. Being both a diligent food blogger and generally opposed to processed food products, I’ve tried to find a ‘from scratch’ recipe that measures up to my Bisquick memories. Sadly, every recipe I tried was a disappointment.

sour-cream-pancakes-2

And then I found these pancakes. Insanely fluffy, just the right amount of saltiness, not too sweet, a hint of spice. They are perfection in a pancake.  They have more depth than the old Bisquick standby, but I’ve never finished them disappointed craving a ‘real’ pancake. While I may never find a pancake that replaces Bisquick pancakes in my heart, these are a very close second.

Sour Cream Pancakes with White Peaches, adapted from the Smitten Kitchen Cookbook
1 egg
1 cup sour cream (8 oz)
1/4 teaspoon vanilla extract
2 tablespoons sugar
1/4 teaspoon salt (heaping 1/4 teaspoon of Kosher salt, a level 1/4 teaspoon if you’re using table salt)
1/4 teaspoon ground cinnamon
A pinch of ground nutmeg
3/4 cup all purpose flour
1 teaspoon baking powder
1/2 teaspoon baking soda
butter for the pan
1 – 2 white peaches, depending on their size and how much you like peaches
maple syrup for serving

sour-cream-pancakes-1

Preheat your oven to 250 degrees and place a cookie sheet or heatproof plate on the middle rack (to keep the pancakes warm while you cook the other batches). In a large bowl, whisk together egg, sour cream, vanilla and sugar. In another bowl, combine, salt, cinnamon, nutmeg, all-purpose flour, baking powder and baking soda. Fold the dry ingredients into the wet, stirring just to combine. The batter will be a little lumpy.

Heat a skillet over medium-low heat (I usually just use the nonstick to keep things easy) and add a pat of butter. When the butter is bubbling, spoon in the batter. I can usually fit about 3 pancakes in my 10″ skillet – they expand as the cook. When they start to bubble and the edges are dry, about 3 – 4 minutes, flip them. Cook them another few minutes on the other side and then transfer to the oven while you cook the rest.

While the pancakes are cooking (or before if you’re nervous about burning things), cut the peaches into small chunks.  To serve, make a short stack, pile on the peaches and top with maple syrup!

sour-cream-pancakes-3

Ps. Don’t be scared by the cup of sour cream. It is GOOD. Just go with it. Also, who doesn’t have a tub of sour cream languishing in their fridge left over from a taco night. This is the perfect way to use it up.

-Emily


Categories
Recipes

vegetable ‘ceviche’ salad

vegetable-ceviche-6-1

Jordan and I stumbled upon a recipe for vegetable “ceviche” when we were on a plane to Idaho a few weeks back. At first I thought it just sounded silly, like vegetarians trying too hard. For something to be ceviche, fish is a requirement. But, we let the thought marinate (ha), made the dish, and it was tough to come up with something else to call it. Diced raw vegetables with lime juice doesn’t quite have the same ring to it.

So here we are, eating ceviche sin pescado and liking it. Liking it a lot. Chop up a little of whatever summer produce you’ve got hanging around, mix that with a ton of lime juice, some cilantro and an onion. Let the mixture sit together for an hour or two and call it dinner. Ceviche bonus points if you’re into practicing your knife skills and everything you dice comes out perfectly uniform. Ladies and gentlemen, let it be known, my man can dice like the best of ’em.

vegetable-ceviche-1vegetable-ceviche-3

Vegetable ‘Ceviche’ Salad 
2 ears of corn, cut of the cob
2 cucumbers, diced
3 tomatoes, chopped
1 red onion, diced finely
3 sweet peppers, diced
2 avocados, cut into cubes
1 bunch cilantro, choped
3 limes, zest of 1 and juiced
salt

In a large bowl, mix together corn kernels, diced cucumber, chopped tomatoes, diced sweet peppers, diced red onion, chopped avocado and cilantro. Douse liberally with lime juice and season with salt. Let sit at room temperature for an hour or two. Stir again and serve.

vegetable-ceviche-5

Because of all the lime juice, this salad survives quite well in the fridge for a few days.

vegetable-ceviche-7

-Emily

Categories
Recipes

bo-berry pie

berry-pie-with-titles

A few Saturdays ago before there wasn’t a wave in sight, Jordan and I went surfing in Bolinas. It was lovely and sunny and summery. We met up with friends, the waves were tiny and fun. Jordan worked on his cross step (ever the over-achiever), I worked on turning and not falling (it’s doubtful I will ever be an athlete). Best of all, we parked next to a serious bramble of wild blackberries. Best part of surfing = wild blackberries? See the previous statement. Ever thinking about what I can cook and when I can eat it, I was determined to take advantage of this prime parking spot and pick a few pints post-surf.

After we packed up the car, I put Jordan to work and we picked a bunch of blackberries. Hands and feet were scratched in the process, but I knew there’d be a handsome reward. Tiny and tart, I decided a pie would be the best way to showcase them. And so here we are—a blackberry pie made with wild blackberries picked in Bolinas after a day of surfing, topped with vanilla ice cream. With that back story, how could it be anything but perfect?

When life seems particularly grim—and lately it has been testing me—I hope I can think back to this day and this pie and remember there are still many, many good things. Good things like homemade blackberry pie, like Bolinas, like a summer surf sesh with good friends, and like my sweet Jordan who never fails to trust my blackberry-picking whims.

blackberry-pie-2

Bolinas Blackberry Pie
For the Pie Crust 

2 1/2 cups all purpose flour
1 1/4 teaspoons kosher salt
2 1/2 sticks unsalted butter
about 5 tablespoons ice water

In a food processor, combine flour and salt. Remove the butter from the fridge and cut into 1 inch cubes. Add them to the flour mixture. Process until the butter chunks are about the size of peas. Add the water and pulse a few times to combine. Divide into two equal balls, flatten into 1″ thick discs, wrap in plastic wrap and refrigerate for at least two hours or overnight.

blackberry-pie-1

After the dough has chilled, roll out one of discs and line the bottom of a 9″ pie dish.  Put it back in the fridge while you mix the filling. Lukewarm, uncooked pie crust is sad a sight.

For the filling
4 cups blackberries, rinsed
3/4 cup sugar (taste your blackberries, if they’re sweet, you might want to cut back the sugar)
1/4 cup flour
1 lemon, juice and zest

blackberry-pie-4blackberry-pie-3

Preheat your oven to 350° F. Gently mix the blackberries, sugar, flour and lemon juice and zest in a large bowl. Pour into the pie shell. Top with a second full crust, or cut the dough into strips and weave a lattice.

blackberry-pie-5blackberry-pie-6

Bake 1 hour, until the pie crust is golden brown. Let cool before serving.

blackberry-pie-7

Bo-berry pie is best enjoyed with a scoop of vanilla ice cream while watching Star Trek. Or eaten for breakfast so you can get decent light to take a photo.

blackberry-pie-9

-Emily

Categories
Recipes

enchiladas suizas

enchiladas-suizas-1-text
I’ve been thinking about making these enchiladas for months. Correction, I just looked at the issue of Saveur from whence this recipe came and it was the August/September 2012 issue.  So I’ve been dreaming of these enchiladas for a year. I saw their picture in the magazine and knew I had to eat them. When we discovered a few weeks ago that there was indeed a latino market in our neighborhood (I cannot explain why this discovery took three years), my dream was realized.

Enchiladas suizas are a specialty originally served in a Mexico City department store called Sanborns. Their recipe is apparently the best and while there are stateside renditions, those supposedly pale in comparison. Chicken-filled tortillas blanketed in a creamy tomatillo salsa, topped with salty, melted cheese. Ya, I can see how those would win an enchilada contest.

And so I made them. And they are indeed amazing. They make all the other enchiladas feel sad and inferior with their spicy, tangy, creamy, cheesy majesty. Now every time I have enchiladas, I will wish they were these enchiladas. If that doesn’t convince you to make them, you cannot be saved.

enchiladas-suizas-8enchiladas-suizas-13

Enchiladas Suizas, adapted from Saveur Magazine, Aug/Sept 2012
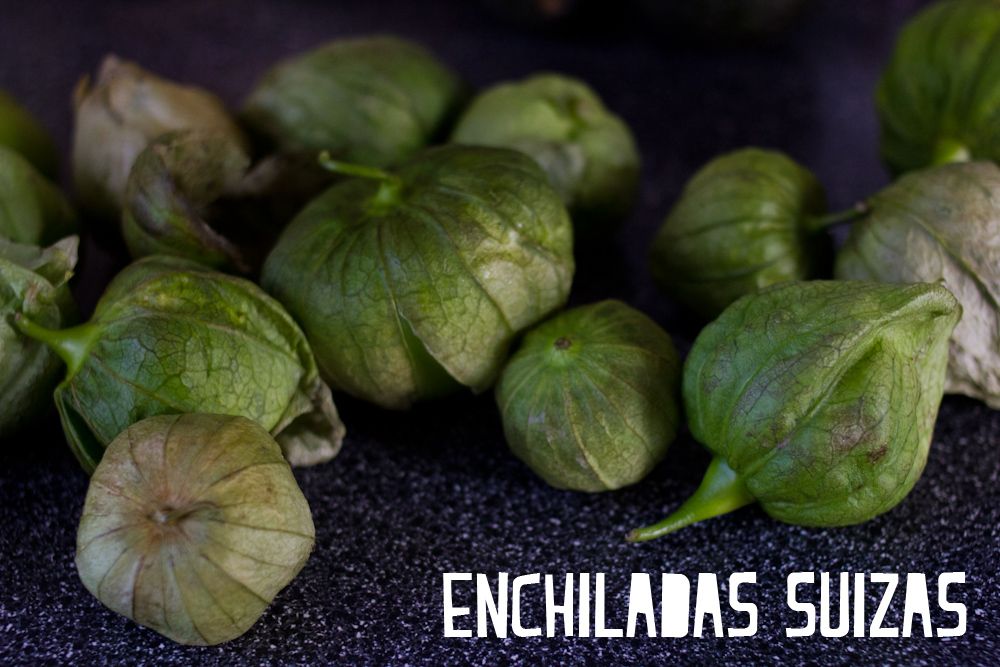
2 lbs tomatillos, husks removed and rinsed
2 serrano chilis, stemmed
2 poblano chilis
1 cup cilantro, roughly chopped
1 cup sour cream
1/2 teaspoon cumin
4 cloves garlic, roughly chopped
kosher salt, fresh black pepper
8 corn or flour tortillas
3 cups cooked shredded or chopped chicken
1 1/2 cups grated queso Oaxaca (or mozzarella)

The first question is, do you have shredded chicken sitting in your fridge? You do, you lucky duck. You don’t, no problem. Heat your oven to 425° F. In a small baking dish, bake four boneless, skinless chicken thighs for about 20 minutes, until the internal temperature is 165°. Take them out of the oven, let them cool and chop or shred with a fork, depending on your preference.

enchiladas-suizas-4

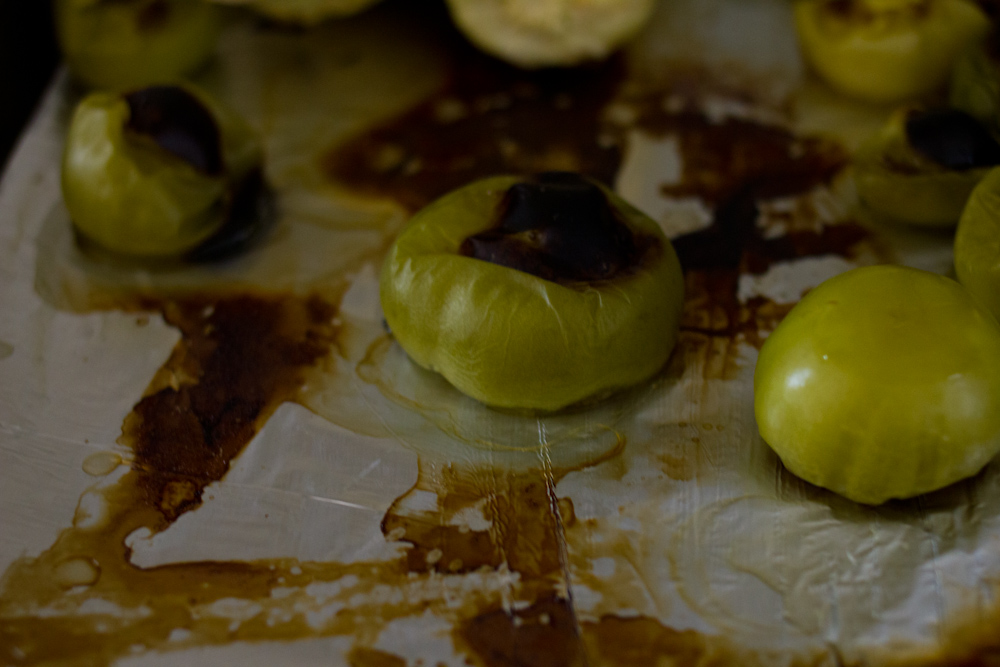
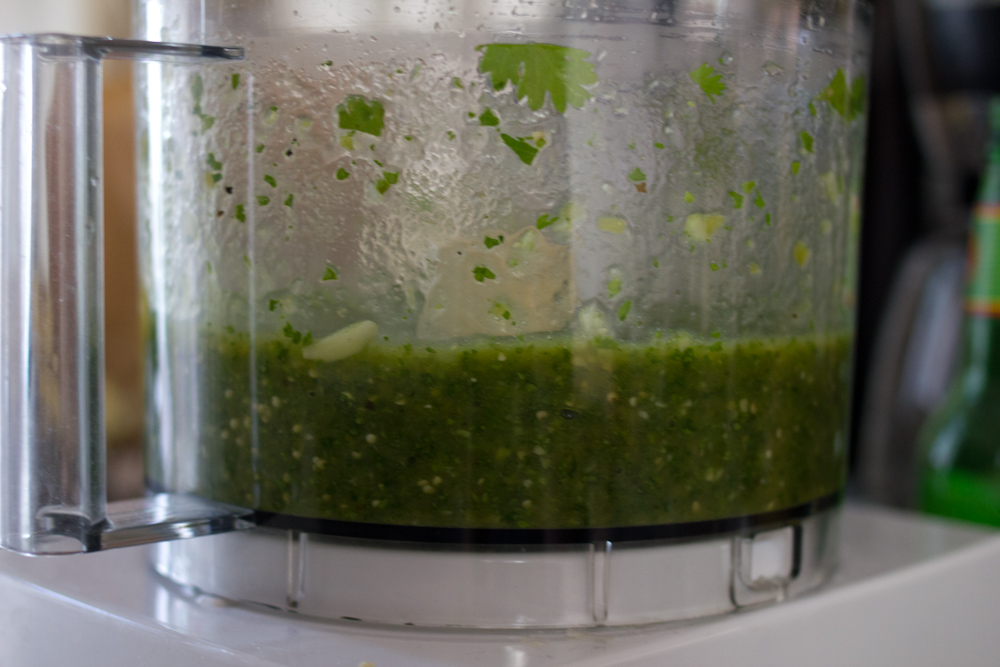
Arrange your oven rack to be four inches from your broiler and heat broiler to high. Line a baking sheet with tin foil. Broil tomatillos, serranos and poblanos, until blackened, turning occasionally to brown all sides. Let cool for about 10 minutes and discard any skins. I did a half-hearted job of removing the skins and it turned out just fine. Remove the stem and seeds from the peppers and chop into rough chunks. Transfer tomatillos, serranos and poblanos to a blender or food processor. Add the cilantro, cumin, garlic, and a pinch of salt. Plus to combine. Add the sour cream and whizz until smooth. Taste for seasoning. Season with more salt and pepper.

enchiladas-suizas-5enchiladas-suizas-6

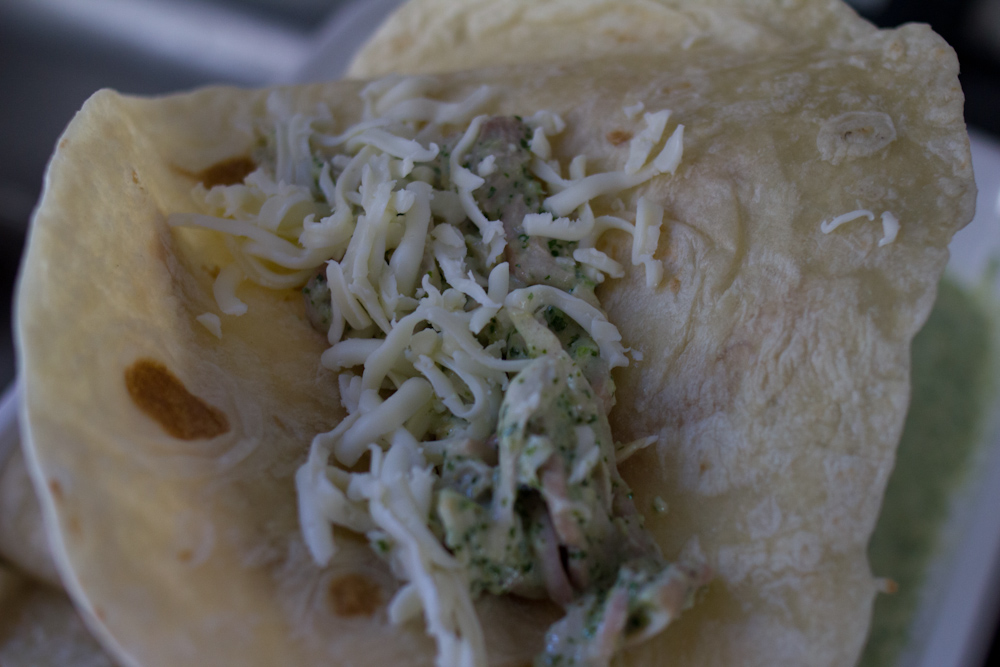
To assemble, coat the bottom of a baking dish with about 1 cup of the sauce. In a large bowl, combine chicken with 1 cup of the sauce. Toss to coat all the chicken. Grate the queso Oaxaca. If using corn tortillas, you’ll need to fry them for a minute or two in some vegetable oil so that they are pliable enough to roll into tubes. If you’re a gringa and have an undying love for flour tortillas, you’re good to go.

enchiladas-suizas-7

Divide sauced chicken evenly among the tortillas. Sprinkle with a little bit of cheese and add to the sauce-coated pan. After you’ve rolled all the enchiladas, cover the dish with the rest of sauce and sprinkle with a healthy dose of cheese.

enchiladas-suizas-9 enchiladas-suizas-11

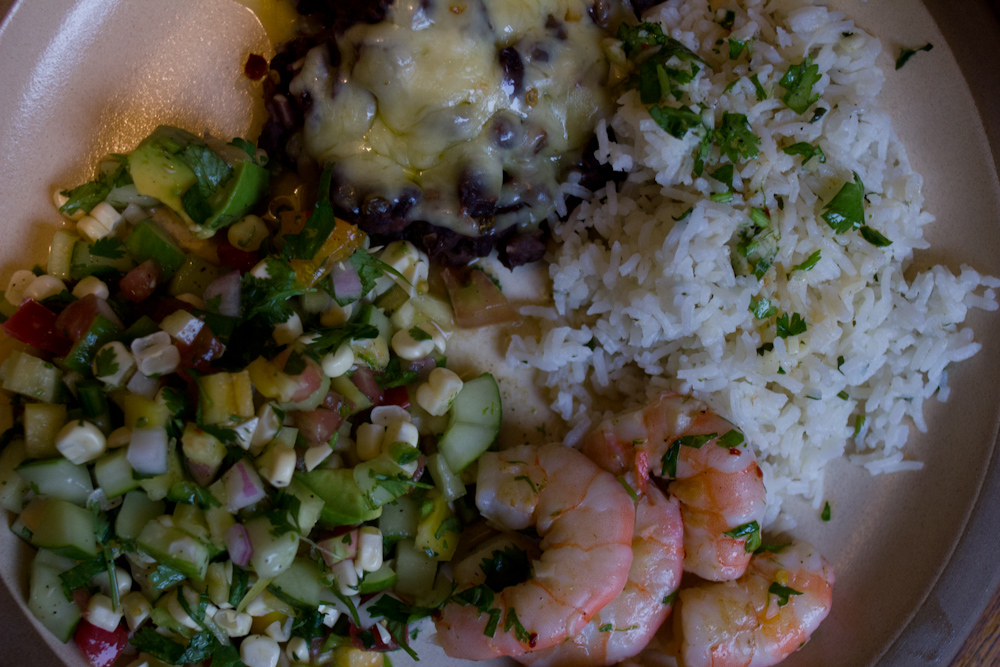
Heat your oven to 375° F. Bake enchiladas until the sauce is bubbling and the cheese is melted, about 25 minutes. Take care not to bake the enchiladas too long, you don’t want that luscious sauce to evaporate. Remove from the oven and let cool 10 minutes. Serve with plenty of sauce, crema and the salsas of your choice.

enchiladas-suizas-14

Pico de Gallo
1 lb fresh tomatoes, chopped
1/2 red onion, diced
1/2 bunch cilantro, chopped
1/2 – 1 jalapeño, stem and seeds removed, diced (depending on how spicy the pepper)
2 – 3 limes, juiced
salt

In a medium bowl, combine tomatoes, onion, cilantro, jalapeño and lime juice. Season with salt.
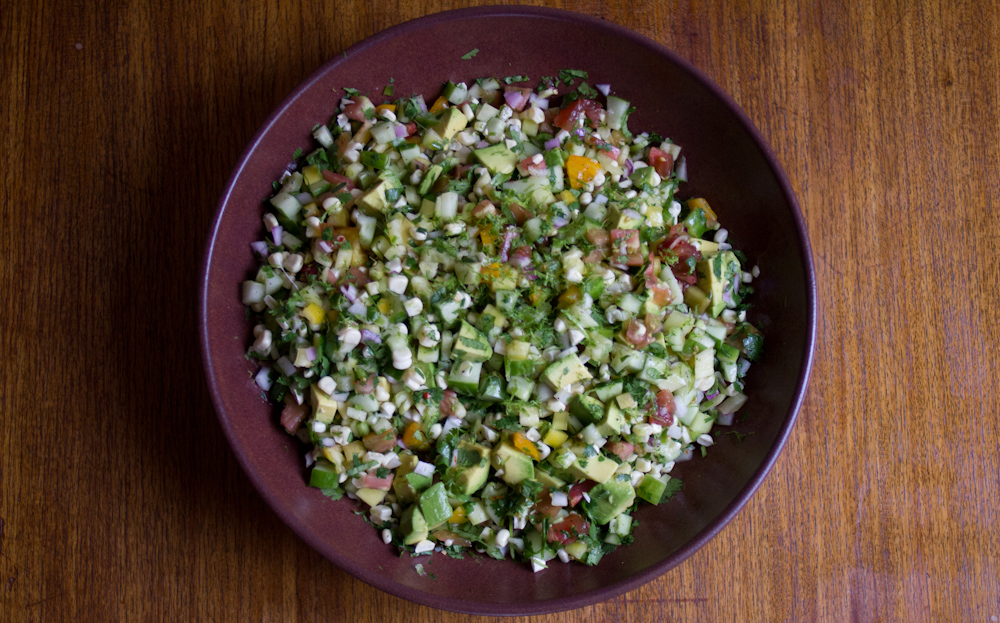
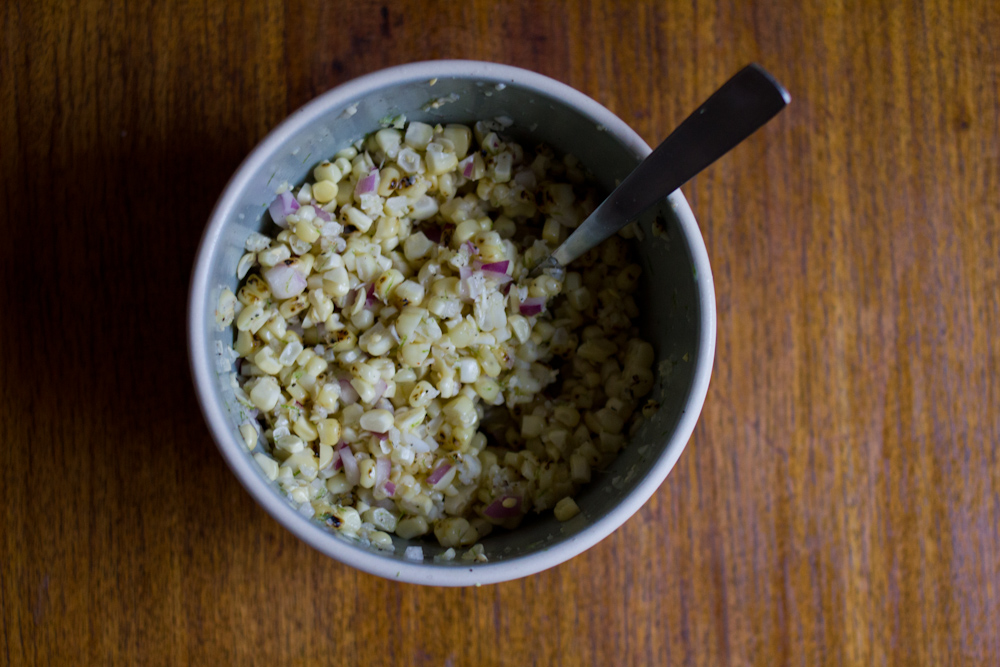
enchiladas-suizas-2

Roasted Corn Salsa
2 ears of corn, roasted over a gas stove, broiled or grilled
1/2 red onion, diced
1 – 2  limes, juiced
salt

Roast your ears of corn over a gas flame, until they are browned in parts, but still uncooked in others. Cut the corn off the cob. Combine in a medium bowl with the red onion and lime juice. Season with salt.

enchiladas-suizas-3enchiladas-suizas-12

Quick and Easy Black Beans
2 cans black beans
1 small onion, diced
3 cloves of garlic, chopped
olive oil
salt, pepper
ancho chili powder

In a medium sauce pan over medium-low heat, saute the onion until translucent, about 8 minutes. Add the garlic and saute another minute more. Add the cans of black beans and their juice. Reduce heat to low. Season with salt and pepper. Add a good pinch of ancho chili powder. Ancho chili powder is great in this recipe. It adds smokiness and depth, and because black beans have such a mild flavor, the ancho is able to really shine. Simmer until about half of the liquid has evaporated. Serve topped with crema.

enchiladas-suizas-15

-Emily


Categories
Recipes

pimm’s cup popsicles

pimms-popsicles-for-edits-3

This is a perfect popsicle for summer. Light, refreshing, just slightly boozy, it is everything you want to eat/drink on a late summer afternoon. Trust us, it is hard to only have one. (Famous last words). Now if only it was a bit warmer than 60° in SF.

Maybe you’re curious. What exactly is a Pimm’s Cup? Well, I’m glad you asked. Pimm’s originally made a variety of liquors numbering one though six, each based on a different spirit. Sadly, all fell out of production aside from No. 1. Pimm’s No. 1 is based on gin and apparently was deemed worthy of keeping around. It can be served over ice or mixed with soda and variety of chopped fruits. Pimm’s Cups (Pimm’s No. 1 + soda + fruit) are now a popular drink at snazzy British events like Wimbledon and polo matches. They are also extremely popular with not-British, non-polo-playing me.

I like everything about a Pimm’s Cup. Citrusy, slightly spicy, just a hint bitter, with cucumber notes that aren’t shy—it is a perfect cocktail. I’d dare to say it has universal appeal, especially in the summer. Which is precisely why I thought it should be turned into a popsicle. And here we are.

pimms-popsicles-for-edits-2

Pimm’s Cup Popsicles
4 strawberries, cut into quarters
8 – 10 slices of cucumber
2 sprigs of mint
3/4 cup Pimm’s No 1
1-12 oz bottle ginger beer
1-12 oz bottle lemon soda

pimms-popsicles-1 pimms-popsicles-2 pimms-popsicles-3

Cut the strawberries and cucumbers into slices. Pour 3/4 cup Pimm’s No. 1 into a glass measuring cup. Add cucumber, strawberries and mint. Cover and let this mixture steep in your fridge for a day or two. This will allow the cucumber, mint and berry flavors to infuse into the Pimm’s.

pimms-popsicles-4

Pour the Pimm’s mixture through a strainer into a large glass measuring cup. Add 1/2 bottle ginger soda and 1/2 bottle lemon soda to the Pimm’s. Taste. If it’s a little boozy for your taste, add some more soda. Pour into your popsicle mold and freeze four hours or overnight.

At this point I should admit that this might not have been one of my best laid plans. Carbonation + popsicle mold = small popsicle explosion in my freezer. When I opened my freezer I felt instant dismay, but then I tasted some of the frozen Pimm’s Cup bursting out the top of my popsicle mold. GOOD GOLLY. Delicious. So, throw a cookie sheet or plate under your popsicle mold and be happy with slightly unattractive popsicles. It’s worth it.

pimms-popsicles-5

If you’re of the mind that one should avoid popsicle mold overflow, I do think this would make an awesome granita. Pimm’s Cup slushy anyone? Simply pour the whole mixture into a large, shallow tupperware, large enough to leave an inch or two of space from the top rim. After two hours, take a spoon and scrape it along the top and sides to break the ice crystals forming. Put it back in the freezer for another hour or two. Scrap again. Back in the freezer for a bit, scrape again, until you’ve got a slushy-like consistency or until you can’t take waiting for your frozen cocktail any longer.

pimms-popsicles-for-edits-1

And, because it wouldn’t be popsicle week if I didn’t share some of the pops invented by the rest of the rad food blogosphere that Billy rounded up, here are some I most certainly will make when San Francisco gets her Indian Summer in October …

Coffee-Dulce de Leche Frozen Yogurt Pops from Piece of Cake for Jordan who loves dulce de leche almost as much as he loves bacon.

Peach Julepsicles from Southern Souffle because frozen bourbon on a stick! What could be better?

Chocolate-Covered Toasted Coconut Pops from An Edible Mosaic and/or Chocolate-Dipped Coconut + Rum Popsicles from Hungry Girl Por Vida because our obsession with Trader Joe’s Coconut Water Fruit Floes has put us on a permanent coconut kick.

Green Smoothie Detox Pops from Top with Cinnamon for after all these other pops.

If you want to see the entire round up and fill your freezer full of frozen goodness, visit Wit & Vinegar. It is worth the trip.

-Emily

Categories
Recipes

chipwiches!

popsicle-week-test

It’s the first ever Popsicle Week here on the old bloggity. We’ll be featuring a few recipes by yours truly and some other gems from rest of the participating food blogiverse. 26 bloggers, 26+ popsicles. It’s a popsicle party and you’re invited.

chipwiches-9

First, just to buck non-existent tradition, we’re starting off with chipwiches! While not at all a popsicle, chipwiches are a novelty ice cream treat that can be procured in the same section of the grocery store as popsicles. Also, they are very delicious. Based on these facts alone, I’ve deemed it acceptable to submit a non-popsicle as my first entry into these great popsicle olympics.

chipwiches-6

Vanilla ice cream sandwiched between two chocolate chip cookies, chipwiches are as delicious as they are decadent. They show none of the healthy restraint of a fruit pop, nor are they a particularly revolutionary dessert. But, they are dang good and every time I visit the corner store, I consider grabbing one, and that really is enough for me.

Chipwiches!
For the cookies
2 1/2 cups all-purpose flour
1 teaspoon baking soda
1 teaspoon salt
1 cup butter, softened
3/4 cup granulated sugar
3/4 cup brown sugar
2 large eggs
1 teaspoon vanilla
2 cups semi-sweet chocolate chips (Guittard is king)

Preheat oven to 375 degrees.

In a medium bowl, mix together flour, baking soda and salt. In the bowl of a mixer, beat the butter until it is light and fluffy. Add the sugars and beat a few minutes more. Beat in eggs and vanilla until smooth. Gradually add the flour mixture and stir to combine. Add the chocolate chips.

chipwiches-1-1

Spoon well-rounded tablespoons onto a cookie sheet. Take care to make your spoonfuls as even as possible. Sandwiching does require a certain degree of precision. Bake 8 – 10 minutes, until just starting to brown on the edges. Remove from the oven and let cool.

chipwiches-3

chipwiches-5

To assemble
1 quart vanilla ice cream (We’ve done a lot of testing and Trader Joe’s Vanilla Ice Cream is our current favorite. If you’re feeling feisty, you could make your own, but that’s bonus points.)
a large-ish spoon
a cup of warm water
a parchment paper lined cookie sheet
room in your freezer

Once your cookies have cooled, remove the ice cream from the freezer. Put the cookies (two for each sandwich you want to make—we made 8) on the parchment lined sheet and let them sit in the freezer for 15 minutes. Let the ice cream soften for 15 minutes to make it easier to scoop and shape.

chipwiches-4

chipwiches-7

Using a large spoon, spoon a few decent scoops of ice cream onto your base cookie. You can rinse the spoon in warm water between scoops if your ice cream is sticking too much to your spoon and giving you trouble. Top the ice cream mound with another cookie and smooth the edges to make sure you’ve got a firm adherence between ice cream and cookie. Return the chipwich the cookie sheet. Repeat with the rest of the cookies. Return the chipwiches to the freezer and freeze for another hour to two. After a few hours in the freezer, the chipwiches will meld, transitioning from separate ice cream and cookie entities to a chipwich sum greater than its parts (depending on who you ask around here).

chipwiches-8

We recommend you eat chipwiches for dessert after a large meal of burgers and fries.  You want the true American summer experience, after all.

-Emily

Categories
Recipes

spaghetti carbonara revisited

A few years ago when we first started the bloggity, Jordan wrote a post about carbonara and his love for it. Because his post was so great (and we rarely hear from Jordan any more—dang grad school), we are going to run it again with our updated carbonara recipe. Enjoy!

+++

carbonara-6

Let me begin by saying that this is one of those perfect dishes; nothing is wrong with it, nothing needs to be added and nothing needs to be taken away.  Spaghetti alla carbonara is a wonderful mix of egg, pancetta, parmigiano reggiano, and black pepper which form a silky sauce for the pasta.  Not only is it a perfect meal, but it’s quick and easy to make.  Before I get to the recipe I’ll give you a sneak peek into my past and what this dish means to me.

When I was a young food nerd on my first (and hopefully not last) trip to Europe, I given some excellent advice from my father: “eat as much spaghetti alla carbonara as possible because it’s very difficult to find in the US.”  I did.  In fact, I believe I at spaghetti alla carbonara five times during my six days in Italy. This was back in 2004, and I’ve only tried to recreate the magic once.  My first attempt probably wasn’t long after the trip and needless to say, it wasn’t quite as good as the stuff from overseas.  Fortunately, since then I’ve become much more proficient in the kitchen and, inspired by the amazingly fresh eggs in our CSA box, I decided to give it another go.

It really is an amazingly simple dish, but I still used a recipe for guide.  Emily recommended the version from Ruth Riechl’s Garlic and Sapphires, which immediately appealed to me due to her substitution of bacon for pancetta.  Now I’m sure some people would find this blasphemous, but I prefer the flavor of bacon and I think that the use of pancetta may have been my downfall all those years ago in my first attempt.  So, with the pork issue sorted out, it’s time to get cooking.

carbonara-5

Spaghetti alla Carbonara
1 lb spaghetti
3 – 4 slices of bacon, cut into 1/4″ pieces
2 – 3 cloves of garlic, cut in half
2 eggs
1/2 cup parmesan cheese, grated
salt and fresh black pepper

carbonara-1

First, bring a large pot of water to boil, then add a nice handful of salt.  Meanwhile, cut bacon into 0.25 inch slices.  Cook the bacon and garlic in a saute pan over medium heat.  Allow the bacon to render its fat and start to crisp at the edges.  Don’t cook it like you’re serving it for breakfast because you need it to be soft to incorporate into the sauce.

carbonara-2

While the bacon is cooking, in the bowl you are going to serve the pasta in whisk together the two eggs. Add a pinch of salt and a pretty good amount of freshly ground black pepper.  Then grate a generous half a cup of parmigiano reggiano into another bowl (don’t skimp here, buy the good stuff).

carbonara-3

When the pasta is done cooking reserve about a quarter cup of the cooking liquid and add the drained pasta to the egg mixture in about three batches, mixing each time.  This tempers the eggs (cooks them slowly) so they don’t curdle.  Once all the pasta is in, add the bacon, its fat, the garlic cloves and the parmesan.  Toss it all together and add some of the reserved water if the sauce needs to be looser.  Serve immediately with more parmesan and pepper.

carbonara-4

Conclusions:  Awesome!  Just as good as Italy.  If you execute it properly, without over-thinking it, and use good quality ingredients, it will be perfect.

Also, if you have one of those pasta spoons with the long tines, it works really well when adding the pasta to the eggs because the pasta still holds onto some of the water so you don’t have to add it later.

-Jordan