Categories
Recipes

roast chicken

This past week, we had a wonderful opportunity through Eatwell Farm, our CSA farm, to cook three very special chickens. The chickens are a heritage breed, Black Australorp, and were raised in the open air on pasture for the past four months at their farm as part of a sustainable poultry project they’ve been developing at the farm. The birds were harvested the very same morning they were dropped off with me. I know for a fact that I’ve never had the chance to cook a chicken as fresh or as humanely raised as these beauties, and the experience was delicious from start to finish.

eatwell-chicken-3eatwell-chicken-5

In the United States, and especially in big cities, we’re incredibly distanced from where our food comes from. Our meat comes butchered, pre-packaged and shrink-wrapped, even if we’re shopping at quality markets. It’s very easy to forget that meat comes from animals, animals who gave their life so that we could take pleasure in eating them. It’s a convenient system, but I find, even as a person who thinks about food a lot, I often forget this incredibly important fact.

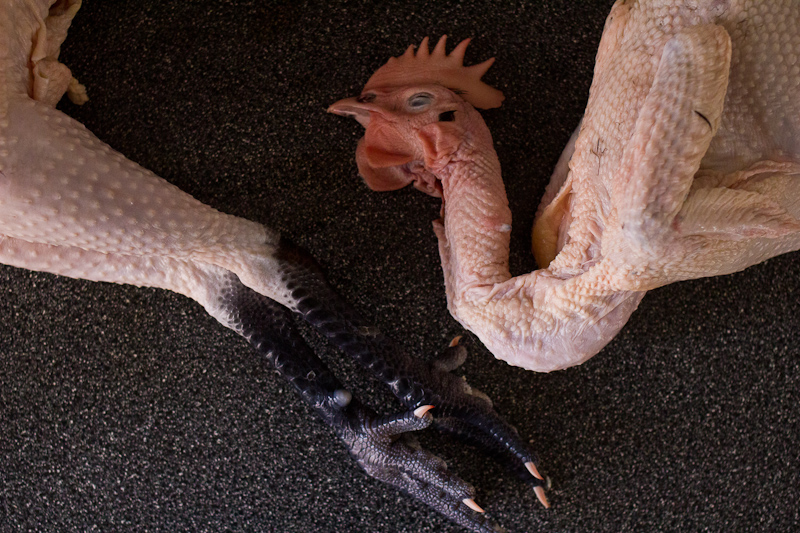
And so it was exciting, and intimidating, to be handed three large birds with head and feet still attached on Friday afternoon. They were impressive and a bit scary with their black talons sticking eight inches out of a plastic bag. But what I did not expect when I signed up to test cooking a few chickens was how differently I’d feel about the birds because of this simple change in butchering style.

eatwell-chicken-1eatwell-chicken-2

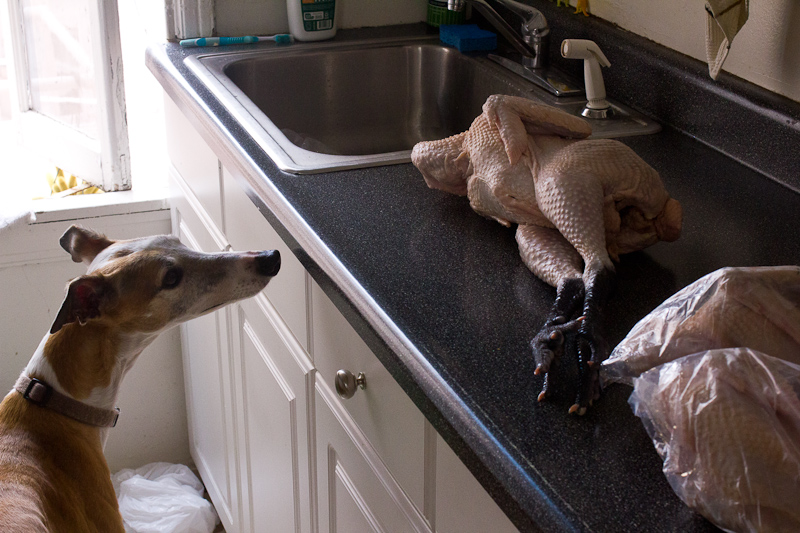
My emotional connection to sitting down for a meal is very strong, but I’ve never experienced that type of connection with a piece of raw meat before now. Sure I’ve appreciated a steak for it’s perfect marble, but holding that chicken’s head in my hand, examining it’s long, lean legs, I felt an entirely new appreciation for the creature and for the effort that went into raising it. Because it was undeniable that the bird I was planning to cook was a very real animal, cooking it was even more meaningful. I could begin to grasp the sacredness this exchange. That awareness is something that we don’t often experience with city living, and I’m grateful for it. Being more thoughtful and emotionally engaged is always a good thing, especially regarding something we do every single day—eat.

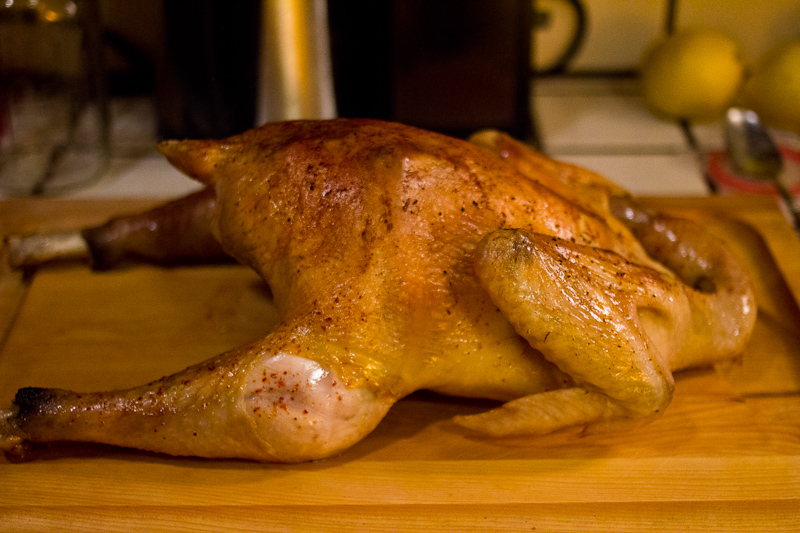
Now, what you really want to know—how did that handsome bird taste? The skin was phenomenal. Thicker and fattier than a typical store-bought chicken, which meant it crisped up into perfect chicken cracklins! I could have eaten the whole birds worth on my own. The meat was far more complex than a conventional bird, even the breasts had a ton of flavor. The thighs and legs were not as tender, but I liked that, evidence that the bird used it’s muscles like it was meant to. Our friend Josh thought the chicken tasted wild, and meant that in the most complimentary way possible. Thanks to these chickens, we had two very special meals, and I’d jump at the chance to cook more of these wonderful birds.

eatwell-chicken-4eatwell-chicken-6

Roast Chicken with Butter, Piment d’Ville and Lemon
1 whole chicken
kosher salt
4 tablespoons butter, melted
Piment d’Ville (or other mildly spicy and flavorful pepper, piment d’espelette, paprika, ancho chili)
1 lemon

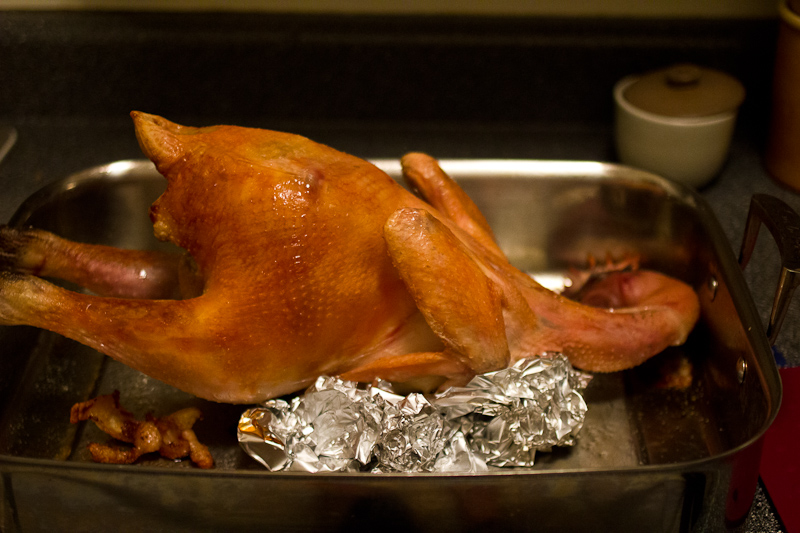
A note on my butchering before we begin, I roasted these birds the same way on two separate occasions. One I brought over to our friends place, and not knowing the size of their oven, I cut off part of the legs and butterflied the chicken. These were tall chickens! The other I roasted at home and left completely intact, using tinfoil to keep the bird upright. I must say quite enjoyed the presentation!

One day before you plan to cook your chicken, sprinkle it liberally with salt. I like to use about 1 teaspoon per pound, as the wonderful Judy Rodgers of Zuni Café recommends (and if anyone knows a roast chicken, it’s Zuni). Salting early allows the salt to really permeate the meat and keeps it very moist after cooking.

Preheat your oven to 400° F. Place your chicken in the center of a large roasting pan. After about 25 minutes, baste your bird with the fat that has rendered out. Tilt the pan, and just spoon the fat over the whole chicken. After about 35 minutes, check the it and baste it again, this time with a little melted butter. My bird was done after about 40 minutes, but be sure to check yours for doneness. The internal temperature should be 160° F.

eatwell-chicken-7eatwell-chicken-9eatwell-chicken-10

Remove the chicken from the oven, and sprinkle it with the Piment d’Ville, or whatever pepper is your favorite. Let it rest for 10 minutes before carving. Carve the chicken, taking care to put a piece of crispy skin with each piece of meat. Pour the remaining melted butter over the carved chicken pieces and sprinkle with lemon juice.

-Emily

Ps. Coming up next with our final chicken—coq au vin!

Categories
Recipes

enchiladas suizas

enchiladas-suizas-1-text
I’ve been thinking about making these enchiladas for months. Correction, I just looked at the issue of Saveur from whence this recipe came and it was the August/September 2012 issue.  So I’ve been dreaming of these enchiladas for a year. I saw their picture in the magazine and knew I had to eat them. When we discovered a few weeks ago that there was indeed a latino market in our neighborhood (I cannot explain why this discovery took three years), my dream was realized.

Enchiladas suizas are a specialty originally served in a Mexico City department store called Sanborns. Their recipe is apparently the best and while there are stateside renditions, those supposedly pale in comparison. Chicken-filled tortillas blanketed in a creamy tomatillo salsa, topped with salty, melted cheese. Ya, I can see how those would win an enchilada contest.

And so I made them. And they are indeed amazing. They make all the other enchiladas feel sad and inferior with their spicy, tangy, creamy, cheesy majesty. Now every time I have enchiladas, I will wish they were these enchiladas. If that doesn’t convince you to make them, you cannot be saved.

enchiladas-suizas-8enchiladas-suizas-13

Enchiladas Suizas, adapted from Saveur Magazine, Aug/Sept 2012
2 lbs tomatillos, husks removed and rinsed
2 serrano chilis, stemmed
2 poblano chilis
1 cup cilantro, roughly chopped
1 cup sour cream
1/2 teaspoon cumin
4 cloves garlic, roughly chopped
kosher salt, fresh black pepper
8 corn or flour tortillas
3 cups cooked shredded or chopped chicken
1 1/2 cups grated queso Oaxaca (or mozzarella)

The first question is, do you have shredded chicken sitting in your fridge? You do, you lucky duck. You don’t, no problem. Heat your oven to 425° F. In a small baking dish, bake four boneless, skinless chicken thighs for about 20 minutes, until the internal temperature is 165°. Take them out of the oven, let them cool and chop or shred with a fork, depending on your preference.

enchiladas-suizas-4

Arrange your oven rack to be four inches from your broiler and heat broiler to high. Line a baking sheet with tin foil. Broil tomatillos, serranos and poblanos, until blackened, turning occasionally to brown all sides. Let cool for about 10 minutes and discard any skins. I did a half-hearted job of removing the skins and it turned out just fine. Remove the stem and seeds from the peppers and chop into rough chunks. Transfer tomatillos, serranos and poblanos to a blender or food processor. Add the cilantro, cumin, garlic, and a pinch of salt. Plus to combine. Add the sour cream and whizz until smooth. Taste for seasoning. Season with more salt and pepper.

enchiladas-suizas-5enchiladas-suizas-6

To assemble, coat the bottom of a baking dish with about 1 cup of the sauce. In a large bowl, combine chicken with 1 cup of the sauce. Toss to coat all the chicken. Grate the queso Oaxaca. If using corn tortillas, you’ll need to fry them for a minute or two in some vegetable oil so that they are pliable enough to roll into tubes. If you’re a gringa and have an undying love for flour tortillas, you’re good to go.

enchiladas-suizas-7

Divide sauced chicken evenly among the tortillas. Sprinkle with a little bit of cheese and add to the sauce-coated pan. After you’ve rolled all the enchiladas, cover the dish with the rest of sauce and sprinkle with a healthy dose of cheese.

enchiladas-suizas-9 enchiladas-suizas-11

Heat your oven to 375° F. Bake enchiladas until the sauce is bubbling and the cheese is melted, about 25 minutes. Take care not to bake the enchiladas too long, you don’t want that luscious sauce to evaporate. Remove from the oven and let cool 10 minutes. Serve with plenty of sauce, crema and the salsas of your choice.

enchiladas-suizas-14

Pico de Gallo
1 lb fresh tomatoes, chopped
1/2 red onion, diced
1/2 bunch cilantro, chopped
1/2 – 1 jalapeño, stem and seeds removed, diced (depending on how spicy the pepper)
2 – 3 limes, juiced
salt

In a medium bowl, combine tomatoes, onion, cilantro, jalapeño and lime juice. Season with salt.

enchiladas-suizas-2

Roasted Corn Salsa
2 ears of corn, roasted over a gas stove, broiled or grilled
1/2 red onion, diced
1 – 2  limes, juiced
salt

Roast your ears of corn over a gas flame, until they are browned in parts, but still uncooked in others. Cut the corn off the cob. Combine in a medium bowl with the red onion and lime juice. Season with salt.

enchiladas-suizas-3enchiladas-suizas-12

Quick and Easy Black Beans
2 cans black beans
1 small onion, diced
3 cloves of garlic, chopped
olive oil
salt, pepper
ancho chili powder

In a medium sauce pan over medium-low heat, saute the onion until translucent, about 8 minutes. Add the garlic and saute another minute more. Add the cans of black beans and their juice. Reduce heat to low. Season with salt and pepper. Add a good pinch of ancho chili powder. Ancho chili powder is great in this recipe. It adds smokiness and depth, and because black beans have such a mild flavor, the ancho is able to really shine. Simmer until about half of the liquid has evaporated. Serve topped with crema.

enchiladas-suizas-15

-Emily


Categories
Recipes

chicken pot pie

The chicken pot pie of my childhood was made by Marie Callender’s. It was a personal pot pie, and it baked in the oven for what seemed like an eternity. My favorite part was the crust coated in that creamy pot pie sauce. Well, this chicken pot pie a thousand times better, though it’s a time commitment. Between making the pie crust, roasting chicken, blanching vegetables, making a bechamel, you’re in it for the long haul. But it’s worth it.

I’d recommend making chicken pot pie when you have left over meat from roasting a chicken and chicken enchiladas or chicken soup don’t sound appealing. I’d also recommend it for a crowd – a single slice will fill you up. You could very easily make this ahead of time, freeze it and bake it straight from the freezer, adding 20 – 30 minutes of additional bake time.

03-30-13-6

Chicken Pot Pie, adapted from Ad Hoc at Home
Pie Crust
2 1/2 cups all purpose flour
1 1/4 teaspoons kosher salt
2 1/2 sticks unsalted butter
about 5 tablespoons ice water

Filling
1 cup red skinned potatoes, peeled and cut into 1/2 inch pieces
1 cup carrots, peeled and cut into 1/2 inch pieces
12 pearl onions, peeled
1 cup celery, cut into 1/2 inch pieces
3 bay leaves
3 thyme sprigs
1/2 tablespoon peppercorns
1/2 cup peas
2 cups cooked chicken, cut into 1/2 inch pieces

Bechamel
3 tablespoons butter
3 tablespoons flour
3 cups milk
1 teaspoon kosher salt
black pepper
1 tablespoon parsley
1/2 teaspoon fresh thyme
pinch of cayenne

Make the pie crust the night before. In a food processor, combine flour and salt. Remove the butter from the fridge and cut into 1 inch cubes. Add them to the flour mixture. Process until the butter chunks are about the size of peas. Add the water and pulse a few times to combine. Divide into two equal balls, wrap in plastic wrap and refrigerate.

03-30-13-1

Preheat your oven to 375 degrees. Remove the dough from the fridge and let it warm just slightly. Roll out the dough and place one piece in a 9 inch pie pan. Cut around the edges and put it back in the fridge. Roll out the second piece of dough into a 12 inch round. Place on a baking sheet and put it back in the fridge.

03-30-13-2

Bring a pot of water to boil. Add the bay leaves, thyme and pepper corns. Salt the water until it tastes like sea water. Blanche the potatoes, carrots and onions for 8 minutes. Add the celery and cook for another two. Strain the vegetables from water, pour them onto a sheet pan and discard the spices.

In a medium pan over medium heat, melt the butter. Add the flour and whisk for 2 to 3 minutes, until the mixture is light brown. Whisk in the milk. Let the sauce come to a boil to thicken, stirring often. Remove from the heat. Add the salt, pepper, thyme, parsley and cayenne. Make sure you’re happy with the seasoning.

03-30-13-3

Remove the bottom crust from the fridge. Scatter the blanched vegetables, frozen peas and chicken in the pie shell. Pour the bechamel over the pie. Beat an egg in a small bowl. Moisten the rim of the shell with some of the egg. Top it with the other crust. Pinch around the edges and cut off the excess. Brush the top with the egg. Cut a small vent in the top crust to allow steam to escape.

03-30-13-4

Bake on the lower rack of 375 degree oven until the crust is golden brown, 45 minutes to 1 hour. Remove the pie and let rest for 10 minutes. Cut into wedges and serve warm.

03-30-13-5

-Emily

Categories
Recipes

mustard chicken milanesa

Pound anything thin, coat it in bread crumbs and then pan fry it, and it’s sure to be pretty good. This chicken milanesa is better than good. Mustard, garlic, herbs and lemon zest are mixed in with the egg wash to really transform the flavor of the chicken. Instead of a being a one note dish—that one note being the glorious taste of fried food—this dish has nice depth. And as a bonus, that added depth doesn’t make it any more difficult to prepare.

1.17.13-18

One year ago:  Tabbouleh Salad with Chicken Shish Kebab
Two years ago: Jordan’s Review of Bar Tartine & More Brownies

Mustard Chicken Milanesa, adapted from the Smitten Kitchen Cookbook
2 – 3 boneless, skinless chicken thighs (you could also use chicken breast, but we’re thigh people)
salt and pepper
1/2 cup all-purpose flour
1 egg
2 tablespoons smooth dijon mustard
2 garlic cloves, grated or minced
2 teaspoons fresh thyme (or oregano, or 1 teaspoon dried)
1/2 lemon, zested
1 1/2 cups panko breadcrumbs
vegetable oil for frying (we use safflower)

With a sharp knife, trim any dangling bits off the chicken thighs. The chicken thighs I used had little chicken bits hanging off which I cut off, seasoned and also battered and fried turning them into real life chicken nuggets. If you’re using chicken breasts, butterfly your chicken breasts and slice them all the way through so you have two thin slices per breast.

1.17.13-16

With a meat pounder or a rolling pin, pound the chicken in between two pieces of plastic wrap. Season with salt and pepper on both sides.

Line a baking sheet with parchment paper. Put the flour on one plate and the bread crumbs on another. In a small bowl, mix the egg, mustard, garlic, herbs and lemon zest. Dredge each piece of chicken lightly in flour, then heavily in the egg mixture, then generously in the bread crumbs. Place them on the baking sheet in a single layer and cover them in plastic wrap.

1.17.13-15
Refrigerate for an hour or up to a day. The refrigeration prevents the coating from coming off when you fry it and it totally works. I thank Deb for this incredibly helpful and effective tip.

1.17.13-17

Preheat your oven to warm. Pour 1/2″ of oil in a fry pan. Heat it over medium high heat. Cook the chicken, about 3 – 4 minutes on the first side and 2 – 3 minutes on the second side. The little chicken nuggets will cook even faster – about 2 minutes per side. Remove from the pan and let drain briefly on paper towels. Place in the oven to keep warm while you cook the remaining chicken. Serve warm with lemon wedges, plus something green for good measure.

1.17.13-19

-Emily

Categories
Recipes

tabbouleh salad with chicken shish kebab

Jordan and I both love tabbouleh. The first time we had tabbouleh it was purchased from a tiny on-campus grocery store while I was studying at Georgetown. It was delicious. I made meals of it. Case in point: When I was an editor at The Georgetown Voice,  I would fuel the long nights we spent putting together that fine newsmagazine with a container of tabbouleh, a stack of pita bread and a pack of Haribo gummy bears. A balanced diet if there ever was one.

Now that I am older and wiser (and can no longer consume the quantity of candy I could during my Voice days), I decided to pair the tabbouleh with rice and chicken shish kebab. For those of you that might be skeptical, you don’t miss the gummy bears at all.

Chicken Shish Kebab
1/2 lb chicken, cut into 1 inch cubes
1/2 cup plain yogurt
1/2 lemon, juiced
1 t paprika
1/2 t cayenne
salt and pepper

In a medium bowl, mix the yogurt, lemon juice, paprika, cayenne, salt and pepper. Taste for seasoning  — it should be well seasoned since this is the only seasoning you’ll put on the chicken. After your satisfied with the taste of your marinade, add the chicken and let sit for at least one hour or overnight. Meanwhile, make the tabbouleh.

Tabbouleh Salad
1 cup fine-grain bulgur wheat
2 bunches parsley, chopped
1 bunch mint, chopped
1/2 red onion, diced
2 cloves garlic, diced
1 lemon, juiced
salt and pepper
1/4 cup olive oil

Bring two cups of well-seasoned water to a boil. Add the bulgur, cover and set aside for 20 minutes. Meanwhile, prepare the rest of the salad. Chop the herbs—some stems are totally ok— chop the onion and garlic. Mix the herbs and vegetables together in a large bowl. If tomatoes are in season, feel free to chop a few of those and add them in as well.  Add the lemon juice. Drain the excess water out of your bulgur and add that to the herb mixture. Toss well and season with salt and pepper. It should be quite herby and lemony. Add a hearty drizzle of olive oil to help mellow the flavors out and set aside. This salad only improves as the flavors meld.

Put the chicken cubes onto skewers. You’ll lose some of the yogurt marinade while skewering, but the flavors should have had time to permeate the chicken. Heat a grill or grill pan over high heat. Cook the skewers for several minutes per side, until the chicken is cooked through. Serve over rice alongside the tabbouleh salad.

-Emily

Categories
Recipes

larb—a delightful thai salad

I am a big fan of the Spilled Milk Podcast by Molly Wizenberg and Mathew Amester-Burton. It makes me laugh out loud—usually on my commute home—which in any other city might look weird, but in San Francisco just makes me typical. A few weeks ago they did an episode on Thai Salads and I was inspired to try this dish. The toasted rice component was irresistible.

This dish is typically served in cabbage leaves. You could also serve it over rice or noodles. Or —my preferred method—make little Thai burritos with cabbage leaves, rice and larb all wrapped up in one awesome bundle.

Larb Gai, adapted from Spilled Milk
1 pound ground chicken thighs or pork (breasts will dry out too much)
1/2 cup shallots, thinly sliced
2 tablespoons scallions, sliced
2 tablespoons fish sauce
3 tablespoons lime juice from 1 to 2 limes
1 teaspoon red chile flakes
2 to 3 tablespoons toasted rice powder (below)
cabbage or lettuce leaves leaves

Heat a skillet over medium-high heat. Add the ground chicken or pork, shallots, scallions, red pepper flakes, fish sauce, and lime juice. Cook, stirring occasionally, until the meat is cooked through.

Turn the larb out into a bowl and cool for at least ten minutes. Stir in rice powder. Serve with cabbage or lettuce leaves for wrapping.

Toasted Rice Powder
1/4 white rice, uncooked

Place a dry skillet over medium heat. Add 1/4 cup white rice to the pan. Toast the rice, stirring and shaking the pan frequently, until the rice is golden-brown, about 5 minutes. Cool to room temperature and grind to a very fine powder in a spice grinder or coffee grinder. I used my magic bullet—thanks Dad!

Larb is as delicious as it is fun to say! Jordan and I really enjoyed this meal. We are also trying to invent more things to top with toasted rice powder! That stuff is awesome.

-Emily

Categories
Recipes

little birds

Emily and I wanted to do something a little special (and very delicious) for a recent dinner party.  After nearly endless debate and hours scanning the pages of our cookbooks, we settled roast cornish hens from Ad Hoc at Home.  These succulent little chickens are slathered and stuffed with gremolata butter.  It couldn’t possibly be bad.

Roasted Game Hens with Gremolata Butter, from Thomas Keller’s Ad Hoc at Home.

For the gremolata butter
1 t black peppercorns
finely rated zest of 2 lemons
2 garlic cloves, grated or minced
12 T (1.5 sticks) unsalted butter, at room temperature
2 T lemon juice
2 T  finely chopped flat-leaf parsley
1 T kosher salt

Grind the pepper in a mortar and pestle, add the lemon zest and garlic, and mash to a paste.  Stir pepper mixture and butter together in a medium bowl followed by the lemon juice.  Stir in the parsley and salt.

Yummmmm.  You could do anything with this and it will turn out amazing.  But, we chose to put it all over little birds.

For the hens
4 cornish game hens
duck fat (you can use canola oil if you’d like)
6 garlic cloves, smashed, skin left on
1 bunch thyme
fleur de sel (any sea salt will do)

Remove the neck and innards if they are still intact.  Rinse the birds inside and out then dry them thoroughly with a paper towel.  Then remove the wish bone.

Next, insert your fingers between the skin and the meat, starting at the end of the cavity.  Work your way down the breasts and repeat for the thighs.  Once the skin is loosened, insert about .5 T of the gremolata butter under each thigh and about 1 T under each breast.  Truss the birds and let them stand at room temperature for about 30 minutes.  While they rest, preheat the oven to 450 degrees.

Brush the birds with melted duck fat (or canola oil if you’re using that) and season with sea salt.  Don’t go crazy with the salt here because there is a healthy does of it in the butter already.  Place the birds on their backs in a single layer on a roasting pan and evenly scatter the garlic and thyme around the birds.   Put the birds in the oven for about 25 or 30 minutes, until the internal temperature of the thigh is 160 degrees.  Let rest on a cooling rack for 10-15 minutes then either serve them whole, halved, or quartered.

conclusions:
This was a delightful, tasty meal and those little birds made it feel special.  The gremolata butter is great and I can think of a dozen things to do with it.  The first being this same recipe, but with normal sized chickens.  This is my only complaint with the recipe; the birds are so small that they only take 25 to 30 minutes to cook, which is not nearly enough time for the skin to get brown and crispy.  Next time, I’ll be making this recipe with a four pound chicken and giving it 50-60 minutes in the oven (reducing the temperature to 350 after 10 or 15 minutes, of course).  I’ll let you guys know how it turns out.

-Jordan

Categories
Recipes

buttermilk baked chicken

Everyone likes fried chicken, but actually frying said chicken is a big pain. With this recipe you end up with the perfect crunchy-crisp exterior and juicy chicken interior, but don’t have to deal with vats of oil.  We were actually blown away by how well this chicken turned out and how easy it was to prepare. Even after a few cocktails, the recipe when off without a hitch!

Buttermilk Baked Chicken 

2 chicken legs and thighs, separated
1 cup buttermilk
2 t paprika
salt and pepper
1 cup panko (japanese style breadcrumbs)
1 egg

Salt and pepper the chicken. Marinate it in the buttermilk and paprika for a few hours. Marinating the chicken in buttermilk is key and makes a huge difference in the moistness and flavor.

Preheat an oven to 350 degrees and line a baking sheet with parchment paper. Strain the chicken from the buttermilk, dunk each piece in egg and coat in panko. Put on the baking sheet. Bake for about 15 – 20 minutes, until the chicken is firm to the touch. If your chicken isn’t browned, throw it under the broiler for a minute or two.

The only update we’d make to this recipe the next time we prepare it is to mix the panko with a little melted butter to give the crust just a bit more flavor and color.

We served this chicken with some beautiful artichokes, but I imagine it would go great with cole slaw or mac and cheese!

-Emily

Categories
Recipes

tortilla soup

The first time that I can remember having tortilla soup was at Chili’s. Yes, the chain restaurant home to blue margaritas, hot wings and molten chocolate cake. It was called chicken enchilada soup and I thought it was good. When planning our meals on Sunday morning, I decided to improve upon my chicken enchilada soup memories. As it turns out, tortilla soup/chicken enchilada soup is pretty darn easy to make and my soup blew that one from Chili’s out of the water. Big surprise, right?

Tortilla Soup
1 onion, diced
2 cloves garlic, minced
1 quart vegetable stock
1 16 oz can diced tomatoes
2 chipotles in adobo sauce (This is the secret ingredient that adds a smokey, spicy quality to the soup. You can find it in the ethnic section of any grocery store. These chipotles are very spicy. A little goes a long way.)
2 chicken legs and thighs
1 can black beans, rinsed
salt, pepper, olive oil
For garnish: cilantro, sour cream, cheese, crisped tortilla strips or chips, green onion

Salt and pepper both sides of the chicken legs and thighs.

In a dutch oven or heavy stock pot, saute the diced onion and garlic over medium heat in a little olive oil until it starts to become translucent. Push the onions to the sides of the pan and add the chicken. Brown each side of the meat. Add the vegetable stock, diced tomatoes and two chipotles. Let simmer for about 20 minutes, until the chicken has cooked through.

Remove the chicken and set aside to cool. Remove the chipotles and discard. Puree the soup. You’re welcome to leave the chillis in the soup, but I found the broth was spicy enough without pureeing the chillis. Put the soup back on to simmer. Shred the chicken. About 10 minutes before serving, add the chicken and black beans to the soup.

Serve with cilantro, sour cream, cheese, crumbled chips and green onion. We also enjoyed some roasted purple cauliflower.

This soup was awesome and will become part of the permanent repertoire. I love all of these flavors. Jordan and I ate it for two days straight! The broth is spicy and tomatoey, but still creamy and viscous.  Another bonus: the soup could easily be made vegetarian – just add an extra can of black beans.

-Emily


Categories
Recipes

quick chick(en)

Last night dinner had to be easy, and preferably quick. Why? Well, because I’ve neglected all of my chores in favor of baking and butter making. Hard to believe, I know.

I also have this problem at the butcher counter where if all of the young, corporate women in front of me (I am one now, sort of) ask for boneless, skinless chicken breasts, I have to break the mold by asking for an entire chicken, and 3 lbs of lamb shanks. Yep. And I was making a dinner for two.

These two issues (mountain of chores and whole chicken) collided last night and  … I made easy roast chicken thighs and legs.

Preheat an oven to 350 degrees.

Break down the chicken into appropriate sized pieces for two people (or don’t go crazy at the butcher counter). Salt and pepper both sides.

Place chicken in an oven safe baking dish, drizzle with a little olive oil, toss in some sliced onion, carrot, and whole garlic cloves. I forgot to, but you could also throw in some rosemary or thyme to jazz the bird up a bit.

Bake for 45 minutes (or until the meatiest part feels like the fatty palm of your hand when you press it — Jordan’s trick).

While this is cooking you can start a load of laundry, throughly clean the bathroom, and scrub the kitchen floor, assuming your home is less than 500 square feet.

Conclusions: The chicken was delightful, as roast chicken always is, especially the juices in the bottom of the pan, and super easy. I tossed it in the oven, and forgot about it for 45 minutes and it still turned out just fine. My perfect bite … roasted garlic clove, dark meat, crispy skin, dunked in chicken juice. Try it, you won’t be disappointed.

-Emily

P.S. Throwing the chicken under the broiler at the last minute makes the skin nice and extra crispy as well.

-Jordan