Categories
Recipes

pasta with creme fraiche, kale and mushrooms

Each year, we have what we’ve come to call the “pasta of the year”.  The pasta of the year is a pasta dish that we turn to for a reliably tasty and soul-satisfying dinner every other week or so. It quickly becomes part of our regular weeknight dinner repertoire, dominates for nearly a year, and then mysteriously fades away, only to be rediscovered occasionally by browsing our own blog archives. It’s a strange phenomenon, but we’ve come to accept it’s benevolent presence in our lives.

pasta-of-the-year

The pasta that started it all was a marinated tomato and ricotta pasta. You’d let some peak of summer tomatoes hang around with fresh herbs, olive oil and lemon juice for 20 minutes or so. Then toss your pasta with an excess of ricotta cheese and top that with the marinated tomatoes. Heaven from June through September.

There was the pasta carbonara kick, which featured an incredibly poetic post from Jordan about his love for the dish. And then there was orzo topped with burrata cheese. My spicy soba noodle salad was certainly a contender in 2014.

And now, though the soba noodle salad is making an honorable attempt to defend the title in 2015, we have our new favorite pasta equation. Pasta + creme fraiche + sautéed shallot + wilted green, and it’s sister pasta, pasta + creme fraiche + shallot + al dente veg. Creme fraiche is a genius way to arrive at a solidly sauced pasta with nearly no effort, and we’ve already established that shallots are good on everything. Toss in whatever green or quick-cooking veggie (mushrooms, asparagus, green beans, favas, peas) you have around and you’ve got yourself a supremely delicious, decently well-balanced meal. If you happen to live at our house in the winter/spring of 2015, you have this pasta every 10 days.

pasta-creme-fraich-kale-2

Pasta with Creme Fraiche, Kale and Mushrooms
1 lb pasta
1 shallot, diced
2 cups (8 oz) cremini mushrooms, sliced
2 cups kale, sliced
2 tablespoons butter or olive oil
1/2 cup creme fraiche
salt and pepper

Bring a pot of salted water to boil. Dice your shallot and slice your kale and mushrooms. Throw your pasta into the pot of boiling water to cook.

Meanwhile, in a sauté pan over medium heat, melt the butter, and sauté the mushrooms. When the mushrooms are nearly done, add the shallot and sauté just a few minutes more. Taste your mushrooms and season them with salt. Then add the kale. Turn the heat off and just let the kale wilt a bit.

Drain your pasta and add it back into the pot. Throw the mushroom mixture into the pasta pot, along with a generous dollop of creme fraiche. Stir to distribute the creme fraiche. Season with bit more salt and pepper, and serve. Feel free to embellish with parmesan cheese and herbs, though it isn’t necessary.

pasta-creme-fraich-kale-1

-Emily

Categories
Recipes

tom ka

Last weekend, we went to Sacramento to meet our caterer for the wedding and visit our families. It was a quick visit, just for the day, but it was a good one. We began planning our wedding menu, reserved glassware and dishes, ate the culinary perfection that is a Dos Coyotes burrito. We thumbed through Jordan’s family’s old photo albums, finding that nothing has changed about the way Jordan poses for photographs today and the way he did at 4 years old. Once a ham, always a ham. (Thanks to these albums, I now also harbor a not-so-secret hope that one day Jordan will have a mustache as phenomenal as his dad’s in many of the photographs).

We brainstormed our must-play list for the DJ, tossing ideas back and forth around the kitchen island, occasionally (incessantly?) teasing my mom about her taste in music. I can’t remember the last time I laughed that much on a visit home. We ate red beans and rice. To close out the night, we looked at a bunch of old photos my mom had brought back from a recent visit to my grandmother’s—my grandparent’s wedding photos, photos of my mom as little girl, photos of my great grandmother. I hadn’t seen many of the photos before, and they were all so beautiful. Beautiful in the very particular way old photographs are always beautiful. And full of the characteristic, big round eyes that will forever remind me of my mother. Strong genes right there.

tom-ka-1

Meanwhile, back in SF (insert a more eloquent transition if you’ve got one), we’ve been hitting the crock pot pretty hard. You’ve heard about the chili verde, but there’s also been chicken tinga (recipe forthcoming, thanks Billy for the inspiration), bourbon pulled pork (thanks Liz!), my mom’s red beans and rice, ‘baked’ potato soup, and tom ka. Tom ka is a thai soup, heavy on the coconut milk and just a tad spicy. It’s one of my go-to orders at one of the Thai restaurants in our neighborhood. Our neighborhood has so many Thai restaurants that I’ve got a restaurant for curry, a restaurant for larb and garlic quail, a restaurant for soup. The glory that is San Francisco.

So I decided to see if I could make a half-decent version of tom ka at home. In my crockpot. Dun, dun dunnnn. It really wasn’t half the challenge I though it would be. As it turns out, it’s hard to screw up anything with a can of full fat coconut milk. The revelations of a home cook. They are why you come to this blog.

But this soup is delicious. It’s stupidly simple to make if you have a crockpot, and pretty darn simple even if you don’t. Combine everything and simmer until the chicken is cooked. It calls for some unique ingredients, but most of them have a long shelf life (fish sauce, curry paste), and will happily hang out in your fridge until you want to make the soup again.

tom-ka-2

Crockpot Tom Ka (Thai Coconut Chicken Soup)
6 cups chicken broth
1-14 oz can coconut milk
1-2″ piece of ginger, peeled and sliced
1 stalk of lemongrass, sliced lengthwise
2 garlic cloves, sliced
2 shallots, sliced
2 – 3 boneless chicken thighs, cut into strips
1/2 – 1 cup button mushrooms, sliced (how much do you like mushrooms?)
2 – 3 teaspoons thai red curry paste (or 2 thai chilis, sliced)
2 tablespoons fish sauce
2 limes, juiced
salt, to taste
bell pepper, cilantro and green onion for serving
rice or rice noodles (optional)

In a crockpot, combine chicken broth, coconut milk, ginger, lemongrass, garlic, shallots, chicken, mushrooms, chili paste and fish sauce. Cook on low for 4 to 6 hours. If serving with rice noodles, add the rice noodles into the soup and let them cook through. Then add the lime juice and season with salt to taste. Garnish with bell pepper, cilantro and green onion.

I really like to dip rice into the broth of my tom ka like the soup is a dipping sauce. This isn’t traditional by any means and causes confusion in Thai restaurants, but that rarely stops me. Take a page from my book and serve your soup with a side of rice and salad. Live on the wild side.

-Emily

PS. Four hams. From an old roll of film, finally developed.

jordan-josh-combo-small

Categories
Recipes

recipes to carry you through

Welp, February is nearly over. What a sneaky month. I feel like all I’ve said since January (or possibly November) is how busy life is around here lately, and I’m starting to find that a bit tiresome. Jordan and I were talking with our friend Alexa about just this predicament, and she suggested it was time for a mind shift. Simply use the power of our amazing human brain to decide that the way we currently think about something is no longer useful (or possibly more damaging than something that’s merely useless), and think about it differently.

breakfast-combo

Well, I happen to like this idea a lot. But I’ll also have you know, I’m not sure if it’s working for me yet. At the outset, my goal was to use this mind shift to better manage how I feel about busyness of my work-life. Things since launch have been hectic for everyone, and it doesn’t seem to be slowing down. I haven’t made a lot of progress here, if we’re honest, but I really do like the work. I show up every day, and give it what I’ve got, and leave each night with a growing to-do list. Half-way mind shift?

I’ve also seemed to amplify my life-life busyness. Got to stay in stride with myself, I suppose. Haphazard wedding planning, obsessive apartment cleaning and rearranging, marathon sessions in the pottery studio, too many podcasts. Cooking, mostly the same old favorites, but a few new ones here and there. Trying to figure out if it is possible to create a baking brioche or jet-puffed marshmallow scented perfume, and turn that into a viable business opportunity. Downloading apps that tell me how much time I spend on my phone each day, deleting social media apps as a result, downloading meditation apps instead. I feel like I’m working towards a clearer mind. But I also feel a little crazy. One-third-of-the-way mind shift?

Why am I telling you this? Maybe putting it out there in the universe means the missing piece of my mind shift connects with the part I’ve already started. Maybe because I’ve got two recipes for you. Simple, solid recipes that have become standbys at our house. Both of these things?

We’ve got a granola, borrowed from one of my favorite blogs Orangette, that is just perfection. Nutty, toasty, just a tad sweet. Great on yogurt, vanilla ice cream or eaten out of the palm of your hand. And avocado toast. The Midwest and South surely don’t consider this a meal, Jordan might not either. But I’m of the belief that avocado on bread is solid, California hippie that I am. Top that with pickled shallot and hot sauce, and it’s heaven, and only takes about 5 minutes to make.

You can eat both at once if you’re feeling especially brunch-y. Or do like I do and insert them into random intervals of your day, alternating granola, toast, granola, toast. One last note, don’t make a half batch of the granola. You’ll regret it in two days.

granola-1

Simple Granola, from Orangette
6 cups rolled oats
2 – 3 cups chopped nuts (I used pecans, walnuts and almonds – basically a bit of whatever I have in the freezer)
2 – 3 cups flaked coconut (unsweetened, I find mine at Whole Foods)
2 teaspoons kosher salt
1 cup maple syrup (Or 1/2 cup maple syrup and 1/2 cup honey)
2/3 cup olive oil

Mix everything together in a large bowl and spread on a parchment-lined baking sheet. Bake at 300° F for about 40 minutes, stirring occasionally, until golden brown. Feel free to use approximate measurements for all of the ingredients to suit whatever you have around. We’ve made it many times with success, and I only measured the first time.

avocado-toast-1

Avocado Toast with Pickled Shallot and Hot Sauce 
2 – 4 slices of crusty bread (~2 slices per person)
1 avocado, mashed
1 shallot, sliced thinly
1/4 cup red wine vinegar
1 teaspoon sugar
1 pinch of salt
Crystal Hot Sauce or Tapatío, for serving

In a small jar, combine the vinegar, sugar and salt and stir to combine. Add the shallot and let sit for a few minutes (or a few hours, or a few days in the fridge). Lightly toast the bread on both sides. Spread the toast with mashed avocado and top with picked shallot and a generous dose of the hot sauce of your choosing. Makes a perfectly serviceable lunch or dinner, don’t skip the shallot.

-Emily

Categories
Recipes

the indescribable magic that happens when butter and sugar are combined via vigorous mixing

Josh and Erin are good friends. The kind of friends who will happily share a wave with you, help you get a new job when you need one, encourage your best/worst poetic ramblings or punny jokes, refuse to bat an eye when your anxious dog pees on their carpet, and make you a damn good cocktail. Good souls with generous hearts.

This cake is was made to celebrate their marriage, and I’m honored I was asked to make it. I love how special and celebratory a cake feels once you’ve stacked a few layers up, one on top of another, and covered it in buttercream. I also love that Erin is the type of friend who intentionally crafts her emails as to not stifle creative confection expression. The title of this post, that is all Erin, a writer with far more talent than I possess.

josh-erin-cake-2-1josh-erin-cake-2-2

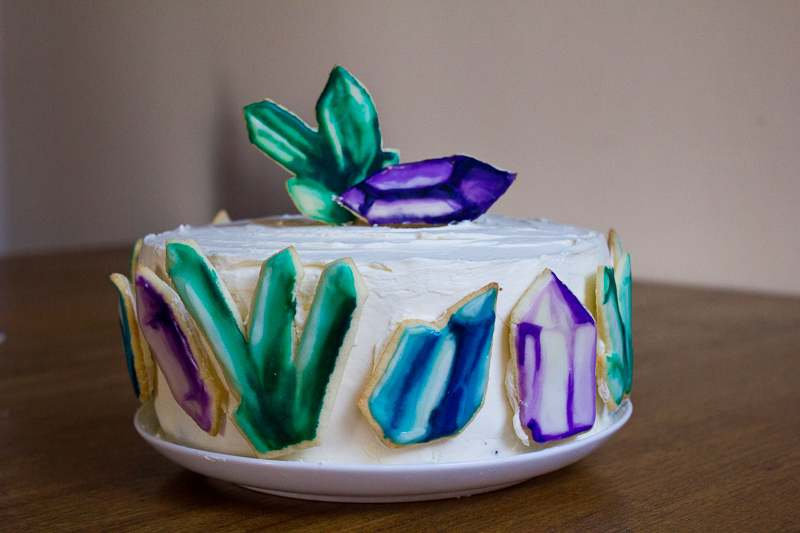
Lately, Erin and I have been jokingly/seriously channeling the vibes of various crystals to improve our attitudes and our surfing, and so I thought it only fitting to decorate their wedding cake with a few crystalline beauties. Who doesn’t want good vibes as they transition from one life phase into the next? Not to mention, the natural geometry of  crystals is just as stunning as that of flowers, but far better suited to this couple.

I doubt anyone will re-create this cake from my recipe, since really, it is cake meant for only two people on this beautiful, mysterious rock, but I’m pretty proud of it from both culinary and artistic standpoints, and so I’m sharing it here. It feels good deep in the soul to make something special for friends, something to celebrate the magic that is finding another person who loves you for all your goodness and all your badness too.

Congratulations Josh and Erin, may your years together be filled with happiness, couples waves, and endless good vibes.

Good Vibes Wedding Cake 
For the cake
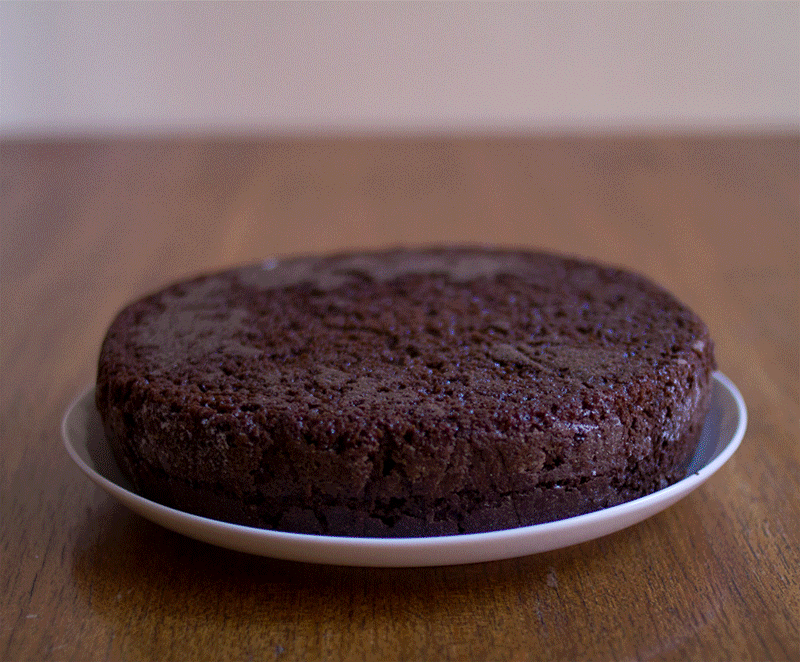
This is Jordan’s favorite chocolate cake. It’s the cake that I make on birthdays, and the cake I’ll probably make for our wedding too. It’s an Ina Garten recipe that we’ve adapted slightly over the years.
Butter, for greasing the pans
1 3/4 cup flour
2 cups sugar
3/4 cup cocoa powder
2 t baking powder
1 t baking soda
1 t kosher salt
1 cup buttermilk
1/2 cup vegetable oil
2 eggs, at room temperature
1 cup freshly brewed hot coffee

Preheat the oven to 300° F. Butter the cake pans and line with parchment paper, then butter parchment and dust with flour.

Sift the dry ingredients into the bowl of a mixer fitted with the paddle attachment. Stir to combine. Combine wet ingredients in another bowl. With the mixer on low, slowly add the wet ingredients to the dry. Add the coffee.

Pour into prepared pans and bake for 35 – 40 minutes. Cool in the pan for 15 minutes, then invert onto a rack to cool completely. Wrap in plastic wrap and freeze.

For the vanilla swiss buttercream
Make the buttercream just before you plan to assemble the cake. You can refrigerate the assembled cake for a day or two, just it come to room temperature before serving. 
1 cup sugar
4 large egg whites
26 tablespoons butter, softened (3 sticks plus 2 tablespoons – hell yes it is a lot butter)
1 teaspoon vanilla extract

Whisk egg whites and sugar together in a big metal bowl over a pot of simmering water. Whisk occasionally until you can’t feel the sugar granules when you rub the mixture between your fingers.

Transfer mixture into the mixer and whip until it turns white and about doubles in size. Add the vanilla. Finally, add the butter a few tablespoons at a time and whip, whip, whip.  Don’t freak out if the frosting looks soupy, just keep whipping. It will come together gloriously, it just takes a while. Set the frosting aside, leaving it at room temperature.

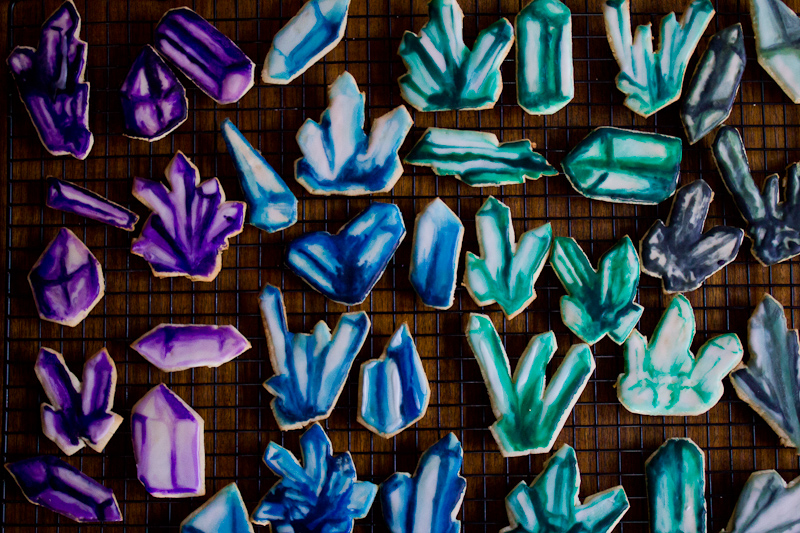
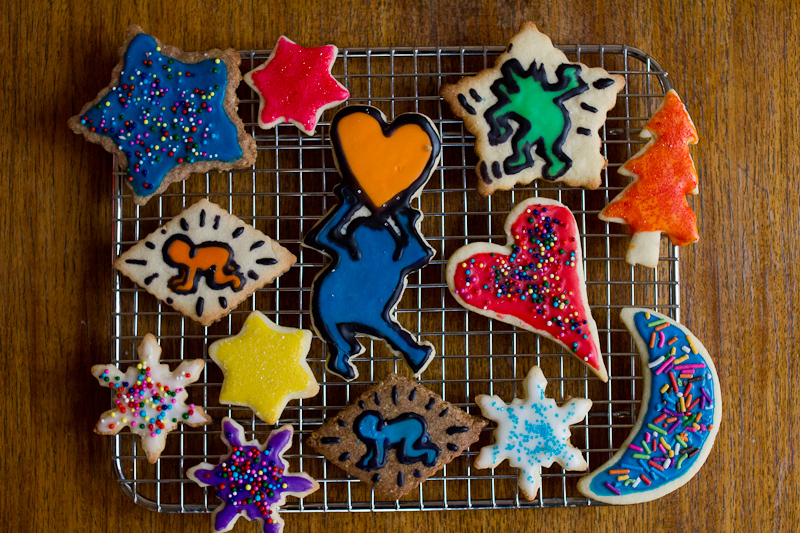
For the decorative cookies of a minerally, gemstoney persuasion
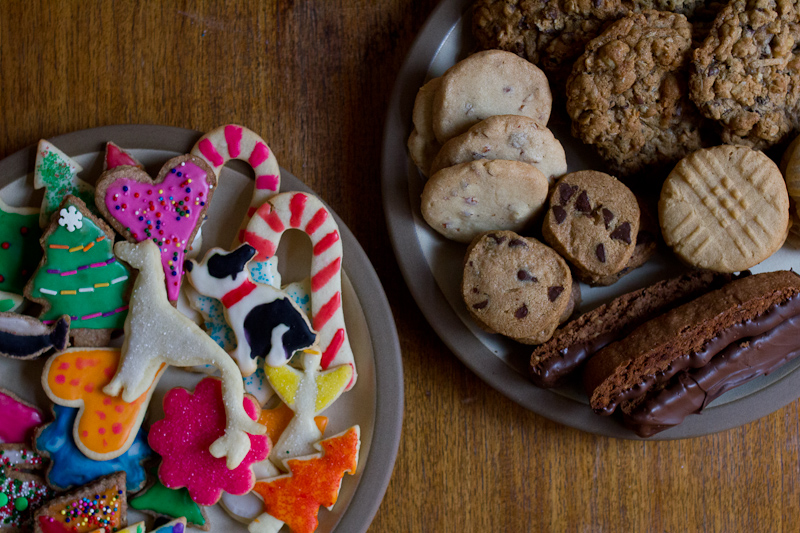
This is my Nonnie’s recipe for christmas cookies. They are simply the best. The frosting is a simple royal icing (powdered sugar + milk) colored to varying shades of blue, purple and green with different amounts of food coloring. We used an ice cube tray to create our color pallet, which I must say was a stroke of genius on my part.

josh-erin-cake-2-3
1/2 cup butter, softened
1 cup sugar
1/2 teaspoon vanilla
1 egg
1/2 teaspoon salt
2 teaspoons baking powder
2 cups flour

Beat the butter until it is light and fluffy. Add the vanilla and sugar and cream together for a few more minutes. Add the egg. In another bowl, sift together the salt, baking powder and flour. Add flour mixture into the butter mixture and stir until combined. Divide into two balls, flatten into discs and refrigerate for 4 hours or overnight.

josh-erin-cake-2-6 josh-erin-cake-2-5 josh-erin-cake-2-4

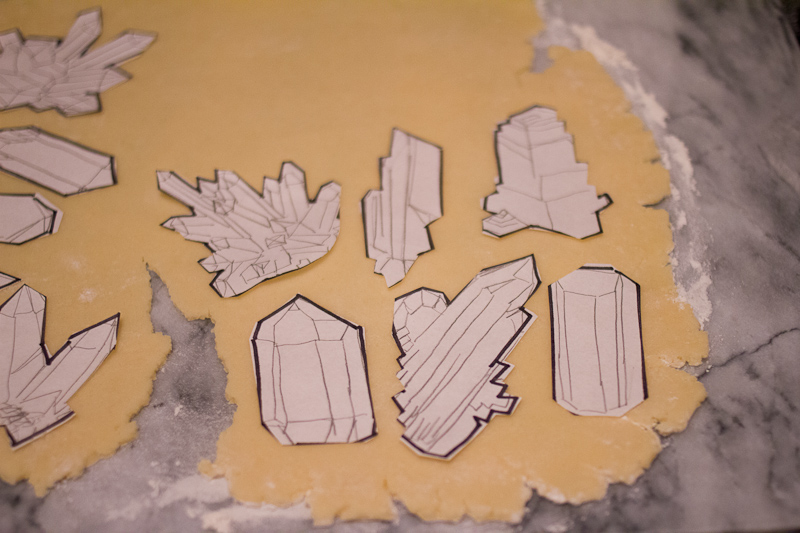
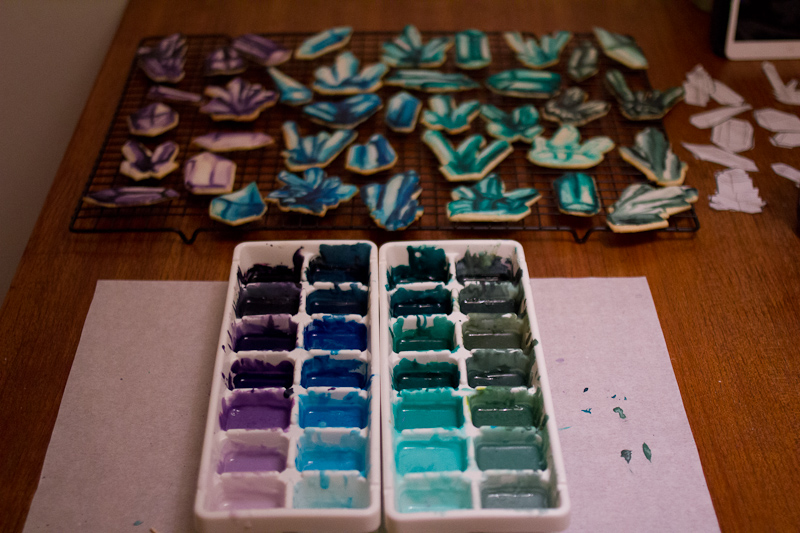
Roll out into 1/4″ thickness and cut out your gems. To make the crystal shapes, I drew several different crystals on paper, cut out the drawings, laid them out on the dough and cut around them with a sharp paring knife.  Bake at 400° for 6 – 8 minutes.

For the cookie icing
4 cups powdered sugar, sifted
a few tablespoons milk
food coloring

Let the cookies cool and then frost them with the icing, whatever color pallet suits you. Make the cookie decorations the day before you plan to assemble the cake so they have time to set up.

To assemble

josh-erin-cake-gif
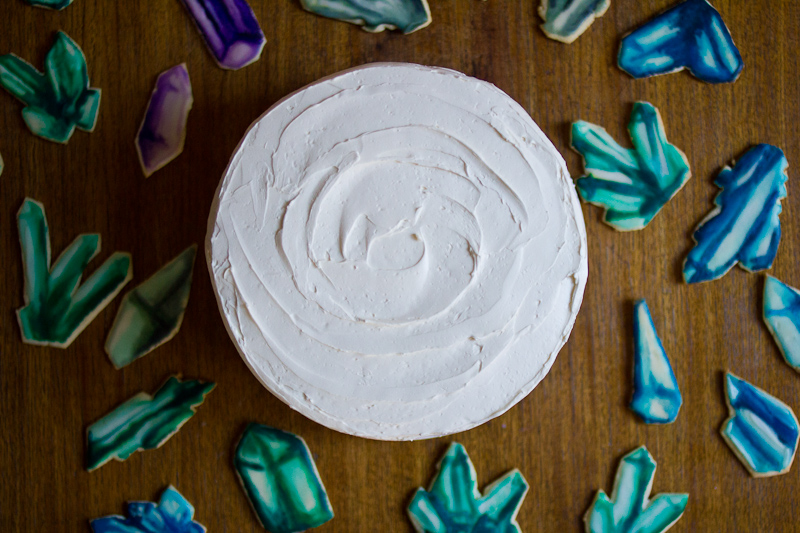
Store the cake in the freezer before you frost it. This will make the frosting process much simpler. Remove from the freezer and place one round on an appropriately-sized plate. Spread the top with a decent layer of buttercream. Top with the other half of the cake. Spread the entire cake with a thin, but even layer of frosting. It’s ok if it isn’t perfect. This is the crumb coat. Put it back in the freezer.

After 10 minutes, remove your cake from the freezer. Coat with another layer of icing. Dip your spreading knife in a glass of hot water, quickly dry it off and use the hot knife to smooth the frosting, or leave some texture, up to you. Use the remaining buttercream to attach the cookie decorations. Store in the fridge, but let the cake come to room temperature before serving. Enjoy the cake and all the good vibes that flow from it!

And a special thank you to my friend Kelly, who lent both her paintbrushes and her artistic expertise to this endeavor.

Xo, Emily

Categories
Recipes

spicy soba noodle salad

Despite the name of this fine blog, many of the meals we eat are vegetarian. This recipe also happens to be vegan and gluten-free—do you even recognize us!?  We are indeed pro-vegetable here at The Answer is Always Pork and this salad has become one of our weeknight favorites. You can throw it together in about 25 minutes, which is especially handy when you a) are trying to launch a new product at work, b) remember less than an hour before leaving for an event that it is a potluck, or c) that special combination of lazy and impatient that makes ordering take out impossible. It’s also really easy to scale this up for a group, just double or triple everything and it works out fine.

soba-salad-2

What else? We’re gradually making progress planning our wedding, which somehow still feels like the most obvious and the most surprising thing to happen to us. Jordan is back at school for the spring semester, though he is never really *off* anymore these days, masters-shmasters. I’m online shopping for obscure textile art and pottery books from the 70s, purchases include “Far Beyond the Fringe”, undeniably an amazing title for any book. Willow is decapitating toys shaped like Star Wars characters, no wookie left unscathed. There’s a new bakery in the neighborhood that’s pretty mind-blowing. Life is moving right along, and I like that just fine.

Spicy Soba Noodle Salad
For the dressing

1 lemon, zested and juiced
1-1″ piece of ginger, peeled and grated
2 cloves of garlic, grated
1/4 cup rice vinegar
1 tablespoon honey (or agave syrup for you super vegans)
2 tablespoons soy sauce
1 teaspoon sesame oil
2 – 3 tablespoons olive oil
a small pinch of cayenne pepper or a squirt of siracha chili sauce
salt and pepper to taste

For the salad
1 head of romaine lettuce, chopped
1 cucumber, sliced
cilantro, mint or green onion, sliced thinly
2 bunches of soba noodles (japanese buckwheat noodles, they come wrapped in single-serving bunches)
4 oz of extra firm tofu (I like the Trader Joe’s sprouted tofu that comes in two 4oz packages)

soba-salad-1

In a medium bowl, whisk together the dressing ingredients. Season with salt and pepper. Bring a medium pot of water to boil and season it with salt.

While you’re waiting for the water to boil, chop the lettuce, herbs and cucumber. Mix them together in two medium bowls. These will become your dinner bowls. Slice the tofu into 1.5″ x  0.5″ slices. Put a non-stick pan over medium heat. Pat the tofu dry with a paper towel and then brown the tofu, about 4 minutes per side. When your tofu is cooking on it’s last side, cook the soba. You can also serve the tofu raw, but I like

Cook the soba noodles according to the package directions, somewhere between 5 and 8 minutes. Drain the soba noodles and rinse with cold water. Put back into the pot and pour the dressing over the soba.

Top each salad bowl with soba and then sprinkle with tofu. Serve with siracha and sesame seeds.

-Emily

Categories
Recipes

chili verde

I’d always been opposed to the idea of owning a crock pot. Our apartment is so tiny and it doesn’t seem possible to nestle another thing in between our kitchen aid mixer, vitamix, coffee maker, soda stream, food processor … so many gadgets … that I use surprisingly regularly. A crock pot also felt like giving up. Surrendering my culinary creativity to mushy foods that all taste and look the same. Not to mention the myriad of crock pot recipes that call for condensed soups, seasoning packets and all of those industrial food products that I just can’t get behind.

And then, around Thanksgiving, I was visiting my mom. We ran errands all day, hopping in and out of the car, driving from place to place, and got home around six in the evening. And her house, her house smelled amazing. The kind of smell that really makes you feel taken care of and instantly banishes the “what the hell are we having for dinner tonight” worry. Unbeknownst to me, my mom had thrown leeks, potatoes and vegetable stock into her crockpot before we’d left to take on the days errands, and now all that was left to do was to puree the soup and make a salad. This was when I realized that I could indulge the convenience of the crock pot without giving up good food.

chili-verde-4

Fast forward to Christmas, and my grandparents gifted us a crock pot. Since then I’ve been experimenting with a few new recipes, including my mom’s leek and potato soup. Most of these recipes could also be braised in a dutch oven or made on the stovetop, but I must again admit it is insanely nice to come home to a meal that is nearly ready to eat.

This chili verde is a mashup of several different recipes from around the Internet. It’s hard to go wrong when you combine tomatillos, chilis and pork. They’re made for each other. This version is not particularly spicy and makes enough for at least eight meals. Not surprisingly, it freezes well and you can easily reheat it in your crock pot and enjoy another round of chili verde at a later date. I’m starting to see why people like these things.

But, I still resist the microwave. It is my last stand.

Chili Verde
1 1/2 lbs tomatillos, taken out of their husks
1 onion, cut into eighths
6 cloves of garlic
4 serrano chilis, stemmed and de-seeded (Keep in mind that the heat of serranos is quite variable, it’s good to taste them to see how spicy they are before you increase the amount of chili you use)
3 lbs pork shoulder, peeled and cut into 1.5″ cubes
4 yukon gold potatoes, cut into 1″ cubes
1 orange, juiced (or 1/4 cup orange juice)
4 cups of chicken stock
1 teaspoon cumin
1 teaspoon dried oregano
2 bay leaves
salt and pepper
olive oil/bacon fat/lard
fresh cilantro, sour cream, avocado, cabbage, lime, tortillas and hot sauce/salsa for serving

chili-verde-1chili-verde-2

Cut your pork into one and half to two inch cubes. Season it with salt. Heat a tablespoon of oil/bacon fat/lard in a non-stick skillet over medium high heat. In batches, brown the pork on all sides. Put your first batch aside and brown the next few pieces. Continue until you’ve browned all of your pork. It will probably take somewhere in the neighborhood of 20 to 30 minutes to brown this much pork, but it adds a ton of flavor into the final dish.

Meanwhile, line a baking sheet with parchment paper and spread the tomatillos, onion, garlic, and serrano chilis into a single layer. Turn your broiler to high and char the vegetables. You’re looking for a deep dark spots on all of the vegetables and for the tomatillos to look deflated. Pour your charred vegetables and all of their juice into your crock pot vessel, or into a dutch oven.

After you’ve browned all the pork, deglaze with some orange juice, chicken stock or water. Be sure to scrape up all the delicious browned bits and add those into your crock pot, along with all of the pork.

Add the potatoes, chicken stock, cumin, oregano, bay leaf, a little salt and pepper, and cover. (FYI – If this is too much to do before work, you can prep the recipe up until this point and refrigerate the entire dish, and then start the cooking in the morning). Set your crockpot to high and cook for 6 hours, or low and cook for 8 to 10 hours. If you’re cooking in a dutch oven in the oven, preheat your oven to 300° F and cook for about 4 hours. The pork should be super tender by the end of the cooking time, and the vegetables will have become a soupy sauce.

Taste for seasoning. Add more salt and pepper as needed. It may need salt, especially if your broth was unseasoned. I serve chili verde in a soup bowl with tortillas, cilantro, sour cream, avocado, salsa and cabbage on the side. This way folks can make their own mini tacos with whichever fixings they like best, and you get to drink up that delicious tomatillo broth at the end of the meal.

chili-verde-3

-Emily

Ps. Do you have a crock pot or crock pot-adaptable recipe that you love? Please send it my way! We’ll soon tire of the three dishes I’ve added into the meal rotation and I’ll need new ones to try. Gracias!

Categories
Recipes

kiwis, crabs and lots of driving

January is already off to a rather busy start. We’re trying to launch our newest product at work, which means I’m creating a new marketing website and a teacher resource website, two promo videos, app store screenshots and descriptions, reaching out to press, following up with pilot classrooms, and so much testing. This also means that I am sick of staring at a computer screen by the time I get home.

Instead of working on computery things like blogging (me) and analyzing data (Jordan) over the weekend, we took the weekend off. Really off. Two whole days. We spent most of Saturday on the Pacific Coast Highway, stopping off wherever it looked interesting and poking around. On Sunday, my dad came down to the city and we feasted on dungeness crab.

pch-weekend-1 pch-weekend-2 pch-weekend-3 pch-weekend-4

We harvested kiwi at Swanton Berry Farm in Santa Cruz. 10 days in the fridge. 10 days on the counter. I guess we’ll know in three weeks how good they are.

pch-weekend-5 pch-weekend-6

You can get dungeness crab fresh and feisty off of the boats in the harbor at Half Moon Bay. Go in the morning, look for a boat with a Live Crab banner, pick a few up and keep them in the fridge until you’re ready to eat later that day. Crab this fresh is heavenly, and a lot of fun to eat with a group. In case you’re not sure how to cook your crab, here’s a post on it from a few years ago, the first time we had a our own crab feed.

pch-weekend-7 pch-weekend-8 pch-weekend-9 pch-weekend-10

I hope your new year is off to a great start—and maybe a bit more full of weekends that feel like vacation than 1-week-from-launch-brain-exploding-workweeks.

-Emily

Categories
Recipes

new old fashioned

old-fashioned-1

I’m having trouble collecting my thoughts about the end of 2014 and the start of 2015. It seems healthy to start the year off with a little reflection, but instead of taking a few moments to think about what I’ve learned this past year, my brain is instead obsessing with how I’m going to tetris the generous gifts we received from our families into our tiny apartment. Not to mention, all ten seasons of Friends are now on Netflix, and I got a crock pot for Christmas that begs experimentation, I just had to make these cookies yesterday, go see this striking art exhibit today, and then go buy four pounds of sushi rice. I confuse myself by how I can simultaneously have enough focus to spend eight hours dip-dying two hundred tiny pieces of paper (wedding!), but cannot bring myself to sit down for an hour to write.

So instead of thoughts on life and learning and new years, I’ve got a cocktail for you. We make it often (I use it as an excuse to eat maraschino cherries), and we also made it on New Year’s Eve. It’s delicious. Serve it to your friends.

New Old Fashioned
2 oz of bourbon or rye
1 bar spoonful of muscovado rich syrup (from our favorite food podcast, Spilled Milk)
1 dash angostura bitters
a maraschino cherry and an orange peel for garnish (get Luxardo Cherries, they’re more expensive but so worth it)

Make the rich syrup. Combine 2 parts muscovado sugar with 1 part water in a small saucepan. Heat and stir until the sugar dissolves. You could also use brown sugar – they have similar flavors. Store rich syrup in a jar in the fridge.

In a cocktail shaker, combine the bourbon/rye with the rich syrup and a dash of bitters. Stir with ice for 20 to 30 seconds and strain into a cocktail class. Garnish with a cherry and an orange peel. Use your potato peeler to peel of a generous amount of orange zest.

Wishing you love, happiness and good vibes for 2015!

-Emily

Categories
Recipes

christmas cookie day

Every year, I host a Christmas cookie party. We bake and decorate, drink mimosas, eat take out tacos from spot next door. The tradition actually goes back further to when I was living in D.C. during college. My Maryland family, the Adinehs, would host a Christmas cookie party of impressive proportions. If there were not at least 12 types of cookies baked and two card tables piled high with delicious treats by the end of it, we had not done our job. I learned from the best, and try to recreate it every year in considerably less kitchen real estate.

christmas-cookie-2014-21

This year, our friend Kelly brought a new technique to the table. She made her own cookie cutters! Using this tutorial, she made a cookie cutter based on her Boston terrier puppy Nibbler and another based on the artist Keith Haring’s work.  Serious cookie dedication. We were all impressed. Go Kelly!

christmas-cookie-2014-19 christmas-cookie-2014-18

There were also Laura Bush’s famous cowboy cookies, whole wheat chocolate chip sablés, peanut butter and jelly sandwich cookies, pecan sandies, and double chocolate biscotti for my Food Blogger Cookie Swap friends. We baked from 11 am to 8 pm, which is precisely why Cookie Day is one of my favorite holiday traditions—pure dedication to the art of cookie making combined with very little restraint. I cannot wait for next year.

christmas-cookie-2014-15

Granny’s Sugar Cookies, from Nonnie
1/2 cup butter, softened
1 cup sugar
1/2 teaspoon vanilla
1 egg
1/2 teaspoon salt
2 teaspoons baking powder
2 cups flour

Beat the butter until it is light and fluffy. Add the vanilla and sugar and cream together for a few more minutes. Add the egg. In another bowl, sift together the salt, baking powder and flour. Add flour mixture into the butter mixture and stir until combined. Divide into two balls, flatten into discs and refrigerate for 4 hours or overnight. Roll out into 1/4″ thickness and cut with cookie cutters. Bake at 400° for 6 – 8 minutes. These babies cook fast so set a timer!

For the icing
4 cups powdered sugar, sifted (trust me, it will save you time in the end)
a few tablespoons of milk
food coloring

Sift the powdered sugar into a large bowl. Start with 3 tablespoons of milk and whisk together. It will be a big sugary clump. Add a tablespoon of milk at a time, until you get a smooth icing. Careful though, you don’t want it to be so runny it runs of the cookie. Divide into as many small bowls or cups as colors you’d like to make and add the food coloring. I’d recommend getting a pack of cheap paint brushes so you can get real precise with your icing.

christmas-cookie-2014-7 christmas-cookie-2014-6christmas-cookie-2014-12

Double Chocolate Biscotti, adapted from my Nonnie’s recipe
2 eggs
2 egg whites
1 cup neutral oil, like canola
1 1/2 cup sugar
1 tablespoon vanilla
1 teaspoon salt
1 cup flaked coconut
1 1/2 cup slivered almonds, toasted
6 oz semi-sweet chocolate chips (I like Guittard)
3 1/2 cups flour
1 teaspoon baking powder

In the bowl of a stand mixer, beat together the eggs, egg whites and oil. Add in the sugar, vanilla, salt, and flaked coconut, and mix to combine.

In a medium bowl, mix together the flour and baking power.  In a sauté pan, brown the nuts over medium heat. Pour the nuts into a food processor and pulse a few times, add the chocolate chips and pulse a few more times. This will chop both up a bit, and also start to melt the chocolate. Add the nut and chocolate mixture to the stand mixer, and mix to combine. Slowly add the flour mixture on low speed, and mix until all of the flour is incorporated.

Divide the dough into four parts. Scoop the dough onto four pieces of plastic wrap. Wrap in plastic and shape into a flat log shape. This takes a little maneuvering, but you can make it happen. Let the dough chill overnight.

Preheat your oven to 325° F. Line two baking sheets with parchment paper and place two biscotti logs on each baking sheet whole. Bake for 40 minutes. Remove from the oven and using a sharp knife, cut the logs into strips. Spread the strips apart and turn them onto their sides. Return to the oven and cook for about 20 more minutes. You want the cookies to be dry and crunchy. Remove from the oven and let cool completely.

Once cooled, melt about 12 oz of chocolate in a double boiler. Dip the bottom of each biscotti into the chocolate and then let them rest on their sides for the chocolate to harden, depending on the temperature and humidity, this can take an hour or so. You can also put them in the fridge to quicken the hardening process. Store in an airtight container.

christmas-cookie-2014-10christmas-cookie-2014-13

Cowboy Cookies, by Laura Bush
These are Hilary’s go to cookie. They are huge, chewy and delicious. She says she likes to keep a roll of dough in her freezer and slice of a cookie or two when she needs a pick me up. I’m digging that idea.

Pecan Sandies, by Thomas Keller
Like all things Thomas Keller, these are lovely and refined. Kelly says that the batch is on the small side, and you should double it if you’re not making other types of cookies.

Whole Wheat Sablés with Chocolate Chips, adapted from Orangette
I follow this recipe, but swapped 2/3 cup of semi-sweet chocolate chips for the cocoa nibs. I’d love to try them with nibs, I’m sure they’d be lovely. I also may have let mine cook a few minutes long, but that added a pleasant browned butter flavor, so no harm done.

Peanut Butter Cookies, from Sally’s Baking Addiction
Robin made a double batch and then sandwiched some jelly between two cookies. I’m working with a creative bunch here.

Almond Spice Cookies, from Epicurious
These were a bit of a challenge. We used them as roll out cookies for decorating, but they required quite of bit of persistence and wrangling on the behalf of Kelly to be shaped into submission. They’re tasty, but I think we’ll try something else next year.

-Emily

christmas-cookie-2014-1

Categories
Recipes

almond cake and tea

I got back from my trip to Taiwan a week before Thanksgiving, and time has just been barreling forward since.  Work, work, work, Thanksgiving, weekend of wedding scheming with my mom, radio appearance, work, work, work, work, work, Christmas Cookie Day, try recipes from a friend’s new cookbook, back to work. I’ve got a feeling we’ll be moving at this clip through the end of the year.

almond-cake-1 almond-cake-2

But, somewhere in there, I did have time to make this cake. This slow down and savor the moment with a cup of tea cake. Neither Jordan or I are big fans of almond flavored desserts typically, but this cake is really perfection. The crumb is tight, but not too dense, and not at all dry. The almond flavor is just right. Not enough to taste fake, just enough to say, ‘yes sir, I am an almond cake. Pleased to be your breakfast’.

I love a cake that transitions effortlessly from dessert to breakfast. Some days mustering up the strength to get out of the door is tough. Cake helps with that. This cake is my breakfast cake ideal, and I’ve been thinking about it every breakfast since I made it a few weeks ago. It feels almost premature to say this one is being promoted to one of my go-to recipes, but I’m going to put it out there. It really is that good.

***

Autosave-File vom d-lab2/3 der AgfaPhoto GmbH Autosave-File vom d-lab2/3 der AgfaPhoto GmbHAutosave-File vom d-lab2/3 der AgfaPhoto GmbH Autosave-File vom d-lab2/3 der AgfaPhoto GmbHAutosave-File vom d-lab2/3 der AgfaPhoto GmbH

In Taiwan we drank a lot of tea. It was on of my favorite parts of the trip. We’d slow down from the marathon eating and sightseeing (which also was an absolute treat), to sit down in a quiet place and share some tea. There’s a whole ritual associated with having tea in Taiwan, which the server would walk us through every time before passing the responsibility of tea-brewer onto someone in our group. Quite possibly this whole routine was just putting on a show for tourists, but I loved it nonetheless. Sitting in a quiet tea shop in a jet-lagged haze, misty air blowing in through the open windows, the business of the city moving along outside, drinking delicately brewed tea, letting the experiences of the trip wash over me. It was good.

Autosave-File vom d-lab2/3 der AgfaPhoto GmbH Autosave-File vom d-lab2/3 der AgfaPhoto GmbHAutosave-File vom d-lab2/3 der AgfaPhoto GmbHAutosave-File vom d-lab2/3 der AgfaPhoto GmbH

I tried to recreate the experience at home with Jordan, but it really wasn’t the same. I’m not quite as experienced a tea preparer as those tea house employees. Though Jordan did say that the tea tasted better out of the little tea set I brought back from Taiwan than out of our regular mugs. So that’s something. Plus, there was almond cake. Where there is tea, there should also be almond cake.

Almond Cake, from Orangette and adapted from Amanda Hesser’s Cooking for Mr. Latte
2 sticks (8 oz.) unsalted butter, at room temperature
1 cup sour cream, at room temperature
1 tsp. baking soda
2 cups all-purpose flour
1/2 tsp. salt
1 1/2 cups sugar
1 (7-ounce) tube almond paste, cut into small pieces
4 egg yolks, at room temperature
1/2 tsp. pure almond extract

Preheat your oven to 350° F. Butter and then line a 9″ springform pan with parchment paper, and then butter the paper. In a small bowl, mix together sour cream and baking soda. In another bowl, whisk together the flour and salt.

In the bowl of an electric mixer fitted with the paddle attachment, beat the butter and sugar until fluffy. Add the almond paste a few pieces at a time, and beat on medium speed for 8 minutes. Yes this is a long time, but want the almond paste to be nicely incorporated—no chunks.

Beat in the egg yolks one at a time, and mix until incorporated. Beat in the almond extract and the sour cream mixture. Reduce mixer speed to low, and gradually add the flour mixture, mixing just until combined. Using a rubber spatula, fold the batter a couple of times to make sure that all of your flour has been mixed in.

Scrape the batter into the prepared pan, and spread it evenly. Bake for about 1 hour – the cake will be a medium brown color and pull away from the sides of the pan. Transfer to a cooling rack, and cool the cake in its pan. Slice and serve with a dollop of whipped cream for dessert, or a cup of coffee or tea for breakfast.

-Emily